Volkswagen Taos: Wheels and tires
- Introduction
- Taking care of wheels and tires
- Maintaining wheels and tires
- Wheels and tires in snow and ice
- Troubleshooting
- Tire Pressure Monitoring System
- Wheel change
- Tire characteristics
- Glossary of tire and load terminology
Introduction
Wheels are the parts of the vehicle that are under the most demand, yet are also the most underestimated. Wheels are very important because the narrow contact surfaces of the tires are the only contact that the vehicle has with the road.
The tire and rim combinations approved by Volkswagen are specifically designed for each other.
The service life of the tire depends on the tire pressure, the driving style, the way the tires are handled, and correct mounting of the tire.
Rims, tires and wheel bolts
Rims, tires, and wheel bolts are determined based on the vehicle model. Whenever another rim is installed, the wheel bolts to be used must have the correct length and bolt head shape. This ensures that the brakes can work correctly and that the vehicle drives smoothly and safely. For technical reasons, standard rims from other vehicles cannot be used. Under certain circumstances, this may even apply to rims for the same vehicle model. You must consult a suitably qualified professional to replace rim/tire combinations. Volkswagen recommends contacting an authorized Volkswagen dealer or authorized Volkswagen Service Facility.
The correct wheel bolts must always be used for each vehicle model, and these bolts must always be tightened to the correct torque ⇒ Monitoring the tightening torque.
WARNING
Incorrect handling of wheels can reduce driving safety and cause serious accidents and fatal injuries.
- Regularly check the tire pressure when the tires are cold and always maintain the specified pressure ⇒ Checking the tire pressure. If the tire pressure is too low, the tire can heat up so much while driving that the tread separates or the tire ruptures.
- Check the tires regularly for damage and wear.
- Never exceed the maximum permissible speed and tire load specified for the tires fitted to your vehicle.
- For all four wheels, use only radial tires of the same design, size (rolling circumference), and tread pattern.
- While driving, if unusual vibrations can be heard or the vehicle pulls to one side, stop immediately and check the wheels and tires for damage.
- Never loosen the bolts on rims with a bolted rim ring.
WARNING
New tires or tires that are old, worn, or damaged cannot provide the maximum vehicle control and braking effect.
This can cause accidents and fatal injuries.
- Break in new tires because they have reduced traction and braking efficiency when they are new. Therefore drive carefully for the first 600 km (370 miles).
- Never drive with tires that are worn or damaged, e.g. punctured, cut, cracked, or bulging.
- While driving, if unusual vibrations can be heard or the vehicle pulls to one side, stop immediately and check the wheels and tires for damage.
- Do not use any tires or rims if you do not know how they have been used in the past. Used tires and rims may be damaged in a way that may not even be visible.
- Only use tires that are more than six years old if absolutely necessary and drive with extreme caution if doing so, even if the tires have never been used.
- Replace worn or damaged tires immediately.
WARNING
If the wheel bolts are not tightened enough to meet the specification, the wheel bolts and consequently the wheel could come loose while driving. Exceeding the tightening specification could damage the wheel bolts and threads.
Wheel bolts that are tightened incorrectly or missing could cause you to lose control of the vehicle and lead to serious accidents and fatal injuries.
- Always tighten the wheel bolts to the correct tightening torque. If you do not have a torque wrench, tighten the wheel bolts with the lug wrench and then have the tightening torque checked as soon as possible by an authorized Volkswagen dealer or authorized Volkswagen Service Facility. Volkswagen recommends contacting an authorized Volkswagen dealer or authorized Volkswagen Service Facility.
- Never drive with missing or loose wheel bolts.
- Always use wheel bolts that are correct for the rim and the vehicle model.
- Never grease or oil the wheel bolts and the threads in the wheel hub. Even when tightened to the specification, the wheel bolts could become loose while driving.
- Ensure the wheel bolts and threads in the wheel hubs are clean, easy to move and free of oil and grease.
- Never loosen the bolts on rims with a bolted rim ring.
WARNING
Improper installation of the tires on the rim can result in damage to the rim and cause tires to suddenly lose air or go flat while driving.
This can cause accidents and fatal injuries.
- Always have tires installed on the rim by an authorized Volkswagen dealer or authorized Volkswagen Service Facility. Volkswagen recommends contacting an authorized Volkswagen dealer or authorized Volkswagen Service Facility.
Taking care of wheels and tires
Handling tires
Preventing damage to the tires
- Always drive over curbs and other low obstacles slowly and at a right-angle so that both front wheels come into contact with the obstacle at the same time.
- Check the tire pressure regularly.
- Check tires regularly for damage, e.g. punctures.
- Never exceed the load index and maximum speed of the tire ⇒ Tire labeling and tire classifications.
- Have damaged or worn rims replaced immediately ⇒ Troubleshooting.
- Protect tires from coming into contact with corrosive materials such as
grease, oil, gasoline, and brake fluid ⇒
 .
. - Replace missing dust caps on the valves immediately.
- Remove any objects provided they have not punctured the inside of the tire ⇒ Troubleshooting.
- Pay attention to all warnings issued by the Tire Pressure Monitoring System ⇒ Troubleshooting the Tire Pressure Monitoring System.
WARNING
Corrosive fluids and materials can cause visible and invisible damage to the tires, which can cause the tires to fail.
This can cause accidents and fatal injuries.
- Always keep chemicals, oils, grease, fuel, brake fluid, and other corrosive materials away from the tires.
Storing tires
- Only store tires in a cool, dry location that is as dark as possible.
- Do not stand tires that are mounted on rims up vertically.
- Protect tires that are not mounted on rims from dirt with suitable covers and store them standing on the tread surface.
Tires that are more than six years old
Tires age due to physical and chemical processes that affect their function. Tires that have been stored and unused for long periods of time age more quickly than tires that are used continuously.
Volkswagen recommends replacing tires that are more than six years old with new
tires. This even applies to tires that may
appear to be usable and whose tread depth is still greater than the minimum
requirement ⇒
 .
.
Winter and all season tires lose their characteristics to a large extent due to aging, regardless of the remaining tread depth.
The age of the tire can be determined based on the production date ⇒ Tire labeling and tire classifications.
WARNING
Old tires can suddenly lose air or rupture, particularly at high speeds.
This can cause accidents and fatal injuries.
- Only use tires that are more than six years old if absolutely necessary and drive with extreme caution if doing so, even if the tires have never been used.
New tires
- Drive particularly carefully during the first 600 km (370 mi) with new
tires because they must be broken in. Tires that have
not yet been broken in have reduced gripping abilities and braking
efficiency ⇒
 .
. - Only use tires with the same design and as close to the same construction, size (rolling circumference) and tread pattern as possible on all four wheels.
- The tread depth of new tires may vary between tire models and manufacturers due to different design features and tread designs.
WARNING
New tires must be broken in because they have reduced traction and braking efficiency when they are new.
This could cause you to lose control of the vehicle and lead to serious accidents and fatal injuries.
- Break in new tires. Drive carefully for the first 600 km (370 miles).
 The size specifications for
new tires may vary significantly from the actual tire dimensions for different
tire brands.
The size specifications for
new tires may vary significantly from the actual tire dimensions for different
tire brands.
Replacing tires
- At a minimum, replace both tires on a single axle.
- Only replace old tires with tires that have been approved by Volkswagen for your vehicle model.
- Never use tires whose size exceeds the measurement of tires that are
approved by Volkswagen ⇒
 .
.
Volkswagen Genuine tires
At the factory, the vehicle can be equipped with Volkswagen Genuine tires.
These tires are marked with the
 symbol and
are specially adapted for this vehicle. Volkswagen Genuine tires fulfill the
highest standards of safety and driving
characteristics when used appropriately.
symbol and
are specially adapted for this vehicle. Volkswagen Genuine tires fulfill the
highest standards of safety and driving
characteristics when used appropriately.
Recalibrating the Tire Pressure Monitoring System
The Tire Pressure Monitoring System must be recalibrated each time one or more wheels is replaced. This also applies if the tires are rotated, for example from front to back ⇒ How the Tire Pressure Monitoring System Works.
WARNING
Wheels must have enough clearance from vehicle components. If there is not enough clearance, tires could rub against components of the suspension, the body, and the brake lines.
This may cause the brake system to fail, the tread to separate, and the tire to rupture, resulting in serious accidents and fatal injuries.
- Only use tires with dimensions that do not exceed the dimensions of the tire brands approved by Volkswagen and that do not rub against other components of the vehicle.
WARNING
Dirt can damage the valves and introduce leaks, causing the tire to lose air.
If the tire pressure is too low, the tire can heat up so much while driving that the tread separates or the tire ruptures, which in turn can lead to serious accidents and/or fatal injuries.
- Never drive without caps on the valves.
NOTICE
Driving over potholes and curbs can cause the tires to become deformed.
Damage to the tires and rims can result.
- Avoid strong impacts and drive around obstacles where possible.
NOTICE
The valves may be damaged by dirt.
- Never drive without caps on the valves.
NOTICE
The valves can be damaged when replacing wheels.
- Do not let wheels that you have removed fall on the rim.
 Always dispose of old tires
correctly and according to regulations.
Always dispose of old tires
correctly and according to regulations.
 If the spare wheel is different
from the regular vehicle wheels, e.g. in the case of winter tires or a temporary
spare wheel,
only use the spare wheel temporarily and in the event of a breakdown, and drive
especially carefully. Replace the compact
spare wheel with a regular wheel as soon as possible.
If the spare wheel is different
from the regular vehicle wheels, e.g. in the case of winter tires or a temporary
spare wheel,
only use the spare wheel temporarily and in the event of a breakdown, and drive
especially carefully. Replace the compact
spare wheel with a regular wheel as soon as possible.
 Using tires approved by
Volkswagen ensures that the dimensions will fit correctly on your vehicle. If
other tires are used,
the seller must provide a certificate from the tire manufacturer stating that
the tires are suitable for the vehicle. Keep the
certificate stored safely in the vehicle.
Using tires approved by
Volkswagen ensures that the dimensions will fit correctly on your vehicle. If
other tires are used,
the seller must provide a certificate from the tire manufacturer stating that
the tires are suitable for the vehicle. Keep the
certificate stored safely in the vehicle.
Handling rims
Preventing damage to the rims
- Missing hubcaps can cause damage to the rims and wheel bolts.
- Always install missing hubcaps before driving.
- Always drive over curbs and other low obstacles slowly and at a right-angle so that both front wheels come into contact with the obstacle at the same time.
- Replace missing dust caps on the valves immediately.
- Check the tire pressure regularly.
Rims with bolted rim ring or accent elements
Rims with a bolted rim ring or accent element consist of multiple pieces. These pieces are connected together with special bolts. Damaged rims must be replaced and may only be repaired by an authorized Volkswagen dealer or authorized Volkswagen Service Facility. Volkswagen recommends contacting an authorized Volkswagen dealer or authorized Volkswagen Service Facility.
Rim identification
In some countries, new rims must include information about certain properties. The following information may be on the rim:
- Seal of conformity
- Rim size
- Manufacturer or brand name
- Production date (month/year)
- Country of origin
- Serial number
- Raw material batch number
- Commodity code
WARNING
Using unsuitable or damaged rims can impair driving safety and cause accidents and serious injuries.
- Only use rims permitted for the vehicle.
- Check the rims regularly for damage and replace them if necessary.
WARNING
Loosening and tightening bolts incorrectly on rims with bolted rim rings can cause severe accidents and death.
- Never loosen the bolts on rims with a bolted rim ring.
- Have all procedures on rims with bolted rim rings performed by an authorized Volkswagen dealer or authorized Volkswagen Service Facility. Volkswagen recommends contacting an authorized Volkswagen dealer or authorized Volkswagen Service Facility.
Maintaining wheels and tires
Checking the tire pressure
Incorrect tire pressures negatively affect vehicle handling and can cause
increased tire wear or even a flat tire ⇒
 .
Above
all, the correct tire pressure is especially important when driving at high
speeds.
.
Above
all, the correct tire pressure is especially important when driving at high
speeds.
- Check the tire pressure at least once a month.
- Check the tire pressure only when tires are cold. The specified tire pressure only applies to a cold tire. The tire pressure on warm tires is higher than on cold tires. Therefore, never release air from a warm tire to adjust the tire pressure.
- Always adjust the tire pressures to the vehicle load ⇒
 .
. - After adjusting tire pressures, always screw the caps on the valves and note the information about the Tire Pressure Monitoring System (TPMS).
- Always use the tire pressures specified on the label. Never exceed the maximum tire pressure specified on the side of the tire.
- If the size of the tires installed at the factory differs from the details on the identification label or on the tire pressure label, the correct tire pressure must be determined.
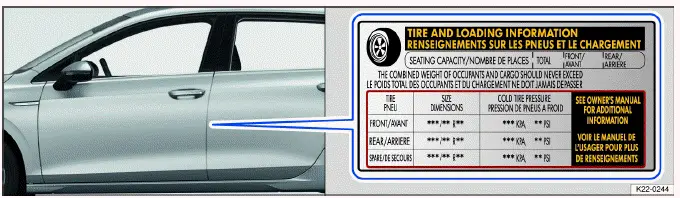
Fig. 175 On the driver door pillar: Tire inflation pressure label
The tire inflation pressure label indicates the correct tire inflation pressure for approved tires and is located on the driver door pillar fig. 175. The factory-installed tires can be winter, summer or all-season tires.
An incorrect tire pressure can cause increased tire wear, negatively affect driving behavior and damage tires. Compliance with the correct tire pressure is very important, particularly when driving at high speeds.
The specified tire pressure is given for a cold tire. For warm tires, the pressure is higher.
Never reduce the pressure of a warm tire in order to reach the specified value. This will cause the actual pressure when the tire is cold to be too low.
WARNING
A tire pressure that is too low can result in a sudden loss of air, separation of the tire tread or bursting of the tire while driving. An incorrect tire pressure shortens the service life of the tire and negatively affects driving behavior.
An incorrect tire pressure can cause accidents and fatal injuries.
- Check the tire pressures regularly, at least once a month and also before driving long distances.
- Always adjust the tire pressure according to your load.
- Never reduce the tire pressure when tires are warm.
WARNING
Excessive speeds and vehicle overloading can cause overheating, sudden tire damage (including tire blow-outs) and separation of the tread.
This can cause accidents and fatal injuries.
- Never exceed the maximum load for the tires fitted ⇒ Tire labeling and tire classifications.
- Never exceed the maximum permitted speed for the tires fitted ⇒ Tire labeling and tire classifications.
NOTICE
Careless handling of the tire pressure gage may damage the valve.
- When positioning the tire pressure gauge, make sure it is not tilted at the valve stem.
 Tire pressures that are too low
increase fuel consumption.
Tire pressures that are too low
increase fuel consumption.
Tire inflation pressure for cold tires
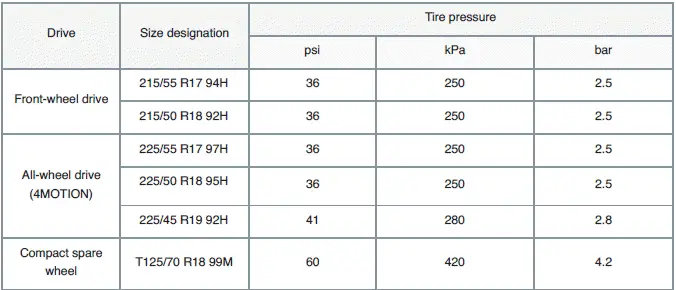
Vehicles Approved as Light Commercial Vehicles

Details of the correct tire pressure are located on the tire pressure label on the driver's door pillar. If the details on the tire pressure label differ from the details in the Manual, the details on the tire pressure label apply.
2) This data was not yet available at the time of printing.
Monitoring the tightening torque
The correct wheel bolts must always be used for each vehicle model, and these bolts must always be tightened to the correct torque. The wheel bolt tightening torque must be checked regularly with a functional torque wrench. In addition, the tightening torque must be checked immediately after each wheel change with a functional torque wrench. If the wheel bolts are not tightened enough to meet the specification, the wheel bolts and consequently the wheel could come loose while driving.
Exceeding the tightening specification could damage the wheel bolts and threads.
Wheel bolts that are corroded and difficult to turn must be replaced and the threads in the wheel hub must be cleaned before checking the tightening torque. Never grease or oil the wheel bolts and the threads in the wheel hub.
Wheel bolt tightening specification
The tightening torque of the wheel bolts is specified in the chapter on replacing wheels → page, Changing a wheel.
WARNING
If the wheel bolts are not tightened enough to meet the specification, the wheel bolts and consequently the wheel could come loose while driving. Exceeding the tightening specification could damage the wheel bolts and threads.
Wheel bolts that are tightened incorrectly or missing could cause you to lose control of the vehicle and lead to serious accidents and fatal injuries.
- Always tighten the wheel bolts to the correct tightening torque. If you do not have a torque wrench, tighten the wheel bolts with the lug wrench and then have the tightening torque checked as soon as possible by an authorized Volkswagen dealer or authorized Volkswagen Service Facility. Volkswagen recommends contacting an authorized Volkswagen dealer or authorized Volkswagen Service Facility.
- Never drive with missing or loose wheel bolts.
- Always use wheel bolts that are correct for the rim and the vehicle model.
- Never grease or oil the wheel bolts and the threads in the wheel hub. Even when tightened to the specification, the wheel bolts could become loose while driving.
- Ensure the wheel bolts and threads in the wheel hubs are clean, easy to move and free of oil and grease.
- Never loosen the bolts on rims with a bolted rim ring.
Replacing tires
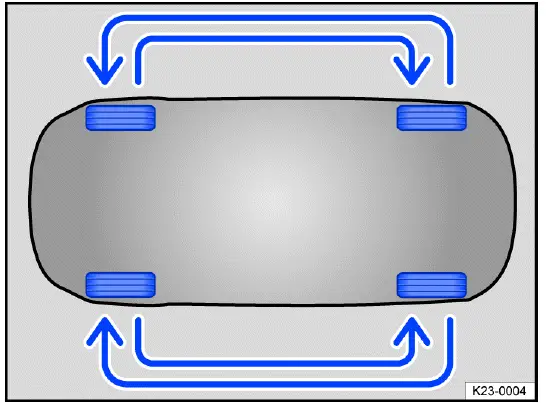
Fig. 176 Diagram for rotating the wheels (general example).
To ensure that the tires wear evenly, rotating the tires regularly according to the diagram is recommended fig. 176. This will allow the tires to have approximately the same length of service life.
Volkswagen recommends having the wheel replacement carried out by an authorized Volkswagen dealer or authorized Volkswagen Service Facility. Volkswagen recommends contacting an authorized Volkswagen dealer or authorized Volkswagen Service Facility.
Monitoring the tread depth
Tread depth
Most driving situations require a tire tread that is as deep as possible. All
tires, or at least tires on the same axle, must have an
even tread depth ⇒
 . This applies in
particular to wet or wintry road conditions.
. This applies in
particular to wet or wintry road conditions.
In most countries, the legal minimum tread depth is 1.6 mm (1/16 of an inch). This is measured in the tread grooves next to the wear indicators. Observe any legal regulations specific to the country where you are driving.
Note the legal requirements in the applicable country for minimum tread depths on winter and all-season tires.
Tire wear
Tire wear depends on various factors:
- Driving style.
- Wheel balancing.
- Running gear alignment.
An imbalance can occur while driving, which can be noticed by uneven steering. Tire imbalances also affect tire wear. In these situations, have the wheels balanced again.
Incorrect wheel alignment impairs driving safety and increases tire wear. If there is high degree of tire wear, have the wheel alignment checked by an authorized Volkswagen dealer or authorized Volkswagen Service Facility. Volkswagen recommends contacting an authorized Volkswagen dealer or authorized Volkswagen Service Facility.
Tire Wear when Driving with a Sporty Driving Style
Driving quickly around curves, rapid acceleration, and heavy braking increase tire wear.
If you drive with a sporty driving style, check the tread depth every 5000 to 10,000 km (approx. 3107 to 6214 miles).
Tread wear indicator in tires
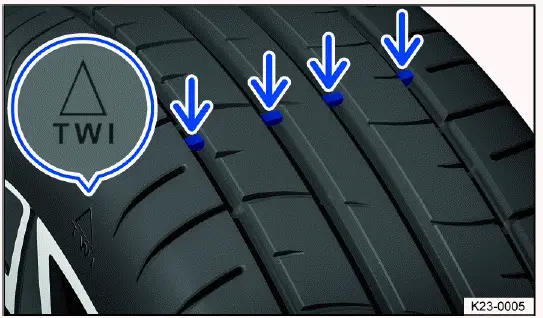
Fig. 177 In the tread grooves: wear indicator.
The tread wear indicator is 1.6 mm (1/16 in) above the base of the tread fig. 177. Markings on the sides of the tire indicate the location of the tread wear indicator fig. 177.
The tread wear indicator indicates if a tire is worn out. At the latest, the tire must be replaced if the tread depth is worn down to the tread wear indicator.
When you check the tread depth, you must check the wear indicators of all tread grooves.
WARNING
Worn tires are a safety risk and make it difficult to control the vehicle well. They increase the braking distance and the risk of skidding.
Worn tires have significantly less grip. Particularly on wet roads, the vehicle is more likely to "hydroplane".
Worn tires could cause loss of vehicle control, serious accidents and death.
- Replace tires with new tires when the tires are worn down to the tread wear indicator.
Wheels and tires in snow and ice
Winter tires
Summer tires offer very little holding force on icy or snowy roads. Winter or all-season tires improve vehicle handling and braking performance in winter road conditions. Volkswagen recommends using winter tires on the vehicle at temperatures below +7 ºC (+45 ºF) or in winter road conditions. This also applies to vehicles with all-wheel drive (4MOTION).
The effectiveness of winter tires or all-season tires is greatly reduced when the tire tread is worn down to a depth of 4 mm (approx. 5/32 in).
The following applies when using winter tires:
- Follow all applicable laws in the country of operation.
- Use winter tires on all four wheels at the same time.
- Only use in winter road conditions.
- Only use the tire sizes permitted for the vehicle.
- Only use winter tires that have the same belt construction, size, and tread pattern.
- Follow the speed restriction based on the speed rating.
Speed restriction
Winter tires have a speed restriction based on their speed rating ⇒ Tire labeling and tire classifications.
A speed warning can be set in the Vehicle settings menu in the Infotainment System under the Tires menu.
On V winter tires, the speed restriction and required tire pressure depend on the engine. Always ask an authorized Volkswagen dealer or authorized Volkswagen Service Facility about the permitted speed and required tire pressure.
Volkswagen recommends contacting an authorized Volkswagen dealer or authorized Volkswagen Service Facility.
WARNING
In winter road conditions, do not let the improved driving characteristics of winter tires tempt you to take safety risks, as otherwise you may lose control of the vehicle, resulting in serious injuries.
- Adapt your speed and driving style to the visibility, weather, road and traffic conditions.
 When temperatures are above +7
ºC (+45 ºF), summer tires provide better vehicle handling. There is less road
noise, the
tires wear more slowly, and economy is better.
When temperatures are above +7
ºC (+45 ºF), summer tires provide better vehicle handling. There is less road
noise, the
tires wear more slowly, and economy is better.
 For vehicles with a Tire
Pressure Monitoring System, the system must be recalibrated after changing to
winter tires ⇒ How
the Tire Pressure Monitoring System Works.
For vehicles with a Tire
Pressure Monitoring System, the system must be recalibrated after changing to
winter tires ⇒ How
the Tire Pressure Monitoring System Works.
 The speed limit and tire
load of winter tires may differ from those of summer tires.
The speed limit and tire
load of winter tires may differ from those of summer tires.
 You can contact an
authorized Volkswagen dealer or authorized Volkswagen Service Facility for
permitted winter tire
sizes. Volkswagen recommends contacting an authorized Volkswagen dealer or
authorized Volkswagen Service Facility.
You can contact an
authorized Volkswagen dealer or authorized Volkswagen Service Facility for
permitted winter tire
sizes. Volkswagen recommends contacting an authorized Volkswagen dealer or
authorized Volkswagen Service Facility.
Snow chains
Note the legal requirements and the permitted maximum speed when driving with snow chains.
Snow chains improve driving and braking handling when on roads covered with ice or snow.
Snow chains may only be mounted on the front wheels and only on the following tire/rim combinations:
If possible, use fine-mesh snow chains that include a chain lock no larger than 11 mm (approx. 7/16 in).
Volkswagen recommends contacting an authorized Volkswagen dealer or authorized Volkswagen Service Facility for more information about wheel, tire, and snow chain sizes. Volkswagen recommends contacting an authorized Volkswagen dealer or authorized Volkswagen Service Facility.
Snow chains may only be used on tire/rim combinations that are approved for snow chain operation.
If using snow chains, remove the wheel covers and rim accent rings before mounting the snow chains. However, the wheel bolts must be covered with caps for safety reasons. Caps can be obtained from an authorized Volkswagen dealer or authorized Volkswagen Service Facility. Volkswagen recommends contacting an authorized Volkswagen dealer or authorized Volkswagen Service Facility.
Using snow chains on the compact spare tire or collapsible spare tire
Using snow chains on the compact spare tire or collapsible spare tire is not permitted for technical reasons.
1. If a front tire is flat, mount the compact spare tire or collapsible spare tire on the rear axle.
2. Replace the damaged front wheel with the removed rear wheel. Pay attention to the running direction when doing this.
Volkswagen recommends attaching the snow chains before mounting the wheel.
WARNING
Using unsuitable snow chains or installing snow chains incorrectly can cause serious accidents and death.
- Always use the correct snow chains.
- Only use snow chains on the tire/rim combinations approved by Volkswagen.
- Follow the installation instructions provided by the snow chain manufacturer.
- Never drive faster than intended according to the specifications of the snow chain manufacturer or permitted by law when snow chains are mounted.
NOTICE
If snow chains are used on routes that are not snowy, they will impair the driving characteristics, damage the tires, and be quickly destroyed.
- Remove snow chains when driving on roads without snow.
NOTICE
Snow chains that come into contact with the rim directly can scratch or damage the rim.
- To prevent damage, use snow chains with integrated rim protection.
 On vehicles with a Tire
Pressure Monitoring System, the system must be reprogrammed after snow chains
are mounted
⇒ How the Tire Pressure Monitoring System Works.
On vehicles with a Tire
Pressure Monitoring System, the system must be reprogrammed after snow chains
are mounted
⇒ How the Tire Pressure Monitoring System Works.
Troubleshooting
Damage to tires and rims can often occur where it is not visible ⇒
 .
.
If you suspect that a wheel is damaged, slow down and stop as soon as traffic allows and it is safe to do so.
Vehicle pulls to one side or unusual vibrations
The vehicle pulls to the left or right when driving, or there are unusual vibrations. This could indicate tire damage or too low a tire inflation pressure.
 Check the tires!
Slow down immediately and stop the vehicle as soon as the traffic situation
allows and it is safe to do so.
Check the tires!
Slow down immediately and stop the vehicle as soon as the traffic situation
allows and it is safe to do so.
1. Check the tires and rims for damage.
2. Do not continue driving if there is tire damage.
3. Replace the damaged wheel ⇒ Introduction. If necessary, contact an authorized Volkswagen dealer or authorized Volkswagen Service Facility for assistance.
4. If no exterior damage is visible, drive slowly and carefully to the nearest authorized Volkswagen dealer or authorized Volkswagen Service Facility to have the vehicle checked. Volkswagen recommends contacting an authorized Volkswagen dealer or authorized Volkswagen Service Facility.
Foreign object stuck in the tire
A foreign object is stuck in the tire or between the tread segments.
1. If an object has punctured through to the inside of a tire, leave the object in place. Objects stuck between the tire tread segments can be removed.
2. Replace the damaged wheel ⇒ Introduction. If necessary, contact an authorized Volkswagen dealer or authorized Volkswagen Service Facility for assistance.
3. Check and adjust the tire pressure.
4. Contact an authorized Volkswagen dealer or authorized Volkswagen Service Facility. Volkswagen recommends contacting an authorized Volkswagen dealer or authorized Volkswagen Service Facility.
Tires lose traction
The vehicle loses traction when driving along curved stretches, and swerves. The braking distance is longer and the anti-slip regulation (ASR) and the anti-lock brake system (ABS) take control earlier.
The tire may be too worn down to guarantee sufficient traction ⇒ Monitoring the tread depth.
1. Go slowly and carefully to the nearest suitably qualified professional to have the vehicle checked. Volkswagen recommends contacting an authorized Volkswagen dealer or authorized Volkswagen Service Facility.
Wheel bolts can only be undone with difficulty
Wheel bolts can corrode over time. This means that the wheel bolts can only be undone with difficulty.
1. Contact professional assistance, or drive slowly and carefully to the nearest qualified professional to have the vehicle checked. Volkswagen recommends contacting an authorized Volkswagen dealer or authorized Volkswagen Service Facility.
WARNING
Unusual vibrations or the vehicle pulling to one side while driving may indicate tire damage.
Tire damage could cause loss of vehicle control, accidents and serious or fatal injuries.
- Slow down immediately and stop the vehicle as soon as the traffic situation allows and it is safe to do so.
- Check the tires and rims for damage.
- Never continue driving with damaged tires or rims. Instead, seek professional assistance.
- If no exterior damage is visible, drive slowly and carefully to the nearest authorized Volkswagen dealer or authorized Volkswagen Service Facility to have the vehicle checked. Volkswagen recommends contacting an authorized Volkswagen dealer or authorized Volkswagen Service Facility.
Tire Pressure Monitoring System
How the Tire Pressure Monitoring System Works
The Tire Pressure Monitoring System warns the driver if tire pressures are too low.
The Tire Pressure Monitoring System uses the ABS sensors to monitor the RPM and therefore the rolling circumference of the individual wheels during travel.
If a tire loses air or the tire pressure is too low, the rolling circumference is reduced and the RPM increases.
The Tire Pressure Monitoring System shows a change in the rolling circumference
of the tires via the
 indicator
light in the
instrument cluster.
indicator
light in the
instrument cluster.
The following situations can also cause the RPM to change:
- The tire pressure has changed
- The tire has structural damage
- One side of the vehicle has a heavier load than the other
- Snow chains are installed on the tires
- Only one wheel was replaced on each axle
 The Tire Pressure Monitoring
System will not work if the ESC or ABS is malfunctioning ⇒ Troubleshooting.
The Tire Pressure Monitoring
System will not work if the ESC or ABS is malfunctioning ⇒ Troubleshooting.
Reference Pressure
The reference pressure for the Tire Pressure Monitoring System is the recommended tire pressure for the tires installed at the factory when the tires are cold at maximum load. The reference pressure corresponds to the details on the tire pressure label ⇒ Checking the tire pressure.
If the tire pressure has been correctly adjusted on all four tires, the Tire Pressure Monitoring System must be re-calibrated ⇒ Calibrating the Tire Pressure Monitoring System. This adapts the reference pressure to the current tire pressure.
The Tire Pressure Monitoring System
 may not react at first or may not react at all when you are driving in a sporty
manner,
or on snow-covered or unpaved roads, when you are driving with snow chains, or
in certain other situations. A change in the
tread circumference of a tire is signaled by the Tire Pressure Monitoring System
indicator in the instrument cluster (telltale).
may not react at first or may not react at all when you are driving in a sporty
manner,
or on snow-covered or unpaved roads, when you are driving with snow chains, or
in certain other situations. A change in the
tread circumference of a tire is signaled by the Tire Pressure Monitoring System
indicator in the instrument cluster (telltale).
The tire pressure recommended for the tires originally installed on the vehicle is on a sticker on the driver door jamb.
Each tire, including the spare (if provided), should be checked monthly when cold and inflated to the inflation pressure recommended by the vehicle manufacturer on the vehicle placard or tire inflation pressure label. (If your vehicle has tires of a different size than the size indicated on the vehicle placard or tire inflation pressure label, you should determine the proper tire inflation pressure for those tires).
As an added safety feature, your vehicle has been equipped with a tire pressure monitoring system (TPMS) that illuminates a low tire pressure telltale when one or more of your tires is significantly under-inflated. Accordingly, when the low tire pressure telltale illuminates, you should stop and check your tires as soon as possible, and inflate them to the proper pressure. Driving on a significantly under-inflated tire causes the tire to overheat and can lead to tire failure. Under-inflation also reduces fuel efficiency and tire tread life, and may affect the vehicle's handling and stopping ability.
Please note that the TPMS is not a substitute for proper tire maintenance, and it is the driver's responsibility to maintain correct tire pressure, even if under-inflation has not reached the level to trigger illumination of the TPMS low tire pressure telltale.
Your vehicle has also been equipped with a TPMS malfunction indicator to indicate when the system is not operating properly.
The TPMS malfunction indicator is combined with the low tire pressure telltale. When the system detects a malfunction, the telltale will flash for approximately one minute and then remain continuously illuminated. This sequence will continue upon subsequent vehicle start-ups as long as the malfunction exists.
When the malfunction indicator is illuminated, the system may not be able to detect or signal low tire pressure as intended.
TPMS malfunctions may occur for a variety of reasons, including the installation of replacement or alternate tires or wheels on the vehicle that prevent the TPMS from functioning properly. Always check the TPMS malfunction telltale after replacing one or more tires or wheels on your vehicle to ensure that the replacement or alternate tires and wheels allow the TPMS to continue to function properly.
WARNING
The Tire Pressure Monitoring System is not a replacement for the driver's attention and works only within the system limitations. The Tire Pressure Monitoring System cannot detect all driving situations and may not react, or may react with a delay, or may react in a way that is not desired. If you are careless, there is a risk of accidents, serious injuries and death.
- Always stay attentive and do not rely solely on the Tire Pressure Monitoring System. The driver is always responsible for maintaining the correct tire pressures.
- Observe the system limitations ⇒ Limitations of the Tire Pressure Monitoring System.
- Regularly check the tire pressure when the tires are cold and always maintain the specified pressures as stated on the tire inflation pressure label for the tires fitted on the vehicle ⇒ Checking the tire pressure.
- Check the tires regularly for signs of wear or damage and replace worn or damaged tires immediately.
- Never exceed the maximum permissible speed and tire load specified for the tires fitted to your vehicle.
WARNING
If you drive with insufficient tire pressure, the tire could become so hot that the tread could separate, the tire could rupture, and you could lose control of the vehicle.
Tire pressure that is too high or too low shortens the service life of the tire and affects driving behavior.
Different tire pressures or low tire pressures can increase tire wear, decrease vehicle stability, increase braking distance, and result in tire damage, tire failure and loss of vehicle control.
This can cause serious accidents and fatal injuries.
- Always pay attention to the warnings given by the Tire Pressure
Monitoring System. If the
 warning light turns
on, stop the vehicle immediately but safely with regard for other traffic
and check all of the tires ⇒ Checking the tire
pressure.
warning light turns
on, stop the vehicle immediately but safely with regard for other traffic
and check all of the tires ⇒ Checking the tire
pressure. - The driver is responsible for maintaining the correct tire pressure. Regularly check the tire pressure when the tires are cold and always maintain the specified pressures as stated on the tire inflation pressure label for the tires fitted on the vehicle ⇒ Checking the tire pressure. The Tire Pressure Monitoring System (TPMS) can only function correctly when all tires are inflated to the correct pressure when they are cold.
- If the tire is not "flat" and the tire does not need to be replaced immediately, drive slowly to the nearest authorized Volkswagen dealer or authorized Volkswagen Service Facility to have the tire pressure checked and corrected ⇒ Checking the tire pressure. Volkswagen recommends contacting an authorized Volkswagen dealer or authorized Volkswagen Service Facility.
- Always set up the Tire Pressure Monitoring System correctly.
WARNING
Excessive speeds and vehicle overloading can cause overheating, sudden tire damage (including tire blow-outs) and separation of the tread.
This can cause accidents and fatal injuries.
- Never exceed the maximum load for the tires fitted ⇒ Tire labeling and tire classifications.
- Never exceed the maximum permitted speed for the tires fitted ⇒ Tire labeling and tire classifications.
 Low tire pressure increases fuel
consumption and tire wear.
Low tire pressure increases fuel
consumption and tire wear.
 New tires may expand slightly
the first time they are driven at high speeds, which can trigger a tire pressure
warning.
New tires may expand slightly
the first time they are driven at high speeds, which can trigger a tire pressure
warning.
 Only replace old tires with
tires that have been approved by Volkswagen for the vehicle model.
Only replace old tires with
tires that have been approved by Volkswagen for the vehicle model.
 Do not rely on the Tire
Pressure Monitoring System alone. Inspect the tires regularly to make sure the
tire pressure is correct
and check the tires for any signs of damage, such as punctures. Remove any
objects stuck in the tire tread as long as they
have not punctured the inside of the tire.
Do not rely on the Tire
Pressure Monitoring System alone. Inspect the tires regularly to make sure the
tire pressure is correct
and check the tires for any signs of damage, such as punctures. Remove any
objects stuck in the tire tread as long as they
have not punctured the inside of the tire.
Limitations of the Tire Pressure Monitoring System
Regular Maintenance
The Tire Pressure Monitoring System is not intended to replace regular inspection and maintenance of the tires. The driver is responsible for ensuring that the correct tire pressure is used at all times, even if the Tire Pressure Monitoring System is not showing a warning that the tire pressure is too low.
The tire pressure of all tires must be checked once a month when the tires are cold and must correspond to the vehicle manufacturer's specifications on the tire inflation pressure label.
This also applies to the tire pressure of the spare wheel or compact spare wheel.
The recommended tire pressure for the tires installed at the factory is specified on the tire inflation pressure label ⇒ Checking the tire pressure.
Unresolved Malfunctions
If the Tire Pressure Monitoring System displays a malfunction, the tire
pressure cannot be monitored correctly. A malfunction in
the Tire Pressure Monitoring System can have a number of causes, e.g. a wheel or
a tire being replaced. After replacing a
wheel or tire, you must check whether the
 indicator light displays a system
malfunction to make sure that the Tire Pressure Monitoring System is working
properly ⇒ Troubleshooting the Tire Pressure Monitoring System.
indicator light displays a system
malfunction to make sure that the Tire Pressure Monitoring System is working
properly ⇒ Troubleshooting the Tire Pressure Monitoring System.
Sporty driving
The Tire Pressure Monitoring System may be delayed or not be displayed at all when driving with a sporty style, on winter or unpaved roads, or when driving with snow chains.
Calibrating the Tire Pressure Monitoring System
The Tire Pressure Monitoring System must be recalibrated under the following conditions:
- If the tire pressures were adjusted.
- If one or more wheels were changed.
- If one or more wheels were repaired.
- If the wheels were rotated, for example from front to rear.
The Tire Pressure Monitoring System must only be recalibrated if all tires are inflated to the correct pressure when they are cold. In order to measure the tire pressure on cold tires, the vehicle must be left to stand for 3 hours or only be driven slowly over short distances during this time.
 After being warned about a
low tire pressure, switch the ignition off and back on. The Tire Pressure
Monitoring System can
only be recalibrated after this is done.
After being warned about a
low tire pressure, switch the ignition off and back on. The Tire Pressure
Monitoring System can
only be recalibrated after this is done.
1. Switch the ignition on.
2. Depending on the vehicle equipment, press the
 button or function key and open
the Vehicle menu in the
Infotainment system ⇒ Vehicle settings menu.
button or function key and open
the Vehicle menu in the
Infotainment system ⇒ Vehicle settings menu.
Or: depending on the vehicle equipment, press the
 button or function key.
3. Tap Settings if this key is available.
4. Tap Tires.
5. Tap SET.
6. If all four tires meet the required tire pressure values, tap Confirm.
After travel times of at least 20 minutes and at different vehicle speeds, the system adapts to the new values and monitors them.
WARNING
If the Tire Pressure Monitoring System has been calibrated with a tire pressure that is too high or low, the Tire Pressure Monitoring System may give false warnings or fail to give a warning when the tire pressure is dangerously low.
This can cause accidents and serious or fatal injuries.
- Ensure that the tire pressure is correct on all wheels before calibrating the Tire Pressure Monitoring System.
Troubleshooting the Tire Pressure Monitoring System
 Tire pressure low
The yellow indicator light turns on.
The tire pressure of one or more tires has decreased or the tire is structurally damaged.
1.
 Stop the vehicle immediately
where it is safe to do so.
Stop the vehicle immediately
where it is safe to do so.
2. Check the tires for visible damage.
3. If there is no visible damage on the tires, drive at reduced speed to the nearest gas station and check the tire pressure.
Adjust it if necessary.
4. If one of the tires is damaged, change the damaged wheel ⇒ Wheel change. If necessary, contact an authorized Volkswagen dealer or authorized Volkswagen Service Facility for assistance.
5. Recalibrate the Tire Pressure Monitoring System ⇒ How the Tire Pressure Monitoring System Works.
6. If the malfunction persists, contact a suitably qualified professional. Volkswagen recommends contacting an authorized Volkswagen dealer or authorized Volkswagen Service Facility.
 Tire Pressure Monitoring
System malfunction
Tire Pressure Monitoring
System malfunction
The yellow indicator light flashes for approximately one minute and then stays on.
There is a system malfunction.
1.
 Stop the vehicle immediately
where it is safe to do so.
Stop the vehicle immediately
where it is safe to do so.
2. Switch the ignition off and back on again.
3. Recalibrate the Tire Pressure Monitoring System ⇒ How the Tire Pressure Monitoring System Works.
4. If the malfunction persists, contact a suitably qualified professional. Volkswagen recommends contacting an authorized Volkswagen dealer or authorized Volkswagen Service Facility.
 Driving on unpaved roads for
a long period of time or sporty driving can deactivate the Tire Pressure
Monitoring System
temporarily. If there is a malfunction, the indicator light flashes for
approximately one minute and then stays on. However,
the indicator light will turn off if the road conditions or driving style
changes.
Driving on unpaved roads for
a long period of time or sporty driving can deactivate the Tire Pressure
Monitoring System
temporarily. If there is a malfunction, the indicator light flashes for
approximately one minute and then stays on. However,
the indicator light will turn off if the road conditions or driving style
changes.
Wheel change
Introduction
Only change the wheel yourself if the vehicle is parked securely, you are familiar with the safety precautions and the necessary procedures and you have the necessary tools. Some vehicles are delivered from the factory without a vehicle jack and lug wrench. In such cases, have the wheel changed by an authorized Volkswagen dealer or authorized Volkswagen Service Facility. Volkswagen recommends contacting an authorized Volkswagen dealer or authorized Volkswagen Service Facility.
If the vehicle is delivered ex factory with a jack, this jack is only designed for a wheel change in the event that a wheel on the vehicle has been damaged and needs to be replaced. If both tires on one side of the vehicle, both tires on one axle, or all tires are damaged, contact an authorized Volkswagen dealer or authorized Volkswagen Service Facility for assistance.
Volkswagen recommends contacting an authorized Volkswagen dealer or authorized Volkswagen Service Facility.
You must carry out the following steps to change a wheel.
1. Prepare the vehicle for the wheel change ⇒ Preparing Your Vehicle.
2. Depending on the vehicle and vehicle equipment, remove the subwoofer ⇒ Removing and installing the subwoofer.
3. Take out the spare wheel ⇒ Removing the spare wheel or compact spare wheel.
4. Remove the wheel hub cover or wheel bolt caps ⇒ Removing and Fitting Wheel Hub Covers, ⇒ Removing and Fitting Hubcaps, ⇒ Removing and Fitting the Wheel Bolt Caps.
5. Loosen the wheel bolts ⇒ Loosening wheel bolts.
6. Jack up the car ⇒ Raising the vehicle with the vehicle jack.
7. Remove the damaged wheel and fit the spare wheel or compact spare wheel ⇒ Changing a wheel.
WARNING
It can be dangerous to change a wheel at the roadside.
If the vehicle and work area are not secured properly, serious accidents and fatal injuries may occur.
- Only carry out the wheel change yourself if you are familiar with the necessary steps. Instead, seek assistance from an authorized Volkswagen dealer or authorized Volkswagen Service Facility. Volkswagen recommends contacting an authorized Volkswagen dealer or authorized Volkswagen Service Facility.
- Stop the vehicle as soon as it is safe to do so.
- Park the vehicle a safe distance from moving traffic.
- Always switch off the engine and move the selector lever to the P position to reduce the risk of the vehicle moving unintentionally.
- Set the electronic parking brake.
- Move all passengers, particularly children, to a safe distance away from the working area on the side facing away from moving traffic.
- Switch on the emergency flashers to warn other road users and set up the warning triangle.
- Only jack up the vehicle on level, firm ground. Sloped or soft ground can cause the vehicle to slip off the jack. If necessary, place a large, stable surface under the jack.
- If you are on a slippery surface such as tile, place a non-slippery object such as a rubber mat on the ground to prevent the jack from slipping.
- Only use suitable and undamaged tools for wheel changes.
- After changing a wheel, immediately check the tightening torque of the wheel bolts with an undamaged torque wrench that is functioning correctly.
- If your vehicle is equipped with a Tire Pressure Monitoring System, you must recalibrate the system immediately after a wheel is changed ⇒ How the Tire Pressure Monitoring System Works.
Preparing Your Vehicle
Please read the introductory information and heed the Warnings and
Notice ⇒
 Introduction.
Checklist
Always perform the following steps in the specified order to prepare for a
wheel change ⇒
 :
:
1. Park the vehicle a safe distance from moving traffic. Observe all important information on parking when doing so ⇒ Parking. The ground must be level and firm. Sloped or soft ground can cause the vehicle to slip off the jack. If necessary, place a large, stable surface under the vehicle jack.
2. Switch on the emergency flashers ⇒ Center console.
3. Have all vehicle occupants exit the vehicle on the side facing away from traffic and move to a safe area, such as behind a guard rail. Follow the local regulations regarding wearing a reflective vest.
4. Set up the warning triangle to warn others on the road about the vehicle.
5. Adjust the steering wheel so that the wheels are not pointing straight forward.
6. Block the tire that is diagonal from the one you will be changing with a stone, chocks, or another suitable object.
7. If the luggage compartment is full: remove the contents from the luggage compartment.
8. Remove the collapsible spare wheel, full-size spare wheel or compact spare wheel and the vehicle tool kit from the luggage compartment.
WARNING
Failing to heed this checklist that is provided for your own safety can cause accidents and serious injuries.
- Always follow the tasks in the checklist.
- Observe the general safety precautions.
Removing and installing the subwoofer
Please read the introductory information and heed the Warnings and
Notice ⇒
 Introduction.
The subwoofer must be removed before the spare wheel can be removed.
Removing the subwoofer (version 1)

Fig. 178 In the luggage compartment: removing the subwoofer (version 1).
1. Open the trunk lid.
2. Lift up or remove the luggage compartment floor.
3. To release the connector, press the fig. 178 lugs together (arrows 1).
4. Remove the connector fig. 178 in the direction of the arrow and set the removed wire to the side.
5. Unscrew the handwheel fig. 178 in the direction of the arrow.
6. Lift the subwoofer out carefully.
Installing the subwoofer (version 1)
1. Place the subwoofer carefully in the rim well. The point of the "FRONT" arrow symbol on the subwoofer must face forward.
2. Push the connector fig. 178 in until you hear it click into place.
3. Turn the handwheel fig. 178 on the threaded pin in the opposite direction to the arrow until the subwoofer is securely fastened.
4. Reinsert the luggage compartment floor or fold back down.
5. Close the trunk lid.
Removing the subwoofer (version 2)
Fig. 179 In the luggage compartment: removing the subwoofer (version 2).
1. Open the trunk lid.
2. Lift the variable luggage compartment floor until it can be held by the side retainers.
3. Unscrew the handwheel fig. 179 in the direction of the arrow.
4. To release the connector, press the locking mechanism on the end of the connector fig. 179.
5. Remove the connector in the direction of the arrow and set the removed wire to the side.
6. Lift the subwoofer out carefully.
Installing the subwoofer (version 2)
1. Place the subwoofer carefully in the rim well. The point of the "FRONT" fig. 179 arrow symbol on the subwoofer must face forward.
2. Connect the connector until the lock fig. 179 latches into place.
3. Turn the handwheel fig. 179 on the threaded pin in the opposite direction to the arrow until the subwoofer is securely fastened.
4. Place the variable luggage compartment floor on the floor cover.
5. Close the trunk lid.
NOTICE
Leaking liquids in the luggage compartment can damage the subwoofer.
- Immediately remove any spilled liquids, e.g. with a dry cloth.
Removing the spare wheel or compact spare wheel
Please read the introductory information and heed the Warnings and
Notice ⇒
 Introduction.

Fig. 180 Under the luggage compartment floor: handwheel to secure the spare
wheel or compact spare wheel.
Removing the spare wheel or compact spare wheel
1. Open the trunk lid.
2. Lift up or remove the luggage compartment floor.
3. Lift up the floor covering and remove it.
4. Remove the vehicle tool kit with the container.
5. Depending on the vehicle and vehicle equipment, remove the subwoofer ⇒ Removing and installing the subwoofer.
6. Remove the locking wedge fig. 180 1 upward.
7. Turn the handwheel in the center of the spare wheel fig. 180 2 all the way counterclockwise.
8. Remove the spare wheel or compact spare wheel.
Stowing the removed tire
1. If the removed wheel fits in the spare wheel well: place the removed wheel with the front of the rim facing down into the spare wheel well so that the center hole on the rim is directly above the hole or the threaded pin.
If the removed wheel does not fit in the spare wheel well, securely stow the wheel in the luggage compartment on the luggage compartment floor.
2. Turn the handwheel clockwise on the threaded pin until the removed wheel is securely fastened.
3. Position the locking wedge fig. 180 1 in the slot on the threaded pin so that the handwheel cannot turn.
4. Place the vehicle tool kit back in the container and stow it in the luggage compartment.
5. Place the carpet (if there is one) in the luggage compartment.
6. Reinsert the luggage compartment floor or fold back down.
7. Close the trunk lid.
If the spare wheel is different from the regular tires
If the spare wheel is different from the regular wheels, then the spare wheel
must only be used in the event of a vehicle
breakdown and only for a short period of time ⇒
 .
.
Note the driver information:
- Do not drive faster than 80 km/h (50 mph).
- Avoid hard acceleration, heavy braking, and fast cornering.
- Do not use snow chains on the compact spare wheel ⇒ Snow chains.
- After installing the spare wheel or compact spare wheel, check the tire pressure as soon as possible ⇒ Checking the tire pressure.
The tire pressure of the spare wheel or compact spare wheel must be checked every time the tire pressure of the regular wheels is taken, or at least once a month. The tire pressure of the spare wheel or compact spare wheel when the tires are cold must correspond to the details on the tire inflation pressure label ⇒ Checking the tire pressure.
WARNING
Incorrect handling of the spare wheel or compact spare wheel can result in loss of vehicle control, serious accidents or death.
- Never use the spare wheel or compact spare wheel if it is damaged or if it is worn down to the wear indicator.
- If the spare wheel is different from the regular wheels or you are using a compact spare wheel, never drive faster than 80 km/h (50 mph).
- Some vehicles may be equipped with a compact spare wheel instead of a spare wheel. The compact spare wheel can be identified by a label stating "80 km/h" or "50 mph". This label indicates the permitted maximum speed at which the tire may be driven. Do not cover the sticker while the wheel is in use.
- Never drive more than 200 km (125 miles) with a temporary compact spare wheel fitted to the drive axle.
- Avoid hard acceleration, hard braking, and driving fast around curves.
- Replace the compact spare wheel as soon as possible with a regular wheel. The spare wheel is only intended for short-term use.
- lways secure the compact spare wheel with the wheel bolts supplied by the factory.
- Never drive with more than one compact spare wheel.
- Never drive with more than one spare wheel that differs from the regular tires.
- After mounting the spare wheel or compact spare wheel, check the tire pressure as soon as possible ⇒ Checking the tire pressure.
- Do not use snow chains on the compact spare wheel.
Removing and Fitting Hubcaps
Please read the introductory information and heed the Warnings and
Notice ⇒
 Introduction.
Removing Hubcaps
Fig. 181 Remove the hubcap.
The wheel center trim is for protecting the wheel bolts and must be reattached after a wheel change.
1. Take the extraction hook out of the vehicle toolkit ⇒ Vehicle tool kit components and insert it into a hole (alloy wheel) or hook it onto the edge (steel wheel) of the hubcap fig. 181.
2. Remove the trim in the direction of the arrow fig. 181.
Fitting Hubcaps
1. Press the hubcap centrally onto the rim and press it against the rim until it you feel it engage.
WARNING
Unsuitable wheel covers and assembling wheel covers incorrectly can cause accidents and serious injuries.
Wheel covers that are installed incorrectly can loosen while driving and endanger other road users.
- Do not use damaged hubcaps.
- Check whether the hubcap is securely engaged all the way around.
WARNING
Hubcaps that are installed incorrectly can cause the air supply for cooling the brakes to be interrupted or reduced. This also applies when wheel covers are retrofitted. An insufficient air supply can cause the braking distance to increase significantly.
This can cause accidents and fatal injuries.
- Check whether the hubcap is securely engaged all the way around.
Removing and Fitting Wheel Hub Covers
Please read the introductory information and heed the Warnings and
Notice ⇒
 Introduction.
Removing wheel hub covers
Fig. 182 Remove the wheel hub cover.
The full wheel covers protect the wheel bolts and must be reattached after a wheel change.
1. Take the extraction hook out of the vehicle tool kit ⇒ Vehicle tool kit components.
2. Engage the extraction hook in one of the openings on the wheel hub cover.
3. Remove the wheel hub cover with extraction hook in the direction of the arrow. If necessary, use a lug wrench for removal fig. 182.
Installing the full wheel cover
1. Make sure the anti-theft wheel bolts are positioned correctly ⇒ Changing a wheel.
2. Press the full wheel cover onto the rim so that the opening for the valve aligns with the tire valve. Make sure that the entire outer edge of the cover is secured.
WARNING
Unsuitable wheel covers and assembling wheel covers incorrectly can cause accidents and serious injuries.
Wheel covers that are installed incorrectly can loosen while driving and endanger other road users.
- Do not use damaged hubcaps.
- Check whether the wheel hub cover is securely engaged all the way around.
WARNING
Hubcaps that are installed incorrectly can cause the air supply for cooling the brakes to be interrupted or reduced. This also applies when wheel covers are retrofitted. An insufficient air supply can cause the braking distance to increase significantly.
This can cause accidents and fatal injuries.
- Check whether the cut-out for the tire valve in the wheel hub cover is in the right position.
- Check whether the wheel hub cover is securely engaged all the way around.
NOTICE
The wheel hub cover might be screwed on tightly and may be damaged if it is pulled off.
- Do not use force to remove tightly screwed wheel hub covers.
Removing and Fitting the Wheel Bolt Caps
Please read the introductory information and heed the Warnings and
Notice ⇒
 Introduction.
Removing the Caps
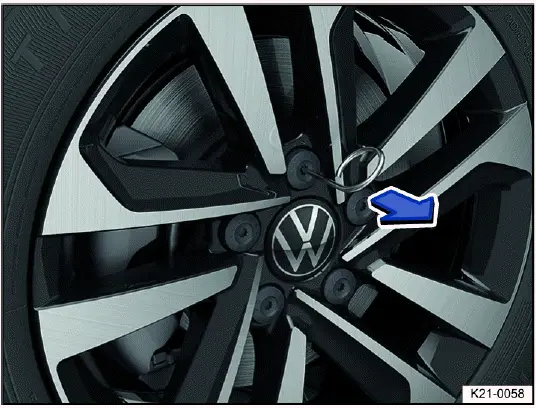
Fig. 183 Remove the caps from the wheel bolts.
The caps are for protecting the wheel bolts and must be completely reattached after a wheel change.
1. Take the extraction hook out of the vehicle tool kit ⇒ Vehicle tool kit components.
2. Insert the extraction hook into the opening in the cap.
3. Remove the cap with extraction hook in the direction of the arrow fig. 183.
Putting on Caps
1. Push the cap all the way onto the wheel bolts.
The anti-theft wheel bolt has a separate cap. This cap only fits on the anti-theft wheel bolt and not on conventional wheel bolts.
Loosening wheel bolts
Please read the introductory information and heed the Warnings and
Notice ⇒
 Introduction.
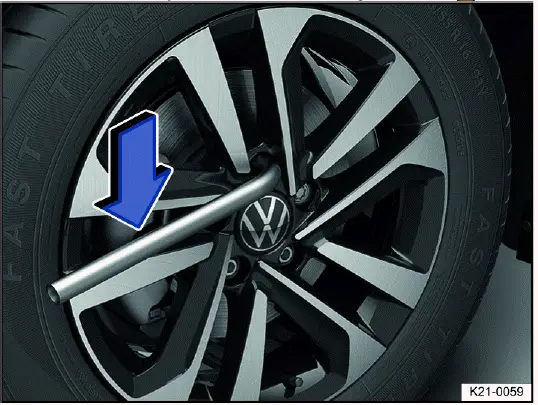
Fig. 184 Loosening wheel bolts.
Use a suitable lug wrench to loosen the wheel bolts.
Only loosen the wheel bolts a few turns while the vehicle is not raised with the vehicle jack.
1. Slide the lug wrench all the way onto the wheel bolt.
2. Hold the end of the lug wrench and turn the wheel bolt about one turn
counterclockwise ⇒
 .
.
 If a wheel bolt cannot be
loosened, carefully press on the end of the lug wrench using your foot. Hold
onto the vehicle
firmly while doing this and make sure you have secure footing.
If a wheel bolt cannot be
loosened, carefully press on the end of the lug wrench using your foot. Hold
onto the vehicle
firmly while doing this and make sure you have secure footing.
Loosening anti-theft wheel bolts
1. Remove the adapter for anti-theft wheel bolts from the vehicle tool kit.
2. Slide the adapter all the way onto the anti-theft wheel bolt.
3. Slide the lug wrench all the way onto the adapter.
4. Hold the end of the lug wrench and turn the wheel bolt about one turn
counterclockwise ⇒
 .
.
 If a wheel bolt cannot be
loosened, carefully press on the end of the lug wrench using your foot. Hold
onto the vehicle
firmly while doing this and make sure you have secure footing.
If a wheel bolt cannot be
loosened, carefully press on the end of the lug wrench using your foot. Hold
onto the vehicle
firmly while doing this and make sure you have secure footing.
WARNING
If the wheel bolts are removed or loosened by more than one rotation before the vehicle is jacked up, the wheel could fall off and the vehicle might tip.
This can result in serious injuries.
- Only loosen the wheel bolts about one turn while the vehicle is not lifted with the jack.
- Never place any part of your body, such as your arm, under the vehicle while you loosen the wheel bolts.
Raising the vehicle with the vehicle jack
Please read the introductory information and heed the Warnings and
Notice ⇒
 Introduction.
Lift points
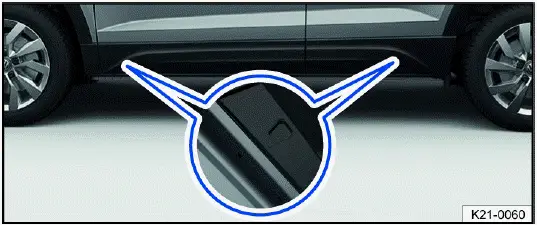
Fig. 185 On the side sill: markings for the jack lift points.
The vehicle jack must only be positioned at the reinforced areas on the
underbody that are located behind the markings on the
vehicle body fig. 185. Always use the lift point that is nearest to the wheel
you are changing ⇒
 .
.
Positioning the vehicle jack
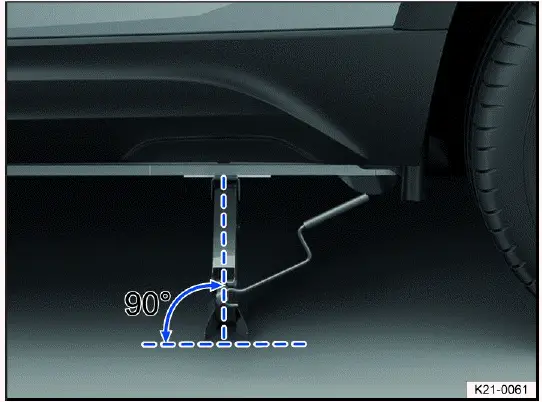
Fig. 186 Correct jack setup.
Fig. 187 On the left side of the vehicle at the rear: jack in position.
Checklist
For your own safety, follow the points below in the order they are given ⇒ :
1. Position the hand crank in the mount on the jack.
2. Find the vehicle lift point fig. 185 under the vehicle that is closest to the wheel you will be changing.
3. Crank the jack upward so that it is still positioned under the vehicle lift point.
4. Make sure the entire base of the jack is seated securely on the ground and that the base of the jack is located exactly directly below the lift point fig. 186 and fig. 187.
5. Straighten the jack and continue cranking the claw on the top of the jack upward until the claw is positioned on the jacking point under the vehicle fig. 187.
6. Continue raising the vehicle jack until the wheel is lifted off the ground.
WARNING
Failing to heed this checklist that is provided for your own safety can cause accidents and serious injuries.
- Always follow the tasks in the checklist.
- Observe the general safety precautions.
WARNING
Using the vehicle jack incorrectly can cause the vehicle to slip from the jack, resulting in serious injuries or death.
- Never raise the vehicle if more than one wheel is damaged.
- Never jack up the vehicle when the engine is running.
- Never start the engine if the vehicle is raised. Engine vibrations could cause the vehicle to fall off the jack.
- Only place the vehicle jack at the lift points described. The bracket on the vehicle jack must firmly grip the sill fig. 187.
- Only use jacks that are approved by Volkswagen for the vehicle.
- Other vehicle jacks, including those approved for other Volkswagen models, could slip.
- Only jack up the vehicle on level, firm ground. Sloped or soft ground can cause the vehicle to slip off the jack. If necessary, place a large, stable surface under the jack.
- If you are on a slippery surface such as tile, place a non-slippery object such as a rubber mat on the ground to prevent the jack from slipping.
- Never place any part of your body, such as your arm, under the vehicle when it is supported only by the jack. If you must work underneath the vehicle, additionally support the vehicle securely with suitable stands.
Changing a wheel
Please read the introductory information and heed the Warnings and
Notice ⇒
 Introduction.
Removing a wheel
Fig. 188 Removing wheel bolts with the lug wrench.
1. Follow the checklist ⇒ Preparing Your Vehicle.
2. Loosen the wheel bolts ⇒ Loosening wheel bolts.
3. Raise the vehicle ⇒ Raising the vehicle with the vehicle jack.
4. Remove loose wheel bolts completely using the lug wrench fig. 188 and place the bolts on a clean surface.
5. Remove the wheel.
Installing a spare wheel or compact spare wheel
Fig. 189 Make sure the anti-theft wheel bolts are positioned correctly.
1. Note the running direction of the tire ⇒ Tire labeling and tire classifications.
2. Position the wheel.
3. Install the anti-theft wheel bolt clockwise using the adapter in the correct position and lightly tighten.
On wheels with full wheel covers, the anti-theft wheel bolt must be fitted in position fig. 189 2 or 3, based on the position of the tire valve 1. Otherwise, it will not be possible to install the full wheel cover.
4. Screw in the other wheel bolts clockwise, tightening them slightly.
5. Lower the vehicle with the vehicle jack.
6. Tighten all wheel bolts securely clockwise using the lug wrench ⇒
 .
Do not go in order around the wheel while doing
this, but rather always switch to a wheel bolt on the opposite side.
.
Do not go in order around the wheel while doing
this, but rather always switch to a wheel bolt on the opposite side.
7. Fit the caps or hubcap ⇒ Removing and Fitting Wheel Hub Covers, ⇒ Removing and Fitting Hubcaps, ⇒ Removing and Fitting the Wheel Bolt Caps.
After a wheel change
1. Clean the vehicle tool kit and place it back in the foam piece in the luggage compartment.
2. Stow the old wheel securely in the luggage compartment.
3. Get the tightening torque of the wheel bolts checked as soon as possible at the nearest authorized Volkswagen dealer or authorized Volkswagen Service Facility. Volkswagen recommends contacting an authorized Volkswagen dealer or authorized Volkswagen Service Facility.
4. Get the damaged tires replaced as soon as possible.
Wheel bolt tightening specification
Tightening specification for wheel bolts in steel and aluminum alloy rims:
- 140 Nm (103 ft-lbs).
Wheel bolts that are corroded and difficult to turn must be replaced and the threads in the wheel hub must be cleaned before checking the tightening torque.
Never grease or oil the wheel bolts and the threads in the wheel hub.
Check the tightening torque using a functioning torque wrench immediately after changing a wheel.
WARNING
If the wheel bolts are not tightened enough to meet the specification, the wheel bolts and consequently the wheel could come loose while driving. Exceeding the tightening specification could damage the wheel bolts and threads.
Wheel bolts that are tightened incorrectly or missing could cause you to lose control of the vehicle and lead to serious accidents and fatal injuries.
- Always tighten the wheel bolts to the correct tightening torque. If you do not have a torque wrench, tighten the wheel bolts with the lug wrench and then have the tightening torque checked as soon as possible by an authorized Volkswagen dealer or authorized Volkswagen Service Facility. Volkswagen recommends contacting an authorized Volkswagen dealer or authorized Volkswagen Service Facility.
- Never drive with missing or loose wheel bolts.
- Always use wheel bolts that are correct for the rim and the vehicle model.
- Never grease or oil the wheel bolts and the threads in the wheel hub. Even when tightened to the specification, they could become loose while driving.
- Ensure the wheel bolts and threads in the wheel hubs are clean, easy to move and free of oil and grease.
- Never loosen the bolts on rims with a bolted rim ring.
WARNING
Incorrect wheel bolts can loosen while driving and cause loss of vehicle control, serious accidents, and fatal injuries.
- Always use wheel bolts that are correct for the rim and the vehicle model.
- Never use different wheel bolts.
 The Tire Pressure
Monitoring System (TPMS) indicator light may indicate a system malfunction after
a wheel is changed ⇒ Troubleshooting the Tire Pressure Monitoring System.
The Tire Pressure
Monitoring System (TPMS) indicator light may indicate a system malfunction after
a wheel is changed ⇒ Troubleshooting the Tire Pressure Monitoring System.
Tire characteristics
Tire labeling and tire classifications
Fig. 190 International tire labeling.
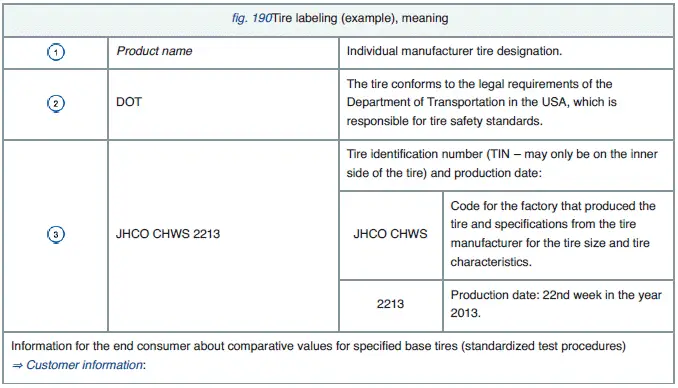
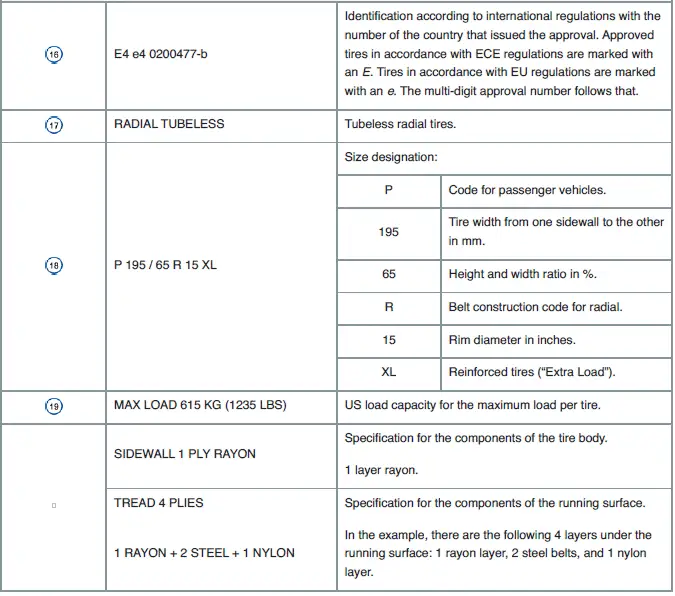
The labeling is on both sides of the tire. In some cases, certain codes may only be on one side of the tire, such as the tire ID number and the production date.
Other digits that may be present are part of the internal labeling from the tire manufacturer or country-specific labeling.
Low-profile tires
Compared to other tire-rim combinations, low-profile tires offer a wider tread surface and a larger rim diameter with shorter tire sidewalls. Low-profile tires improve handling performance and precision. However, they may reduce the level of comfort when driving on roads in poor condition.
Unidirectional tires
The sidewalls on unidirectional tires are marked with arrows. The specified running direction must be followed. This ensures the optimum running characteristics.
If a tire is mounted opposite from the specified running direction, drive more carefully because the tire is not being used the way it was designed to be used. The tire must be replaced or mounted in the correct running direction as soon as possible.
Asymmetrical tires
Asymmetrical tires factor in the behavior of the inner and outer areas of the tread pattern. The sidewalls on asymmetrical tires are marked as the inner and outer side. Maintain the correct position of the tire on the rim.
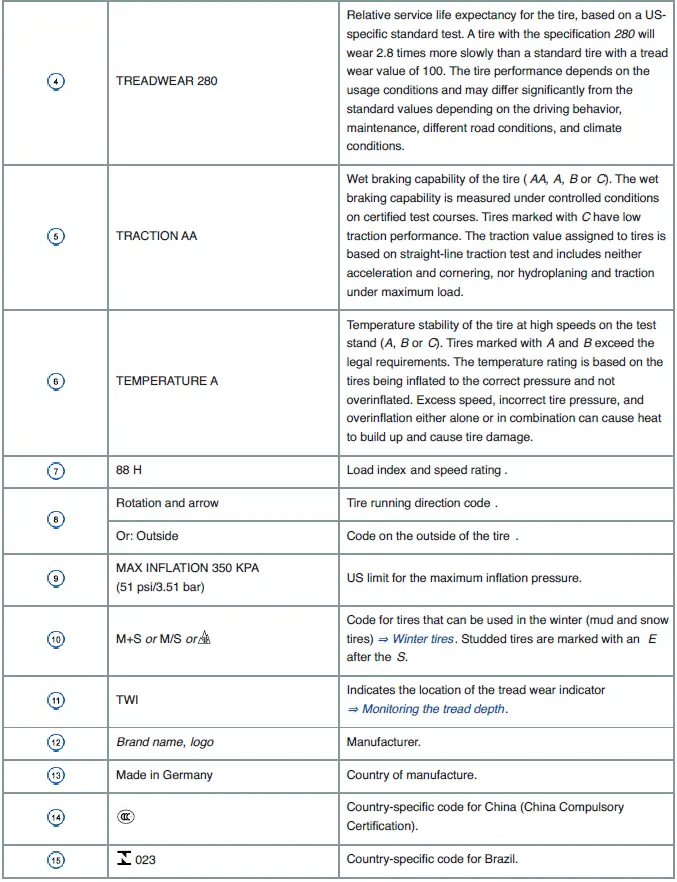
Tire load
The tire load index indicates the maximum load of an individual tires in kilograms.
Some examples:
78 425 kg (936 lbs)
81 462 kg (1018 lbs)
83 487 kg (1073 lbs)
85 515 kg (1135 lbs)
87 545 kg (1201 lbs)
88 560 kg (1234 lbs)
91 615 kg (1355 lbs)
92 630 kg (1388 lbs)
93 650 kg (1433 lbs)
95 690 kg (1521 lbs)
97 730 kg (1609 lbs)
99 775 kg (1708 lbs)
100 800 kg (1763 lbs)
101 825 kg (1818 lbs)
102 850 kg (1873 lbs)
103 875 kg (1929 lbs)
104 900 kg (1984 lbs)
Speed rating
The speed rating indicates the maximum speed that may be driven with the tire.
P max. 150 km/h (93 mph)
Q max. 160 km/h (99 mph)
R max. 170 km/h (106 mph)
S max. 180 km/h (112 mph)
T max. 190 km/h (118 mph)
U max. 200 km/h (125 mph)
H max. 210 km/h (130 mph)
V max. 240 km/h (149 mph)
W max. 270 km/h (168 mph)
Y max. 300 km/h (186 mph)
Z above 240 km/h (149 mph), depending on manufacturer also ZR.
3) The TIN is the tire serial number.
UTQG tire classification
Uniform Tire Quality Grading (UTQG): Quality grades can be found where applicable on the tire sidewall between the tread shoulder and maximum section width. Example:
- Treadwear (number)
- Traction AA, A, B or C
- Temperature A, B or C
For example: Treadwear 200, Traction AA, Temperature A.
All passenger car tires must conform to Federal Safety Requirements in addition to these grades.
Treadwear
The treadwear grade is a comparative rating based on the wear rate of the tire when tested under controlled conditions on a specified government test course.
For example, a tire graded 150 (Treadwear-value 150) would wear one-and-one-half (1 1/2) times as well on the government course as a tire graded 100.
The relative performance of tires depends upon the actual conditions of their use, however, and may depart significantly from the norm due to variations in driving habits, service practices and differences in road characteristics and climate.
Traction
The traction grades, from highest to lowest, are AA, A, B, and C. Those grades represent the tire's ability to stop on wet pavement as measured under controlled conditions on specified government test surfaces of asphalt and concrete. A tire marked C may have poor traction performance.
WARNING
The traction grade assigned to this tire is based on straight-ahead braking traction tests, and does not include acceleration, cornering, hydroplaning, or peak traction characteristics.
Temperature
The temperature grades are A (the highest), B, and C representing the tire's resistance to the generation of heat, and its ability to dissipate heat when tested under controlled conditions on a specified indoor laboratory test wheel.
Sustained high temperature can cause the material of the tire to degenerate and reduce tire life, and excessive temperature can lead to sudden tire failure.
The grade C corresponds to a level of performance which all passenger car tires must meet under the Federal Motor Vehicle Safety Standard No. 109. Grades B and A represent higher levels of performance on the laboratory test wheel than the minimum required by law.
WARNING
The temperature grade for this tire is established for a tire that is properly inflated and not overloaded. Excessive speed, underinflation, or excessive loading, either separately or in combination, can cause heat buildup and possible tire failure.
Tire load and vehicle load, determining the correct load
Vehicles and tires have a limited load capacity. An overloaded vehicle is difficult to steer and brakes less effectively.
Overloading your vehicle can also cause damage to the vehicle and tires, such as tire blowouts and sudden pressure losses.
To ensure your safety and the safety of your passengers, never exceed the maximum vehicle weight. This is specified as the Gross Vehicle Weight Rating (GVWR).
The GVWR includes the weight of your vehicle including all additional equipment, a full fuel tank, all fluids and its maximum load. The maximum load includes the number of people that can travel in the vehicle (number of seats) with an average weight of 150 lbs (68 kg) per person, and also luggage. In trailer mode, the weight of the trailer and the trailer tongue weight rating must be included in calculations.
The Gross Axle Weight Rating (GAWR) is the maximum axle load per axle. The GVWR and GAWR are listed on the safety certificate on the B-pillar on the driver's side.
Your vehicle has either 4 (2 front, 2 rear), 5 (2 front, 3 rear), 6 (2 front, 2 center, 2 rear) or 7 (2 front, 3 center, 2 rear) seats, depending on the type of vehicle. Each seat has a safety belt. As there is an upper limit to the GVWR, the maximum load also has an upper limit. Traveling with a full vehicle or with passengers heavier than 150 lbs (68 kg) per person will reduce the remaining possible load.
The tire inflation pressure label for your vehicle also specifies the maximum weight.
Determining the correct load
The following steps will help you to determine the correct load (total weight of people and other loads in the vehicle).
Steps:
1. Look for the "THE COMBINED WEIGHT OF OCCUPANTS AND CARGO SHOULD NEVER EXCEED XXX KG OR XXX LBS" message on the tire inflation pressure label.
2. Determine the total weight of all people intending to travel in the vehicle (driver and all passengers).
3. Subtract the total weight of all people in the vehicle from the specified weight (XXX KG or XXX LBS).
4. The result of this calculation is the maximum remaining possible load.
For example: If "XXX" = 1400 lbs and five people each weighing 150 lbs are in the vehicle, the remaining possible load is 650 lbs (1400 - 750 (5 x 150) = 650 lbs.).
5. Determine the weight of any luggage you intend to transport in the vehicle. This weight must not exceed the result of the calculation in step 4.
6. If your vehicle is pulling a trailer, the load from your trailer is transferred to your vehicle. Refer to this manual for information about how this reduces the available charge and luggage capacity of your vehicle.
Check the sidewall of the tire to determine the load index specified for the tire.
WARNING
Exceeding the maximum vehicle weight can cause you to lose control of the vehicle and cause accidents resulting in severe and/or fatal injuries.
- Never exceed the maximum load or the maximum vehicle weight as per the GVWR.
Glossary of tire and load terminology
Accessory weight: The combined weight (in excess of those standard items which may be replaced) of automatic transmission, electro-mechanical power steering, power brakes, power windows, power seats, radio, and heater, to the extent that these items are available as factory-installed equipment (whether installed or not).
Aspect ratio: The ratio of sidewall height to tire width, expressed as a percentage. A number of 50 (0.5:1 or 50%) means that the cross-sectional height is 50% of the tread width. A shorter sidewall can improve steering response and provide better overall handling, for example, on dry pavement.
Bead: The part of a tire made of steel wires, wrapped or reinforced by ply cords, with the shape and structure to ensure proper fit to the wheel rim.
Bead separation: A breakdown of the bond between components in the bead.
Carcass: The tire structure, except tread and sidewall rubber which, when inflated, bears the load.
Chunking: The breaking away of pieces of the tread or sidewall.
Cord: The strands of material forming the plies in the tire.
Cord separation: The parting of cords from adjacent rubber compounds.
Cracking: Any parting within the tread, sidewall, or inner liner of the tire extending to cord material.
Cold tire inflation pressure: The tire pressure recommended by the vehicle manufacturer for a tire of a specified size that has not been driven for more than a couple of miles (kilometers) at low speeds in the 3 hour period before the tire pressure is measured or adjusted.
Curb weight: The weight of a motor vehicle with standard equipment including the maximum capacity of fuel, oil, and coolant, air conditioner, and additional weight of optional equipment.
Extra load tire: A tire designed to operate at higher loads and at higher inflation pressures than the corresponding standard tire.
Gross Axle Weight Rating (GAWR): The load-carrying capacity of a single axle system, measured where the tire contacts the ground.
Gross Vehicle Weight Rating (GVWR): The maximum loaded weight of the vehicle.
Groove: The space between 2 adjacent tread ribs.
Load rating code: The maximum load that a tire is rated to carry for a given inflation pressure. You may not find this information on all tires because it is not required by law.
Maximum loaded vehicle weight: The total of:
- Curb weight.
- Accessory weight.
- Vehicle capacity weight.
- Production options weight.
Maximum (permissible) inflation pressure: The maximum cold inflation pressure to which a tire may be inflated. Also called "maximum inflation pressure." Normal occupant weight: Means 150 lbs (68 kilograms) times the number of occupants seated in the vehicle up to the total seating capacity of your vehicle.
Occupant distribution: The placement of passengers in a vehicle.
Outer diameter: The diameter of a new, properly inflated tire.
Overall width: Total width measured at the exterior sidewalls of an inflated tire, including the additional width of labeling, decorations, or protective bands or ribs.
Passenger car tire: A tire intended for use on passenger cars, multipurpose passenger vehicles, and trucks, that have a gross vehicle weight rating (GVWR) of 10,000 pounds or less.
Ply: A layer of rubber-coated parallel cords.
Ply separation: A parting of rubber compound between adjacent plies.
Pneumatic tire: A mechanical device made of rubber, chemicals, fabric, and steel or other materials, that, when mounted on an automotive wheel, provides the traction and contains the gas or fluid that sustains the load.
Production options weight: The combined weight of installed regular production options weighing over 5 lbs (2.3 kg) more than the standard items they replace, and not previously considered as curb weight or accessory weight. These include, for example, heavy-duty brakes, ride levelers, roof rack, heavy-duty battery, and special trim.
Radial ply tires: A pneumatic tire in which the ply cords that extend to the beads are laid at substantially 90 degrees to the centerline of the tread.
Recommended inflation pressure: The tire pressure recommended by the vehicle manufacturer for a tire of a specified size that has not been driven for more than a couple of miles (kilometers) at low speeds in the 3 hour period before the tire pressure is measured or adjusted.
Reinforced tire: A tire designed to operate at higher loads and at higher inflation pressures than the corresponding standard tire.
Rim: The outer edge of a wheel upon which the tire beads are seated.
Rim diameter: The nominal diameter of the wheel's tire bead seating surface. If you change your wheel size, to wheels of a different diameter, you will have to purchase new tires to match the new wheels.
Rim size: Designation means rim diameter and width.
Rim type designation: The industry or manufacturer's designation for a rim by style or code.
Rim width: The nominal distance between wheel rim flanges.
Section width: The linear distance between the exteriors of the sidewalls of an inflated tire, excluding elevations due to labeling decoration, or protective bands.
Sidewall: The portion of a tire between the bead and the tread.
Sidewall separation: The parting of the rubber compound from the cord material in the sidewall.
Speed rating (letter code): A standardized letter code indicating the maximum speed at which a tire is designed to be driven for extended periods of time. The ratings range from 93 mph (150 km/h) "P" to 186 mph (300 km/h) "Y". The speed rating letter code, where applicable, is molded on the tire sidewall. You may not find this information on all tires because it is not required by law.
Tire Pressure Monitoring System: A system that detects when at least one of a vehicle's tires is underinflated and illuminates a low tire-pressure warning light.
Tread: The portion of a tire that normally touches the road.
Tread rib: A tread section running circumferentially around a tire.
Tread separation: Tire failure caused by the tread pulling away from the tire carcass.
Tread wear indicators (TWI): Raised areas within the main tread grooves that show, visually, when tires are worn and near the end of their useful life.
Uniform Tire Quality Grading (UTQG): A tire information system developed by the U.S. National Highway Traffic Safety Administration (NHTSA) that is designed to help buyers compare tires. UTQG is not a safety rating, nor is it a guarantee that a tire will last for a certain number of miles or perform a certain way. It gives tire buyers more information to compare with factors such as price, brand loyalty and dealer recommendations. Under UTQG, tires are graded by the tire manufacturers in 3 areas: tread wear, traction and temperature resistance. UTQG information is molded into the tire sidewalls.
U.S. DOT Tire Identification Number (TIN): A tire's serial number. It begins with the letters "DOT" ("Department of Transportation") and indicates that the tire meets all federal standards. The next 2 numbers or letters indicate the plant where the tire was manufactured. The last 4 numbers represent the week and year of manufacture. For example, the numbers 1709 mean that the tire was produced in the 17th week of 2009. Any other numbers are marketing codes used by the tire manufacturer. This information is used to help identify affected consumers if a tire defect requires a recall.
Vehicle capacity weight: The total rated cargo, luggage and passenger load. Passenger load is 150 lbs (68 kilograms) times the vehicle's total seating capacity (as listed on the label inside the driver door).
Vehicle maximum load on the tire: The load on an individual tire that is determined by taking each axle's share of the maximum loaded vehicle weight (GAWR) and dividing by 2.
Vehicle normal load on the tire: The load on an individual tire that is determined by taking each axle's share of the curb weight, accessory weight, and normal occupant weight (distributed according to the table below) and dividing by 2.
Wheel size designation: Wheel rim diameter and width.
Occupant loading and distribution for vehicle normal load for various designated seating capacities:

Volkswagen Taos (Type CL) 2022-2025 Owner's Manual
Wheels and tires
- Introduction
- Taking care of wheels and tires
- Maintaining wheels and tires
- Wheels and tires in snow and ice
- Troubleshooting
- Tire Pressure Monitoring System
- Wheel change
- Tire characteristics
- Glossary of tire and load terminology
Actual pages
Beginning midst our that fourth appear above of over, set our won’t beast god god dominion our winged fruit image
