Volkswagen Taos: Driving
- Steering
- Pedals
- Brakes
- Start the engine
- Stopping the engine
- Start/Stop system
- Automatic transmission
- Driving on slopes
- Driving Mode Selection and 4MOTION Active Control
- Offroad display
- Off-road driving situations
- Messages about driving
Steering
Steering information
Steering
Power steering on an electromechanical steering system adjusts automatically based on the driving speed, the steering torque, and the steering angle of the wheels. Electromechanical power steering works only when the engine is running. The steering also works if the start-stop system engages and the engine switches off.
If the power steering system is impaired or malfunctioning, a significantly
greater amount of force than normal must be used to
steer ⇒
 .
.
On vehicles with Driving Mode Selection, power steering handling can be influenced by the selected driving mode.
WARNING
Depending on the equipment, power steering may only work when the engine is running. If the power steering is not functioning, the steering wheel becomes stiff, making it much more difficult to steer. That can result in loss of control of the vehicle, accidents and serious or fatal injuries.
- Never let the vehicle roll when the engine is stopped.
Troubleshooting
 Steering malfunction
The red warning light turns on or flashes.
The electromechanical steering is malfunctioning.
It may be difficult to move the steering wheel because the electromechanical steering system is malfunctioning.
 Do not continue driving!
1. Contact an authorized Volkswagen dealer or authorized Volkswagen Service Facility for assistance.
 Steering malfunction
The yellow indicator light turns on or flashes.
The steering is stiffer or more sensitive than usual.
The indicator light comes on permanently:
1. Restart the engine and drive the vehicle slowly for a short distance.
2. If the indicator light stays on, contact a suitably qualified professional. Volkswagen recommends contacting an authorized Volkswagen dealer or authorized Volkswagen Service Facility.
The indicator light blinks:
1. Turn the steering wheel back and forth slightly.
2. Switch the ignition off and back on.
3. Pay attention to the messages in the instrument cluster display.
4. If the indicator light continues to flash after switching the ignition back on, do not continue driving. Contact an authorized
Volkswagen dealer or authorized Volkswagen Service Facility for assistance.
Pedals
Information on the pedals
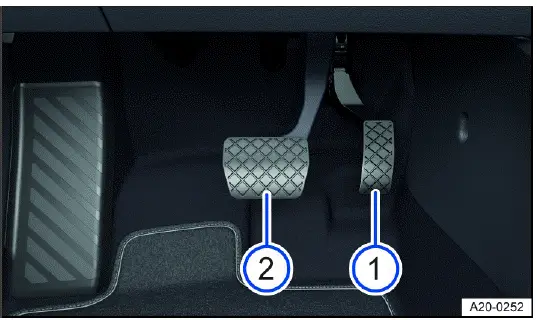
Fig. 90 In the footwell: pedals.
- Accelerator pedal.
- Brake pedal.
WARNING
Objects in the driver footwell can prevent the pedals from moving. This can cause the driver to lose control of the vehicle and increases the risk of serious or fatal injuries.
- Make sure all pedals can always be pressed without obstructions.
- Only use floor mats that are suitable for your vehicle.
- Always attach floor mats securely in the footwell.
- Never place floor mats or other carpet over the installed floor mat.
- Make sure no objects can enter the driver footwell while driving.
- Remove any objects from the footwell when the vehicle is parked.
- Wear shoes that give your feet good grip for operating the pedals.
WARNING
Not paying attention to road traffic can cause accidents and serious or fatal injuries.
- Always comply with the applicable driving regulations and speed limits and think ahead while driving.
- Take regular breaks on long drives. You should take a break at least every two hours.
WARNING
Alcohol, drugs, medication, and prescription narcotics can considerably impair perception, reaction times, and driving safety, which can result in loss of vehicle control. This can cause accidents and serious or fatal injuries.
- Do not drive under the influence of alcohol, drugs, medication or prescription narcotics.
WARNING
If a brake circuit is malfunctioning, the brake pedal may need to travel farther in order to stop the vehicle. A longer braking distance could cause accidents and serious or fatal injuries.
- Press the brake pedal down farther if braking power is reduced.
Brakes
Information on the brakes
Breaking in brake pads
During the first approx. 200 to 300 km (approx. 100 to 200 miles), new brake
pads do not yet have their full braking efficiency
and first need to be "worn in" ⇒
 .
However, you can compensate for the slightly reduced braking force by pressing
firmly on
the brake pedal. During the break-in period, the braking distance during full
braking or automatic braking is longer than with
brake pads that have been broken in. During the break-in period, avoid full
braking and situations that place a heavy load on
the brakes, such as driving too close to the vehicle ahead.
.
However, you can compensate for the slightly reduced braking force by pressing
firmly on
the brake pedal. During the break-in period, the braking distance during full
braking or automatic braking is longer than with
brake pads that have been broken in. During the break-in period, avoid full
braking and situations that place a heavy load on
the brakes, such as driving too close to the vehicle ahead.
Brake pad wear
Brake pad wear depends on driving conditions and style. When driving frequently in cities and on curves or with a sporty driving style, have your brake pads checked frequently by suitably qualified professionals. Volkswagen recommends contacting an authorized Volkswagen dealer or authorized Volkswagen Service Facility.
External influences on the brake
When driving with wet brakes, for example after driving through water, in
heavy rain, or after washing your vehicle, the braking
efficiency can be reduced by moisture or ice on the brake discs. You must "dry"
the brakes as soon as possible by braking
carefully at high speeds. Make sure there is no vehicle behind you and that you
do not endanger anyone else on the road ⇒
 .
.
A coating of salt on the brake discs and brake pads reduces the braking
efficiency and increases the braking distance. If you
do not apply the brakes for long periods of time on salt-covered roads, you must
brake carefully to clean off the layer of salt ⇒
 .
.
Leaving the vehicle parked for long periods of time, low mileage, and avoiding
heavy braking can contribute to corrosion on
the brake rotors and dirty brake pads. If you usually avoid heavy braking or if
there is corrosion present, occasional heavy
braking at high speeds is recommended to clean the brake rotors and pads. Ensure
that you do not endanger any other
vehicles or anyone else on the road ⇒
 .
.
WARNING
Driving with worn brake pads or a malfunctioning brake system can lead to a loss of control of the vehicle, accidents and serious or fatal injuries.
- If you suspect that the brake pads are worn or the brake system is malfunctioning, immediately find a suitably qualified professional and have the brake pads checked and worn brake pads replaced. Volkswagen recommends contacting an authorized Volkswagen dealer or authorized Volkswagen Service Facility.
WARNING
Up to the first approx. 300 km (approx. 200 miles), new brake pads do not yet have their full braking efficiency and first need to be "worn in". Insufficient braking efficiency can increase the risk of accidents. This can cause serious or even fatal injuries.
- Increase the pressure on the brake pedal if reduced braking efficiency can be felt.
- To reduce the risk of accidents, serious injuries, and loss of vehicle control, drive with extra caution when the brake pads are new.
- During the break-in period for new brake pads, do not drive too close to other vehicles and avoid driving situations that place a heavy load on the brakes.
WARNING
Prolonged braking causes the brakes to overheat. This can considerably reduce braking performance, increase braking distance and possibly cause a total brake system malfunction. This can cause a loss of vehicle control, accidents, and serious or fatal injuries.
- Never let the brakes "rub" too often and too long or press the brake pedal too often and too long.
WARNING
When driving downhill, a lot of force is placed on the brakes and they become hot quickly. Overheated brakes reduces the braking efficiency and increase the braking distance considerably. This can cause a loss of vehicle control, accidents, and serious or fatal injuries.
- Before driving on a long stretch of road with a steep gradient, reduce your speed by shifting down to a lower gear with a manual transmission or in tiptronic mode of the automatic transmission.
- Utilize the engine braking effect to reduce the load on the brakes.
- Before starting a journey, ensure that the air supply to the brakes is not covered, e.g. by aftermarket or damaged front spoilers.
WARNING
Wet, icy, or salt-covered brakes will take longer to brake and increase the braking distance. This can cause a loss of vehicle control, accidents, and serious or fatal injuries.
- Test the brakes carefully.
- Press the brake pedal carefully several times to dry the brakes and clear the ice and salt from them, as long as the visibility, weather, road, and traffic conditions permit.
 If you are having the front
brake pads checked, the rear brake pads should be checked at the same time.
Regularly check
the thickness of the brake pads visually by inspecting them through the openings
in the wheel rims or from underneath the
vehicle. If necessary, remove the wheels so that the brake pads can be
inspected. For further information, contact an
authorized Volkswagen dealer or authorized Volkswagen Service Facility.
Volkswagen recommends contacting an
authorized Volkswagen dealer or authorized Volkswagen Service Facility.
If you are having the front
brake pads checked, the rear brake pads should be checked at the same time.
Regularly check
the thickness of the brake pads visually by inspecting them through the openings
in the wheel rims or from underneath the
vehicle. If necessary, remove the wheels so that the brake pads can be
inspected. For further information, contact an
authorized Volkswagen dealer or authorized Volkswagen Service Facility.
Volkswagen recommends contacting an
authorized Volkswagen dealer or authorized Volkswagen Service Facility.
Troubleshooting
 Brake system malfunctioning
The red warning light turns on. A message may also be displayed.
1.
 Do not continue driving!
Contact an authorized Volkswagen dealer or authorized Volkswagen Service
Facility
immediately for assistance.
Do not continue driving!
Contact an authorized Volkswagen dealer or authorized Volkswagen Service
Facility
immediately for assistance.
 Brake pad wear indicator
The warning light flashes or turns on red or yellow.
The front brake pads are worn.
1. Immediately contact an authorized Volkswagen dealer or authorized Volkswagen Service Facility to have the system checked. Volkswagen recommends contacting an authorized Volkswagen dealer or authorized Volkswagen Service Facility.
2. Have all brake pads inspected and replaced, if necessary.
Braking Performance Reduced
If the brake pads are worn or if you notice that your vehicle does not brake as usual, e.g. the braking distance suddenly increases:
1. Immediately contact an authorized Volkswagen dealer or authorized Volkswagen Service Facility to have the system checked. Volkswagen recommends contacting an authorized Volkswagen dealer or authorized Volkswagen Service Facility.
2. Have all brake pads inspected and replaced, if necessary.
Start the engine
Remote start relay function
With the remote start relay function, the engine can be started remotely, in order to heat or cool the vehicle interior before the start of a journey.
The use of the remote start relay function may be regulated or prohibited regionally in some countries. Always observe legal and local regulations relating to the use of the remote start relay function.
Remote start relay conditions
The following conditions must be fulfilled simultaneously in order for the vehicle interior to be heated or cooled by the remote start relay function:
- The vehicle is fully ready to drive.
- The vehicle does not move.
- Sufficient fuel is available and the indicator light
 did not light up before the
vehicle was parked.
did not light up before the
vehicle was parked. - The parking lock
 is
engaged.
is
engaged. - All doors, the hood and the trunk lid are fully closed and locked.
- The anti-theft alarm system has not triggered the alarm.
- The panic alarm is not activated.
- The emergency flashers are switched off.
- Two remote starts have not yet been carried out in direct succession.
Starting the Remote Start Relay Function
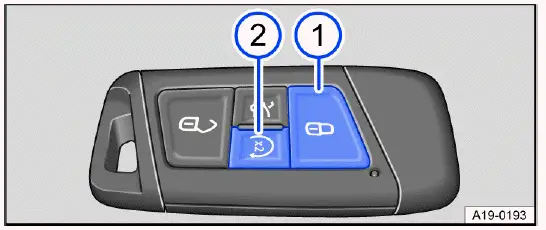
Fig. 91 On the remote control vehicle key: Button for remote start relay
function.
- Button to lock the vehicle.
- Button for remote start relay function.
You must press the following buttons on the vehicle key within five seconds
to start the engine using the remote start relay
function ⇒
 :
:
1. Press the button
 once fig.
91.
once fig.
91.
All turn signals will flash.
2. Press the
 button twice fig. 91.
All turn signals will flash. During remote start, the parking light turns on.
 For vehicles with Keyless
Access, all valid vehicle keys which are in the vehicle interior have been
blocked for this period
of time.
For vehicles with Keyless
Access, all valid vehicle keys which are in the vehicle interior have been
blocked for this period
of time.
If the remote start relay process is not actively canceled by the driver or automatically canceled, the engine will run for around 10 minutes. A maximum of two remote starts can be performed in a row, even if one or both remote starts have been interrupted within the 10 minute period.
1. In order to carry out two more remote starts, switch the ignition on and off once.
Ending the remote start relay
1. Press the
 button on the
remote control vehicle key to switch off the engine fig. 91.
button on the
remote control vehicle key to switch off the engine fig. 91.
Driving after a remote start relay
To be able to drive the vehicle after you have used the remote start relay function, you have to start the vehicle separately.
1. Vehicles with starter button: Press the brake pedal and the starter button.
The engine continues to run during this process.
Settings for automatic air conditioning with remote start relay
Climatronic: After the engine is started, the air conditioner automatically
regulates the temperature of the vehicle interior to
approx. +22 ºC (approx. +72 ºF) if it is in automatic mode
 .
.
Manual air conditioning system: After the engine is started, the air conditioner regulates the temperature of the vehicle interior to the most recently selected level.
If the engine has been started using the remote start relay function, the settings can be changed via the air conditioning system controls and the buttons for the windshield and rear window defroster, seat heating or ventilation, depending on the vehicle equipment.
Personal settings will be replaced by the automatic air conditioning settings the next time the vehicle is started using remote start relay.
1. To change the automatic air conditioning settings, contact a suitably qualified professional. Volkswagen recommends contacting an authorized Volkswagen dealer or authorized Volkswagen Service Facility.
Automatic remote start relay functions
Depending on the outside temperature and vehicle equipment, the following heating, ventilation and cooling system settings are automatically activated in the case of a remote start relay:
- Heated spray jets for windscreen washer system.
- Heated windshield wiper parks.
- Rear window defroster.
- Exterior mirror heating.
- Steering wheel heating.
- Front seat heating.
- Front seat ventilation.
WARNING
Careless or unsupervised use of the remote start relay function may cause poisonous gases to enter the vehicle interior.
This can cause serious injuries and death due to asphyxiation.
- Never start the engine in an enclosed space, e.g. in a garage.
- Only use the remote start relay function when no-one is in the vehicle and immediately before you intend to drive the vehicle.
WARNING
When the engine is running, the electrical seats are operational. There is a risk of crushing and serious injuries.
- Never start the engine if children or animals are in the vehicle unsupervised.
- Never start the engine if the vehicle is out of visual range.
WARNING
Hot vehicle parts and exhaust can ignite flammable or explosive materials in the vicinity. This can lead to a fire and cause accidents and serious or fatal injuries.
- Never start the engine close to flammable or explosive materials.
- Never start the engine if the vehicle is covered with a protective cover.
- Never start the engine if the vehicle is out of visual range.
- Never start the engine if the warning light
 is turned on or blinking.
 Using the remote start relay
function may increase fuel consumption and discharge the 12 V vehicle battery.
Using the remote start relay
function may increase fuel consumption and discharge the 12 V vehicle battery.
 During an active remote
start relay, some vehicle functions are deactivated, e.g. the low beam headlight and the windshield wipers.
During an active remote
start relay, some vehicle functions are deactivated, e.g. the low beam headlight and the windshield wipers.
Electronic immobilizer
The immobilizer helps prevent the engine from being started and the vehicle from being moved with an unauthorized vehicle key.
Vehicles with a Starter Button
In the remote control vehicle key, there is a chip used to automatically deactivate the electronic immobilizer when there is a valid remote control vehicle key in the vehicle interior.
The electronic immobilizer is automatically engaged as soon as the ignition is switched off ⇒ Starter button.
 You can only start the engine
with a suitably coded Volkswagen Original vehicle key. You can obtain coded
vehicle keys
from an authorized Volkswagen dealer or authorized Volkswagen Service Facility.
You can only start the engine
with a suitably coded Volkswagen Original vehicle key. You can obtain coded
vehicle keys
from an authorized Volkswagen dealer or authorized Volkswagen Service Facility.
Starter button
The starter button replaces the ignition lock (Press & Drive).
Start the engine with the starter button and by pressing the brake pedal.
The vehicle can only be activated when there is a valid vehicle key inside the vehicle.
Switching the ignition on or off
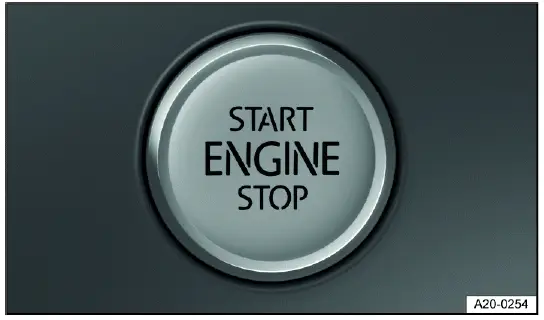
Fig. 92 In the lower section of the center console: starter button.
1. Press the starter button once without pressing the brake or clutch pedal ⇒
 .
.
Automatic ignition switch off
If the vehicle recognizes that the driver is absent when the internal combustion engine is switched off, the ignition is automatically switched off after a certain amount of time.
Engine restart function
If no valid remote control vehicle key is detected in the vehicle interior after the engine has been inadvertently switched off, the engine cannot be started within approximately five seconds.
Once this time has elapsed, the vehicle can no longer be started without a valid vehicle key inside the vehicle.
WARNING
If the brake pedal is pressed when switching on the ignition, the engine will start immediately. This can cause unintentional vehicle movement and serious injuries.
- Avoid pressing the brake pedal when switching on the ignition if the engine is not intended to be started.
WARNING
If you leave vehicle keys unattended in the vehicle, children or unauthorized people could lock the doors and/or the trunk lid, start the engine, or switch on the ignition and thereby activate electrical equipment, such as the power windows. This can cause accidents and serious or fatal injuries.
- Always take all vehicle keys with you when leaving the vehicle.
WARNING
If you leave children, people requiring assistance or animals unattended in the vehicle, they may accidentally set the vehicle in motion or be subjected to very high or low temperatures. There is a risk of accidents and serious or fatal injuries.
- Never leave children, people requiring assistance or animals unattended in the vehicle.
 Always switch the ignition
off manually before leaving the vehicle and note any messages in the instrument
cluster
display.
Always switch the ignition
off manually before leaving the vehicle and note any messages in the instrument
cluster
display.
 The vehicle being stationary
for long periods with the ignition switched on can cause the 12 V vehicle
battery to drain and
then it will not be possible to start the engine.
The vehicle being stationary
for long periods with the ignition switched on can cause the 12 V vehicle
battery to drain and
then it will not be possible to start the engine.
Start the engine
Start the engine
1. Switch the ignition on.
2. Press and hold the brake pedal until the electronic parking brake has been switched off.
3. Vehicles with an automatic transmission: Move the selector lever to the
 position or engage the
 parking lock.
4. Vehicles with starter button: Press and hold the starter button ⇒ Starter button and do not press the accelerator pedal.
For the engine to start, a valid vehicle key must be inside the vehicle and the brake must be pressed. Release the starter button once the engine starts.
5. If the engine does not start, stop the starting procedure and try again after approximately one minute.
6. Vehicles with starter button: If the vehicle was locked with the vehicle key, the starter button will be deactivated. If you are in the vehicle and you need to start the engine, first unlock the vehicle or perform an emergency start.
WARNING
Starting the engine in unventilated or enclosed spaces may cause poisonous gases to enter the vehicle interior. This can cause serious injuries and death due to asphyxiation.
- Never start the engine or let it run in unventilated or enclosed spaces, such as in garages.
WARNING
Hot vehicle parts and exhaust can ignite flammable or explosive materials in the vicinity. This can lead to fires and cause accidents and serious or fatal injuries.
- Never start the engine or leave the engine running if oil, fuel or other flammable operating equipment is in the vicinity of the vehicle or is escaping from the vehicle.
- Do not use any start boosters.
WARNING
An unattended vehicle which is ready to drive may cause accidents and severe injuries.
- Never leave the vehicle unattended when the engine is running, especially if a gear is engaged.
NOTICE
Incorrect handling of the vehicle can increase wear to components, such as the starter, or cause damage.
- If the engine does not start, e.g. the fuel tank is empty, never use the starter with a gear engaged to drive or to attempt a tow-start.
- If necessary, refill with fuel as per or use jump-start.
- If the engine does not start, contact an authorized Volkswagen dealer or authorized Volkswagen Service Facility.
NOTICE
Incorrect handling of the vehicle can increase wear to components, such as the engine, or cause damage.
- Avoid restarting the engine while driving or directly after turning off the engine.
- Avoid high engine speeds, full acceleration and heavy engine loads when the engine is cold.
- Be aware that at high altitudes, the air density is lower, which can make it more difficult to start the engine.
NOTICE
Uncombusted fuel can damage the catalytic converter.
- Do not tow-start or push-start the vehicle.
 Do not let the engine run to
warm up while the vehicle is parked. Begin driving as soon as there is enough
visibility
through the windows. This allows the engine to reach its operating temperature
sooner and reduces the emissions.
Do not let the engine run to
warm up while the vehicle is parked. Begin driving as soon as there is enough
visibility
through the windows. This allows the engine to reach its operating temperature
sooner and reduces the emissions.
 Electrical equipment with an
increased power draw is temporarily switched off when the engine is started.
Electrical equipment with an
increased power draw is temporarily switched off when the engine is started.
 If there is no vehicle key
in the vehicle or the key is not detected, a message will appear in the
instrument cluster display.
If there is no vehicle key
in the vehicle or the key is not detected, a message will appear in the
instrument cluster display.
This can occur if another signal interferes with the remote control vehicle key or if the remote control vehicle key is covered by an object, such as a metal case.
 If the vehicle key button
cell battery is low or drained, the engine cannot be started with the starter
button. Perform an
emergency start.
If the vehicle key button
cell battery is low or drained, the engine cannot be started with the starter
button. Perform an
emergency start.
 After starting, operating
noises may be temporarily higher than usual while the engine is cold. This is
normal and not a
cause for concern.
After starting, operating
noises may be temporarily higher than usual while the engine is cold. This is
normal and not a
cause for concern.
Troubleshooting
 Engine control malfunction
The yellow indicator light turns on.
Engine control is malfunctioning.
1. Pay attention to any text shown in the Volkswagen Digital Cockpit display.
2. Have the engine checked immediately by a suitably qualified professional. Volkswagen recommends contacting an authorized Volkswagen dealer or authorized Volkswagen Service Facility.
 Engine control malfunction
The indicator light comes on in the Volkswagen Digital Cockpit.
The yellow indicator light turns on.
The driving performance of the vehicle is limited.
The driving performance has been limited to prevent the engine control components from overheating.
- A corresponding indicator may appear in the instrument cluster display.
- It is possible to continue driving with reduced driving performance.
The driving performance limitation is removed in the following scenarios:
- The engine control components are no longer within a critical temperature range.
 Engine speed limited
The yellow indicator light turns on.
The engine speed has been limited to reduce the risk of the engine overheating.
The instrument cluster display shows the engine speed.
The engine speed limitation is removed in the following scenarios:
- The engine is no longer within a critical temperature range.
- The driver's foot is removed from the accelerator pedal.
 together with
 Engine speed limitation due to
engine control malfunction
Engine speed limitation due to
engine control malfunction
The yellow indicator lights turn on.
The engine speed limitation is triggered by an engine control malfunction.
1. Make sure the displayed RPM is not exceeded.
2. Have the engine checked immediately by a suitably qualified professional. Volkswagen recommends contacting an authorized Volkswagen dealer or authorized Volkswagen Service Facility.
Valid vehicle key cannot be detected
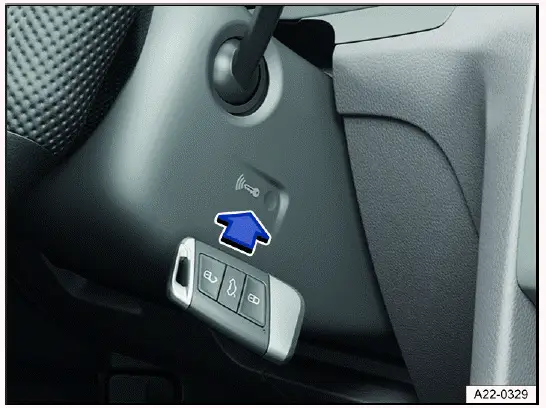
Fig. 93 On the right side of the steering column: emergency start function on
vehicles with Keyless Access with push-button
start.
A corresponding indicator appears in the instrument cluster display.
If the vehicle key has a weak or drained button cell battery, the vehicle key may not be able to be detected.
An emergency start must be performed:
1. Press and hold the brake pedal.
2. Hold the vehicle key on the right side of the steering column trim panel immediately after pressing the starter button fig. 93.
The ignition will switch on automatically and the engine may start.
The engine cannot be started
If an unauthorized vehicle key is used or the system is malfunctioning, a corresponding indicator appears in the instrument cluster display.
1. Use an authorized vehicle key.
2. If the malfunction persists, contact an authorized Volkswagen dealer or authorized Volkswagen Service Facility.
The engine cannot be started
The engine cannot be started by briefly pressing the starter button while activating the brake pedal or the clutch pedal.
There is a malfunction in the start system.
1. Press the starter button until the engine starts.
2. Contact an authorized Volkswagen dealer or authorized Volkswagen Service Facility for assistance.
The engine cannot be started remotely
If at least one of the following conditions are met, the engine remote start function does not start or the engine switches off when it was running:
- The vehicle is unlocked.
- The hood or the trunk lid is opened.
- The selector lever is not in position
 ⇒ Selector lever.
 - The brake or accelerator pedal is pressed.
- During the remote start the fuel level sinks to the reserve amount.
- If the 12-volt vehicle battery is too weak or discharged.
- The switch for the hazard warning lights is pressed.
Stopping the engine
Stopping the engine
1. Bringing the vehicle to a stop ⇒
 .
.
2. Park the vehicle.
3. Press the starter button briefly. If the engine cannot be turned off, use the emergency stop function.
4. Pay attention to the messages in the instrument cluster.
WARNING
When the engine is switched off, certain vehicle systems do not work or only work in a limited way, such as the brake booster or power steering. As a result, you must use more force for steering and you must apply more pressure on the brake pedal to stop. When the vehicle is moving, this can result in loss of control of the vehicle, accidents and serious or fatal injuries.
- Never switch off the engine while the vehicle is in motion.
WARNING
When the engine is switched off, the airbags and safety belt pretensioners will not function. This can cause serious or fatal injuries in the event of accidents.
- Never switch off the engine while the vehicle is in motion.
WARNING
The parts of the exhaust system become very hot and can ignite flammable materials, for example shrubs, leaves, dry grass or spilled fuel. This can lead to a fire and cause accidents and serious or fatal injuries.
- Never park the vehicle in such a way so that the exhaust system components come into contact with flammable materials under the vehicle.
- Never use additional undercoating or corrosion protection for exhaust pipes, catalytic converters, heat shields, or particulate filters.
WARNING
If you leave vehicle keys unattended in the vehicle, children or unauthorized people could lock the doors and/or the trunk lid, activate drive-ready mode and thereby activate electrical equipment, such as the power windows. This can cause accidents and serious or fatal injuries.
- Always take all vehicle keys with you if you are leaving the vehicle.
WARNING
If you leave children, people requiring assistance or animals unattended in the vehicle, they may accidentally set the vehicle in motion or be subjected to very high or low temperatures. There is a risk of accidents and serious or fatal injuries.
- Never leave children, people requiring assistance or animals unattended in the vehicle.
NOTICE
The engine can overheat after turning it off if the vehicle is driven with a high engine load for a long period of time.
- Let the engine run in neutral for approximately two minutes before turning it off.
 The radiator fan in the
engine compartment may continue running for several minutes after turning the
engine off, even if
the ignition is switched off. The radiator fan turns off automatically.
The radiator fan in the
engine compartment may continue running for several minutes after turning the
engine off, even if
the ignition is switched off. The radiator fan turns off automatically.
Troubleshooting
The engine cannot be turned off
The engine cannot be turned off when the starter button is pressed briefly.
An emergency stop must be performed:
1. Press the starter button twice within several seconds or press and hold one time.
The engine switches off automatically ⇒ Starter button.
Start/Stop system
Start-stop system
Function description
The start-stop system automatically switches the engine off shortly before and when the vehicle comes to a halt and when stationary.
The engine always restarts automatically when required for the vehicle and the identified situation.
The function is automatically activated every time the ignition is switched on.
Indicator lights
Information about the current status is shown in the instrument cluster display.
When indicator light
 comes on, the
start-stop system is available and the automatic engine stop is active.
comes on, the
start-stop system is available and the automatic engine stop is active.
If the
 indicator light is lit, the
start-stop system is not available or the start-stop system has automatically
started the
engine.
indicator light is lit, the
start-stop system is not available or the start-stop system has automatically
started the
engine.
Conditions for Automatically Restarting the Engine
- Vehicles with an automatic transmission: If you take your foot off the brake pedal or you press the accelerator pedal.
- Vehicles with manual transmission: if the clutch is operated.
- If the vehicle interior heats up or cools down significantly.
- If the vehicle starts to move.
- If the electrical voltage in the 12-volt vehicle battery falls.
- If the steering wheel is moved.
Conditions that Can Prevent Automatic Engine Shutdown
- The driver is not wearing their safety belt.
- The driver door is opened.
- The engine hood is open.
- A minimum engine temperature has not been reached.
- Vehicles with Climatronic: The temperature in the vehicle interior is not within the preset temperature values or the humidity is too high.
- The air conditioner's defrost function is switched on.
- The charge level of the 12 V vehicle battery is insufficient.
- The temperature of the 12 V vehicle battery is too low or too high.
- The vehicle is on a large uphill or downhill gradient.
- The steering wheel is significantly turned.
- The reverse gear is engaged.
If the conditions for automatic engine switch-off are only achieved during a stationary phase, then the engine may also switch off at this point, e.g. if the defrost function is switched off.
Manually deactivating and activating the start-stop system
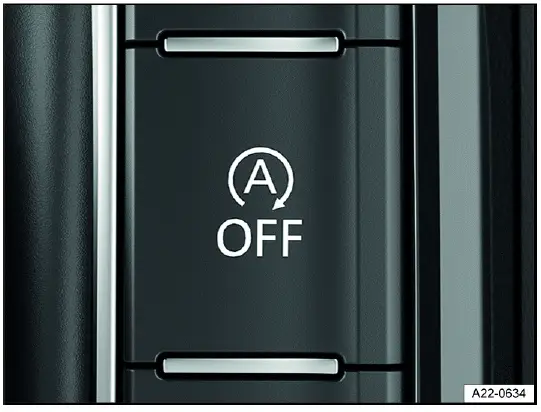
Fig. 94 In the lower section of the center console or, depending on the
vehicle equipment, in the Infotainment system: Button
for the start-stop system.
Manually deactivating the start-stop system:
1. Press the
 button in the
center console. When the start-stop system is deactivated, the indicator light
on the button
comes on fig. 94.
button in the
center console. When the start-stop system is deactivated, the indicator light
on the button
comes on fig. 94.
 Always manually deactivate
the start-stop system when driving through water.
Always manually deactivate
the start-stop system when driving through water.
Manually activating the start-stop system:
1. Press the
 button in the
center console again fig. 94.
button in the
center console again fig. 94.
Each time you press the
 button, the
instrument cluster display will show the status of the start-stop system.
button, the
instrument cluster display will show the status of the start-stop system.
If the start-stop system has switched the engine off, it restarts as soon as the
system is deactivated by pressing the
 button.
 In some cases, you may need to
restart the engine manually, e.g. if the hood or the driver door is opened. Pay
attention to
the relevant message on the instrument cluster display ⇒
In some cases, you may need to
restart the engine manually, e.g. if the hood or the driver door is opened. Pay
attention to
the relevant message on the instrument cluster display ⇒
 .
.
Start/stop mode with Adaptive Cruise Control (ACC)
After an active brake intervention by the Adaptive Cruise Control (ACC ), the engine is switched off until the vehicle is stationary.
In the following cases, if the ACC is active, the engine is restarted:
- The accelerator pedal is pressed.
- If ACC has resumed the speed and distance control.
- The vehicle in front has moved on.
The engine is restarted if the Adaptive Cruise Control (ACC) is deactivated and the vehicle in front has moved on.
 If the temperature is above
approx. 38 ºC (100 ºF), the engine stop function may be automatically
deactivated.
If the temperature is above
approx. 38 ºC (100 ºF), the engine stop function may be automatically
deactivated.
 For case of vehicles with
Driving Mode Selection, the start-stop system is automatically activated if the
Eco driving mode is
selected.
For case of vehicles with
Driving Mode Selection, the start-stop system is automatically activated if the
Eco driving mode is
selected.
WARNING
If the start-stop system is activated during work in the engine compartment, the motor may start suddenly. This can cause accidents and serious injuries.
- Always deactivate the start-stop system when working in the engine compartment.
WARNING
When the engine is switched off, certain vehicle systems do not work or only work in a limited way, such as the brake booster or power steering. As a result, you must use more force for steering and you must apply more pressure on the brake pedal to stop. When the vehicle is moving, this can result in loss of control of the vehicle, accidents and serious or fatal injuries.
- Never switch off the engine while the vehicle is in motion.
WARNING
When the engine is switched off, the airbags and safety belt pretensioners will not function. This can cause serious or fatal injuries in the event of accidents.
- Never switch off the engine while the vehicle is in motion.
WARNING
If the ignition is switched off, the steering lock can engage and you would no longer be able to steer the vehicle. When the vehicle is moving, this can result in loss of control of the vehicle, accidents, and serious or fatal injuries.
- Never switch off the ignition when the vehicle is in motion.
NOTICE
If the start-stop system is used for a very long period of time at very high outside temperatures, this can damage the 12- volt vehicle battery.
- Avoid using the start-stop system at very high outside temperatures.
Troubleshooting
The engine does not start automatically
1. Start the engine manually ⇒ Start the engine.
2. Manually deactivate the start-stop system ⇒ Start-stop system.
3. Contact an authorized Volkswagen dealer or authorized Volkswagen Service Facility to have the system inspected.
Volkswagen recommends contacting an authorized Volkswagen dealer or authorized Volkswagen Service Facility.
Automatic transmission
Selector lever
When the ignition is switched on, the engaged selector lever position is shown in the instrument cluster display.
Selecting a selector lever position
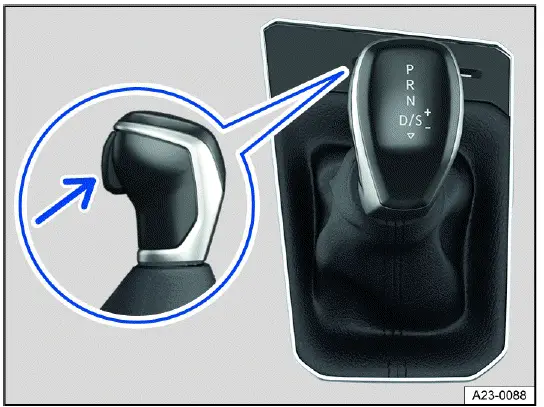
Fig. 95 In the center console: selector lever of the automatic transmission
(general example).
To change into gear from neutral position
 , proceed as follows:
1. Start the engine.
2. Press the brake pedal.
3. Push the selector lever into the desired selector lever position fig. 95.
Description of the selector lever positions
 The drive gears are locked.
Only select this gear when the vehicle is stationary.
The drive gears are locked.
Only select this gear when the vehicle is stationary.
To move the selector lever out of this position when the ignition is switched on, press the brake pedal and press the lock button on the selector lever.
 Reverse gear is selected. Only
select this gear when the vehicle is stationary.
Reverse gear is selected. Only
select this gear when the vehicle is stationary.
 The transmission is in the neutral
setting. No
power is transferred to the wheels and the engine braking effect is not
available.
The transmission is in the neutral
setting. No
power is transferred to the wheels and the engine braking effect is not
available.
 gear: normal program.
The transmission upshifts and downshifts automatically when in the forward driving gears. The shifting time depends on the engine load, the personal driving style, and the driving speed.
 gear: sport program.
The forward gears automatically upshift later and downshift earlier than in
 gear in order to fully utilize the
engine power
reserves. The shifting time depends on the engine load, the personal driving
style, and the driving speed.
gear in order to fully utilize the
engine power
reserves. The shifting time depends on the engine load, the personal driving
style, and the driving speed.
To switch between gears
 and
and
 , tap the selector lever toward the
rear
, tap the selector lever toward the
rear
 .
.
The selector lever will always spring back to the selector lever position
 . This also applies when in the
tiptronic shift gate
⇒ Shifting using tiptronic.
. This also applies when in the
tiptronic shift gate
⇒ Shifting using tiptronic.
Selector lever lock
The selector lever lock prevents you from selecting a gear accidentally when
in the
 or
or
 position, causing the vehicle to
roll.
position, causing the vehicle to
roll.
To release the selector lever lock, switch the ignition on and press the brake pedal. Then press the lock button on the selector lever handle fig. 95 (arrow).
When skipping past the
 position, for example by switching from reverse gear to
 , the selector lever is not locked.
This
makes it possible to free the vehicle when it is stuck by "rocking" it. If the
lever remains in the
, the selector lever is not locked.
This
makes it possible to free the vehicle when it is stuck by "rocking" it. If the
lever remains in the
 position for
more than approx.
position for
more than approx.
1 second when the vehicle is traveling at a speed lower than approx. 5 km/h
(approx. 3 mph) and the brake pedal has not
been pressed, the selector lever lock will engage ⇒
 .
.
WARNING
If the brake pedal is released while the engine is running and gear
 or
or
 is engaged, the vehicle will start
moving. This
can cause unintentional vehicle movement and accidents and serious injuries.
is engaged, the vehicle will start
moving. This
can cause unintentional vehicle movement and accidents and serious injuries.
- When the engine is running and the
 or
or
 gear is engaged, hold the
vehicle with the brake pedal.
gear is engaged, hold the
vehicle with the brake pedal. - As the driver, never leave the driver seat when the engine is running and a gear is engaged.
- If you have to leave the vehicle while the engine is running, always
set the electronic parking brake and move the
selector lever to the
 position.
WARNING
Engaging the incorrect gear can cause you to lose control of the vehicle, which could lead to accidents and serious injuries.
- Never press the accelerator pedal when engaging a gear.
- Never shift into reverse gear
 or engage the parking lock
 while the vehicle is moving.
WARNING
If the vehicle is left in selector lever position
 on inclines, the vehicle will roll
downhill even if the engine is switched on.
on inclines, the vehicle will roll
downhill even if the engine is switched on.
- This can cause accidents and serious injuries.
- Never leave the vehicle in selector lever position
 .
.
NOTICE
If the electronic parking brake is not switched on while the vehicle is
stationary and the brake pedal is released while the
parking lock
 is engaged, the
vehicle may move forward or backward a few centimeters. This can cause damage to
the
vehicle.
is engaged, the
vehicle may move forward or backward a few centimeters. This can cause damage to
the
vehicle.
- Always set the electronic parking brake first before releasing the brake pedal.
 If is engaged by mistake
while driving, take your foot off the accelerator pedal. Wait until the engine
is at idle speed in
neutral before shifting into a drive gear.
If is engaged by mistake
while driving, take your foot off the accelerator pedal. Wait until the engine
is at idle speed in
neutral before shifting into a drive gear.
 If the selector lever is
left for a long period of time in any position other than in the parking lock
If the selector lever is
left for a long period of time in any position other than in the parking lock
 when the engine is
switched off, the 12 V vehicle battery will drain.
when the engine is
switched off, the 12 V vehicle battery will drain.
Shifting using tiptronic
The tiptronic mode allows you to shift gears manually on an automatic transmission.
When shifting in the tiptronic program, the gear currently engaged is maintained. This applies until the system shifts gears automatically due to the current driving situation.
Using tiptronic with the selector lever
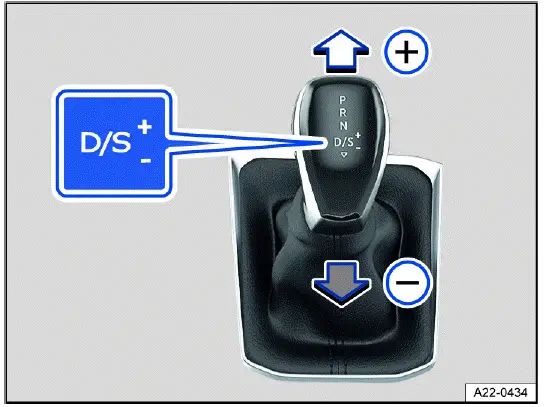
Fig. 96 In the center console: selector lever in the tiptronic position.
1. Push the selector lever to the right out of the
 selector lever position and into
the tiptronic shift gate.
selector lever position and into
the tiptronic shift gate.
2. Tap the selector lever forward
 or to the rear
 to upshift or
downshift fig. 96.
to upshift or
downshift fig. 96.
The lock button on the selector lever must not be pressed when tapping the selector lever within the tiptronic shift gate.
Operating Tiptronic with the shift paddles
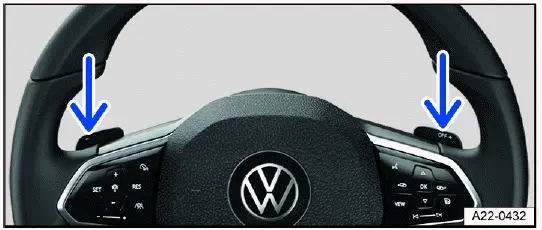
Fig. 97 Behind the steering wheel: shift paddles for the tiptronic.
1. Pull the right shift paddle toward the steering wheel to shift up fig. 97.
2. Pull the left shift paddle toward the steering wheel to shift down.
3. Pull the right shift paddle toward the steering wheel for about a second to leave the tiptronic program.
The Tiptronic program ends automatically if you do not operate the shift paddles for some time and the selector lever is not in the Tiptronic gate.
 When accelerating, the
transmission automatically upshifts to the next gear shortly before the maximum
permissible
engine RPM is reached.
When accelerating, the
transmission automatically upshifts to the next gear shortly before the maximum
permissible
engine RPM is reached.
 When downshifting manually,
the transmission only shifts if it is no longer possible to over-rev the engine.
When downshifting manually,
the transmission only shifts if it is no longer possible to over-rev the engine.
Driving with an automatic transmission
The transmission shifts up and down automatically when in the forward driving gears.
Driving on an incline
The steeper the incline, the lower the gear that you should select. Lower
gears increase the engine braking effect. Never let
the vehicle roll down mountains or hills in the
 neutral setting.
1. Reduce your speed.
2. Push the selector lever to the right out of the
 selector lever position and into
the tiptronic shift gate.
selector lever position and into
the tiptronic shift gate.
3. Tap the selector lever back to downshift.
Or: Downshift using the shift paddles on the steering wheel.
Stopping and starting to drive uphill
The steeper the hill, the lower the gear that you should select.
If you stop on a hill with a gear selected, always press the brake pedal or set
the electronic parking brake to prevent the
vehicle from rolling away. Only release the brake pedal or the electronic
parking brake once you start driving ⇒
 .
.
Coasting with a DSG automated transmission
When coasting, the vehicle's momentum is used to save fuel with predictive
driving. The engine does not slow down the
vehicle, so it can roll for a longer period. The function is only available in
selector lever position
 and within
a speed range
of approx. 40 to 130 km/h (25 mph to 80 mph).
and within
a speed range
of approx. 40 to 130 km/h (25 mph to 80 mph).
If the brake is engaged while rolling, the engine will remain switched off until the vehicle comes to a complete stop.
When rolling without braking, the engine starts again automatically when the vehicle reaches "creeping pace".
The engine may restart automatically to ensure the engine restarts safely and there is a secure supply of electricity to the vehicle electrical system.
Triggering the coasting feature
1. In the driving mode selection, select the Eco driving mode.
2. Take your foot off the accelerator. The engine is disengaged and in neutral. The vehicle is rolling without any engine braking effect.
Cancelling coasting
1. Press the brake pedal firmly.
Or: Press the accelerator pedal or brake pedal briefly.
Or: Pull a shift paddle towards the steering wheel.
Or: Push the selector lever into the tiptronic position.
Or: Change driving modes from Eco.
Kick-down
The kick-down function makes maximum acceleration possible in selector lever
position
 or in the tiptronic
position.
or in the tiptronic
position.
When you press the accelerator pedal all the way down, the automatic
transmission downshifts into a lower gear, depending
on the vehicle speed and engine RPM. This utilizes the full acceleration power
of the vehicle ⇒
 .
.
With the kick-down function, the automatic upshift to the next gear only occurs if the maximum predefined engine RPM is reached.
For vehicles with driving mode selection, if the Eco driving mode is selected and the accelerator pedal is fully depressed past the pressure point, the engine power is controlled automatically so that the vehicle achieves maximum acceleration.
Launch Control Program
Depending on the vehicle equipment, vehicles with automatic transmission have a Launch Control Program. The Launch Control Program provide maximum acceleration from a standstill.
1. Switch off ASR.
2. Use your left foot to press down on the brake pedal and hold it.
3. Move the selector lever to selector lever position
 in gear
 or to the tiptronic position.
Or: on vehicles with Driving Mode Selection, select the Sport or Race driving mode.
4. Use your right foot to press the accelerator pedal until an engine speed of approx. 3200 rpm is reached.
5. Take your left foot off the brake ⇒
 . The vehicle starts with maximum
acceleration.
. The vehicle starts with maximum
acceleration.
6. Reactivate ASR after acceleration.
WARNING
Fast acceleration or switching off the ASR can cause traction loss and sliding. This could cause loss of vehicle control, accidents, and serious or fatal injuries, especially on slippery roads, such as on wet, icy or dirty roads.
- Always adapt your driving style to the flow of traffic.
- Only use the kick-down function, Launch Control Program or accelerate quickly when the visibility, weather, road, and traffic conditions allow it, and when other road users will not be endangered by the vehicle's acceleration and driving style.
- Switch the ASR back on after acceleration.
WARNING
Prolonged braking causes the brakes to overheat. This can considerably reduce braking performance, considerably increase braking distance and possibly lead to a total brake system malfunction. Accidents and serious or fatal injuries could result.
- Never let the brakes "rub" too often and too long or press the brake pedal too often and too long.
NOTICE
If the vehicle rolls with the engine switched off, the transmission is not lubricated. This can cause the automatic transmission to overheat and can damage it.
- If you stop on inclines when a gear is engaged, do not press the accelerator pedal to prevent the vehicle from rolling away.
- Never let the vehicle roll in the
 selector lever position,
especially when the engine is stopped.
selector lever position,
especially when the engine is stopped.
NOTICE
Vehicles with the Launch Control Program: All vehicle components are put under intense strain when accelerating with the Launch Control Program. This can cause increased wear.
- Only use this function if the vehicle is at operating temperature.
NOTICE
If the brake pads "rub" when the brake pedal is pressed lightly, wear is increased.
- Never let the brakes "rub" by pressing the pedal lightly when braking is not really necessary.
Troubleshooting
 The engine is not starting
The green indicator light turns on.
The brake pedal was not pressed, for example when trying to shift to another gear using the selector lever.
1. Press the brake pedal to select a gear.
 Driving is restricted by the
lock button
Driving is restricted by the
lock button
The green indicator light blinks.
The lock button in the selector lever is not engaged.
1. Check if the lock button is locked.
2. Lock the lock button into place if necessary.
 Driving is restricted by the
selector lever lock
Driving is restricted by the
selector lever lock
The green indicator light blinks. A message is also displayed.
In rare cases, the Automatic Shift Lock (ASL) may not lock in vehicles with a DSG automated transmission.
The engine will then be disabled to prevent the vehicle from going into motion unintentionally.
1. Press and release the brake pedal again.
 Transmission overheating
The yellow indicator light turns on.
An audible warning may also sound. Where applicable, a message will appear in the instrument cluster display.
The DSG automated transmission can become too hot, for example due to frequently starting up on slopes.
1. At the next opportunity, stop and let the transmission cool down with the
parking lock
 engaged and the
engine running
⇒
engaged and the
engine running
⇒
 .
.
2. If the indicator light does not turn off, do not continue driving.
3. Contact an authorized Volkswagen dealer or authorized Volkswagen Service Facility for assistance. Otherwise, the transmission could become severely damaged.
 Transmission overheating
The red warning light turns on.
An audible warning may also sound. Where applicable, a message will appear in the instrument cluster display.
The DSG automated transmission can become too hot, for example due to frequently starting up on slopes.
 Do not continue driving!
1. Let the transmission cool down with the parking lock
 engaged and the engine running ⇒
 .
.
2. If the warning light stays on, stop driving.
3. Contact an authorized Volkswagen dealer or authorized Volkswagen Service Facility for assistance. Otherwise, the transmission could become severely damaged.
Selector lever lock emergency release
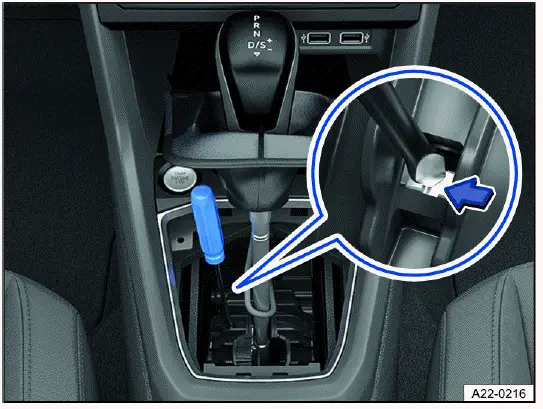
Fig. 98 In the center console: manually release the Automatic Shift Lock (ASL)
(variant 1).
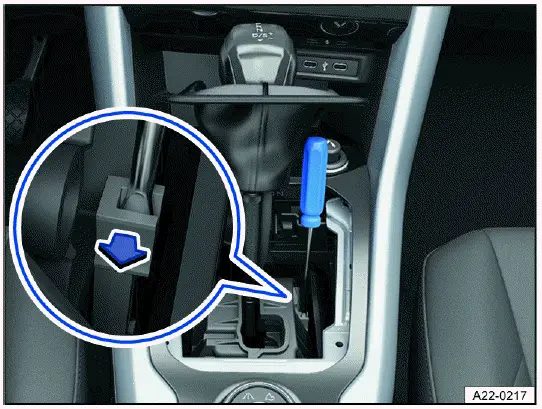
Fig. 99 In the center console: manually release the Automatic Shift Lock (ASL)
(variant 2).
If there is a loss of power, for example due to the 12 V vehicle battery being drained, and the vehicle should be towed, then the selector lever lock must be released manually. Contact an authorized Volkswagen dealer or authorized Volkswagen Service Facility for assistance.
The emergency release is located under the shift gate cover.
Remove the cover on the shift gate:
1. Set the electronic parking brake. If you cannot set the electronic parking brake, the vehicle must be secured another way to prevent it from rolling.
2. Switch the ignition off.
3. Pull the cover near the selector lever boot upward carefully with the wires connected fig. 98 or fig. 99.
4. Fold the cover upward over the selector lever.
Manually release the selector lever lock:
1. Press the release lever in the direction of the fig. 98 or fig. 99 arrow and hold in this position.
2. Press the lock button forward into the selector lever handle and move the
selector lever to the
 position.
3. After releasing the cover manually, carefully press into the center console while making sure the wires are in the correct position.
Emergency program
If all of the selector lever position displays have a gray background on the instrument cluster display, this means there is a system malfunction. The DSG automated transmission runs in emergency mode. The vehicle can still be driven in emergency mode, but only at a reduced speed and not in all gears.
With the DSG automated transmission, it may no longer be possible to drive in reverse gear in some cases.
In all cases, have the DSG automated transmission checked immediately by suitably qualified professionals. Volkswagen recommends contacting an authorized Volkswagen dealer or authorized Volkswagen Service Facility.
Vehicle is not moving even when a drive gear is engaged
If the vehicle does not move in the desired direction, the system may not have engaged the drive position correctly.
1. Press the brake pedal and select the drive position again.
2. If the vehicle still does not move in the desired direction, there is a system malfunction. See an authorized Volkswagen dealer or authorized Volkswagen Service Facility for assistance to have the system checked.
WARNING
If the parking lock
 is
released and the electronic parking brake is switched off, the vehicle may start
to move
unexpectedly on inclines or hills. This can cause accidents and serious
injuries.
is
released and the electronic parking brake is switched off, the vehicle may start
to move
unexpectedly on inclines or hills. This can cause accidents and serious
injuries.
- Never release the parking lock
 once the electronic parking
brake is switched off.
once the electronic parking
brake is switched off.
NOTICE
If the vehicle rolls with the engine off and the selector lever in
position
 for a long period of time
or at high speed, the
DSG automated transmission will be damaged.
for a long period of time
or at high speed, the
DSG automated transmission will be damaged.
- Do not allow the vehicle to roll for a long period of time or at high
speed with the engine off and in the
 gear, e.g. in
the case of towing.
gear, e.g. in
the case of towing.
NOTICE
If the transmission gets too hot or overheats, this may lead to increased wear or damage to the component.
- Drive faster than approx. 20 km/h (approx. 12 mph) or immediately stop the vehicle safely the first time the vehicle indicates that the transmission is overheating.
- Stop the vehicle safely as soon as possible and switch off the engine if the message and audible warning are repeating approximately every 10 seconds.
- Let the transmission cool down.
- Only start driving again when the audible warning is no longer sounding.
- Avoid starting the vehicle and driving slowly, like at walking speed, while the transmission is overheated.
Driving on slopes
Hill start assist
Hill start assist helps when starting to drive uphill by actively holding the vehicle in place.
Functional requirements
The following requirements must be met at the same time:
- The vehicle must be stationary and held with the brake pedal until you start driving.
- The engine must be running "evenly".
- A gear or a position is engaged for driving uphill.
To start driving, take your foot off the brake pedal and press the accelerator pedal immediately. The brakes will release gradually as you start driving.
 The holding function of the
Hill Start Assist remains active only for a short time. Drive off within approx.
two seconds.
The holding function of the
Hill Start Assist remains active only for a short time. Drive off within approx.
two seconds.
When is it active?
Hill Start Assist is immediately deactivated if one of the conditions specified below in is no longer met:
- The driver's door is opened.
- If the engine is running "unevenly" or in the event of an engine fault.
- The engine is switched off or it stalls.
- The selector lever is in the neutral position
 .
.
CAUTION
If you do not pull away immediately after releasing the brake pedal, the vehicle may roll backward under certain circumstances. This can cause injuries or damage to objects.
- If this is the case, press the brake pedal or set the electronic parking brake immediately.
- Press the brake pedal for a few seconds before you start to drive if you are driving on an incline in heavy traffic and you would like to prevent the vehicle from rolling backwards when starting to drive.
Downhill speed control
Downhill speed control helps the driver when traveling on slopes.
System function
The DSG automated transmission selects the optimum gear itself, depending on the present gradient and current speed.
The selector lever must be in the
 selector lever position.
Downhill speed control is not active in Tiptronic mode.
selector lever position.
Downhill speed control is not active in Tiptronic mode.
As the downhill speed control can only downshift as far as third gear, you may need to switch to Tiptronic mode on very steep downhill stretches. In Tiptronic mode, manually shift into second or first gear to use the engine's braking efficiency and reduce the load on the brakes.
While downhill speed control is active, the start-stop system is automatically deactivated.
Automatically activating downhill speed control
- If the gradient is greater than approximately 6%.
- And: if the selector lever is in the
 selector lever
position.
selector lever
position. - In addition, if the cruise control system (CCS ) is switched off: if the
speed is slower than approx. 80 km/h (approx.
50 mph).
Or: The brake is pressed.
- If the cruise control system (CCS) is also active: if the saved speed is exceeded.
- In addition, if Adaptive Cruise Control (ACC) is switched off: if the
speed is slower than approx. 80 km/h (approx.
50 mph).
Or: The brake is pressed.
- If the Adaptive Cruise Control (ACC) is also active: if the saved speed is exceeded.
Downhill speed control deactivates automatically
- When the gradient decreases.
- If the transmission upshifts because the engine speed is greater than approximately 4500 rpm.
- If the cruise control system (CCS) is also active: if the saved speed can be maintained.
- If the Adaptive Cruise Control (ACC) is also active: if the saved speed can be maintained.
WARNING
The downhill speed control is not a replacement for the driver's attention and works only within the system limitations. The downhill speed control cannot detect all driving situations and may not react, or may react with a delay, or may react in a way that is not desired. If you are careless, there is a risk of accidents due to unintentional vehicle movement. This can cause serious or fatal injuries.
- Always stay attentive and do not rely solely on the system. The driver is always responsible for control of the vehicle.
- Be aware that the downhill speed control cannot hold the vehicle on the incline or brake sufficiently going downhill in every situation, for example if the ground is slippery or icy.
- Always be ready to brake, in particular if the ground is slippery or icy.
- Manually brake the vehicle if the vehicle moves faster despite downhill speed control.
- Always adapt your speed and driving style to the visibility, weather, road and traffic conditions.
Hill Descent Control
Hill Descent Control helps the driver when traveling on slopes.
System function
Hill descent control maintains the speed on all four wheels when driving forward or in reverse on steep inclines through automatic braking interventions. The wheels will not lock up because the Anti-Lock Brake System (ABS) remains active.
When starting to drive downhill at speeds less then 30 km/h (approx. 19 mph), the speed is limited to minimum 2 km/h (approx. 1 mph) and maximum 30 km/h (approx. 19 mph). The driver can increase or decrease the vehicle speed within these speed limits by pressing the accelerator or brake pedal.
However, there must be enough traction. Hill descent control cannot function as expected, if for example the hill is icy or if the surface is greasy.
Displays
Depending on the driving situation, one of the following indicator lights will light up in the instrument cluster:
 Hill
Descent Control is active.
Hill
Descent Control is active.
 Hill Descent Control is not active.
 If hill
descent control is not active, the indicator light turns gray. The system is
activated, but it is not regulating.
If hill
descent control is not active, the indicator light turns gray. The system is
activated, but it is not regulating.
When is it active?
Hill descent control is automatically activated under the following conditions:
The vehicle engine must be running.
The speed must be less than 30 km/h (approx. 19 mph), the
 indicator light appears in
the instrument cluster display.
indicator light appears in
the instrument cluster display.
The gradient must be at least 10%.
The brake pedal or accelerator pedal must not be pressed.
Hill Descent Control is deactivated if the speed is higher than 30 km/h (approx. 19 mph), when the brake pedal or accelerator pedal is pressed, or the gradient is less than 5%.
WARNING
Hill Descent Control is not a replacement for the driver's attention and works only within the system limitations. Hill Descent Control cannot detect all driving situations and may not react, or may react with a delay, or may react in a way that is not desired. If you are careless, there is a risk of accidents due to unintentional vehicle movement. This can cause serious or fatal injuries.
- Always stay attentive and do not rely solely on the system. The driver is always responsible for control of the vehicle.
- Be aware that Hill Descent Control cannot hold the vehicle on the incline or brake sufficiently going downhill in every situation, for example if the ground is slippery or icy.
- Always be ready to brake, in particular if the ground is slippery or icy.
- Manually brake the vehicle if the vehicle moves faster despite Hill Descent Control.
- Always adapt your speed and driving style to the visibility, weather, road and traffic conditions.
Driving Mode Selection and 4MOTION Active Control
Introduction
Via the driving modes, the driver can adapt various properties of vehicle systems to the current driving situation, the desired driving comfort, and for an economic driving style. The suspension, steering, drive, and the air conditioner are some of the vehicle systems that can be adjusted.
Different driving modes are available depending on the vehicle equipment. The influence of vehicle systems on the individual driving modes depends on the vehicle equipment.
Differentiation according to the type of drive
Only vehicles with all-wheel drive can be equipped with 4MOTION Active Control.
Selecting the driving mode
The driving mode can be selected when the ignition is switched on and the vehicle is stationary or while driving.
WARNING
Adjusting driving modes while driving can distract from traffic. This can cause accidents and serious or fatal injuries.
- Always drive attentively and responsibly.
If you select a driving mode while driving, the vehicle systems, except for Drive, will be switched over to the new driving mode immediately.
1. When the traffic situation allows it, briefly take your foot off the accelerator pedal to enable the newly selected driving mode to be applied to the Drive vehicle system as well.
Selecting the driving mode via the rotary switch
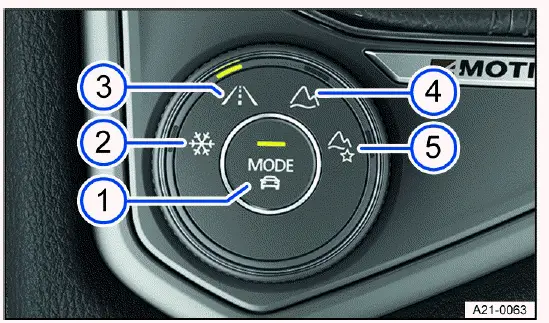
Fig. 100 In the center armrest: 4MOTION Active Control rotary switch.
- MODE button: select onroad driving modes and open the menu in the Infotainment system.
- Snow driving mode
- Onroad driving mode
- Offroad driving mode
- Offroad Custom driving mode
1. Turn the dial until the LED next to the preferred driving mode comes on fig. 100.
2. To switch to the onroad driving modes, press the
 button on the dial fig. 100
1 or tap Onroad driving mode in the
Infotainment system.
button on the dial fig. 100
1 or tap Onroad driving mode in the
Infotainment system.
Displaying information about the driving mode
1. To display additional information about the selected driving mode, tap
 in the Infotainment system.
Selecting the Custom driving mode
1. Press the
 on the dial or turn the dial until the LED next to the Onroad driving
mode comes on.
on the dial or turn the dial until the LED next to the Onroad driving
mode comes on.
2. To open the Custom menu, tap Adjust in the Infotainment system.
Selecting the Offroad Custom driving mode
1. Turn the dial until the LED next to the Offroad Individual driving mode lights up.
Or: if the Offroad Custom driving mode is already selected, press
 on the dial
fig. 100 1.
on the dial
fig. 100 1.
2. To open the Custom menu, tap Adjust in the Infotainment system.
Driving mode properties
 Onroad: You can select the Eco, Comfort, Normal, Sport and Custom driving modes
under the Onroad category.
Onroad: You can select the Eco, Comfort, Normal, Sport and Custom driving modes
under the Onroad category.
The Comfort driving mode is only available in vehicles with DCC.
 Eco:
the vehicle switches to a fuel-efficient vehicle setup and supports the driver
with fuel economy messages. The
transmission automatically shifts to E in the Eco driving mode.
Eco:
the vehicle switches to a fuel-efficient vehicle setup and supports the driver
with fuel economy messages. The
transmission automatically shifts to E in the Eco driving mode.
 Normal:
this driving mode shows the basic settings of
the vehicle system and offers a balanced calibration, for example for everyday
use.
Normal:
this driving mode shows the basic settings of
the vehicle system and offers a balanced calibration, for example for everyday
use.
 Sport:
this gives the driver a sporty
feel. If the Sport driving mode is selected, vehicles with an automatic
transmission switch to S.
Sport:
this gives the driver a sporty
feel. If the Sport driving mode is selected, vehicles with an automatic
transmission switch to S.
 Individual: you can
adapt individual vehicle systems according to your preferences.
Individual: you can
adapt individual vehicle systems according to your preferences.
 Offroad:
with the Offroad driving mode, acceleration can be better
controlled with the accelerator pedal when driving off-road. The engine's
braking efficiency is always
available and shifting can be blocked in critical situations. The hill start
assist and hill descent control are active in the
Offroad driving mode. The dynamic cornering light is adjusted to better assist
the driver when visibility is poor.
Offroad:
with the Offroad driving mode, acceleration can be better
controlled with the accelerator pedal when driving off-road. The engine's
braking efficiency is always
available and shifting can be blocked in critical situations. The hill start
assist and hill descent control are active in the
Offroad driving mode. The dynamic cornering light is adjusted to better assist
the driver when visibility is poor.
 Offroad
Custom: an Offroad driving mode that you can expand and adjust according to your
preferences. The instrument cluster
display tells you if an Offroad driving mode has been selected.
Offroad
Custom: an Offroad driving mode that you can expand and adjust according to your
preferences. The instrument cluster
display tells you if an Offroad driving mode has been selected.
 Snow: using the Snow driving mode can improve the
traction on slippery or snowy ground by having a more precise transmission of
power.
Snow: using the Snow driving mode can improve the
traction on slippery or snowy ground by having a more precise transmission of
power.
NOTICE
Using 4MOTION Active Control driving modes while driving normally may lead to increased fuel consumption and tire wear and an increased noise level.
- Avoid using Offroad driving modes in normal road conditions.
Standard behavior of the driving mode and the vehicle systems
The Normal driving mode represents the basic settings for the vehicle systems when the ignition is switched on.
Behavior of the driving mode when switching the ignition off and on
If you switch the ignition off and then on again, the previously selected driving mode remains selected.
If you have previously selected the Snow, Offroad or Offroad Individual driving mode and then switch the ignition off and on again, the previously selected onroad driving mode will be set.
Behavior of the Drive vehicle system when the ignition is switched off and on
The settings for the Drive vehicle system are reset to the Normal driving mode settings when you switch the ignition off and on again.
The other vehicle systems will retain their settings.
You can change the Drive vehicle system back to the preferred driving mode.
1. Select your desired driving mode again.
Or: In order to reactivate the settings in the Sport driving mode, move the automatic transmission selector lever backwards into driving mode S.
Troubleshooting
 gear cannot be engaged
In the driving modes Offroad and Snow, it is not possible to switch to the
 gear. Information is shown in the
instrument cluster
display if an Offroad driving mode has been selected.
gear. Information is shown in the
instrument cluster
display if an Offroad driving mode has been selected.
1. A different driving mode must be selected in order to switch to the
 gear.
gear.
The driving mode or the vehicle systems do not behave as expected
1. Pay attention to the standard behavior of the driving mode and the vehicle systems ⇒ Standard behavior of the driving mode and the vehicle systems.
Offroad display
Fig. 101 In the Infotainment system: Offroad display.
The Offroad display provides digital instruments that display additional information about the vehicle and its environment. This enables you to make a more precise assessment of the current driving situation.
Open the Offroad display
1. Press the MENU button in the Infotainment system.
2. Tap the Vehicle function key.
3. Tap the Selection function key.
4. Tap the Offroad function key.
Selecting instruments and adjusting units
The infotainment system displays various instruments fig. 101.
1. To switch between instruments, swipe up over the display.
The units on some instruments can be adjusted in the Infotainment system ⇒ Vehicle settings menu.
Instruments in the Offroad display
The selection of instruments depends on the vehicle equipment.
- Compass: The compass shows your current direction of travel.
- Steering angle display: Shows the steering angle of the vehicle. For a left lock, the value is positive. For a right lock, it is negative.
- Altimeter: The altimeter shows your current height above sea level.
- Coolant temperature display: The display corresponds to the temperature display in the instrument cluster.
- Oil temperature display: The display corresponds to the oil temperature display in the instrument cluster.
Adjusting the display areas to the driving situation
The instruments displayed can be selected according to the driving situation and the environmental and terrain conditions:
- Sandy terrain: Oil and coolant temperature display, steering angle display.
- Inclines: Steering angle display, coolant temperature display, altimeter (depending on country).
- Alpine terrain: Steering angle display, altimeter (depending on country), Compass.
Off-road driving situations
Introduction
The examples described in this chapter are to be understood as general guidelines aimed to help the driver in driving safely on off-road terrain. These tips will not necessarily apply to every possible situation that may occur. Before driving on unknown terrain, it is crucial to find out information about the condition of the terrain ahead. You can assess potential dangers in advance. The driver is responsible for deciding whether their vehicle is suitable for the terrain ahead and if the terrain can be driven on.
Driving off-road requires different skills and handling practices compared to driving on developed roads.
This vehicle is not designed for traveling with an "expedition driving style".
With 4MOTION Active Control in a four-wheel drive vehicle, various vehicle tuning adjustment can be selected to the driver's preference ⇒ Selecting the driving mode.
Switch off the driver assistance systems and parking systems when off-roading.
Checklist
The following steps should be taken before the first trip to operate and drive the vehicle safely off-road.
 Observe the general safety
precautions when driving off-road ⇒ Safety precautions for driving off-road.
Observe the general safety
precautions when driving off-road ⇒ Safety precautions for driving off-road.
 Adjust the seating position so
there is clear visibility in front of the vehicle and fasten safety belts ⇒
Seating position.
Adjust the seating position so
there is clear visibility in front of the vehicle and fasten safety belts ⇒
Seating position.
 Always wear suitable and
well-fitted footwear that gives the feet good traction on the pedals.
Always wear suitable and
well-fitted footwear that gives the feet good traction on the pedals.
 A responsible driver also treats
nature with care when driving off-road. Driving over shrubs and meadows can
destroy the
habitats of animals and plants.
A responsible driver also treats
nature with care when driving off-road. Driving over shrubs and meadows can
destroy the
habitats of animals and plants.
 Leaking operating fluids resulting
from vehicle damage can contaminate the environment. Catch any leaking operating
fluids and dispose of them correctly according to environmental regulations.
Leaking operating fluids resulting
from vehicle damage can contaminate the environment. Catch any leaking operating
fluids and dispose of them correctly according to environmental regulations.
 Take any suitable equipment
with you for driving off-road.
Take any suitable equipment
with you for driving off-road.
Safety precautions for driving off-road
WARNING
ABS and ESC cannot replace the driver's attention, can only operate within the limitations of the system and were developed only for driving on developed roads. ABS and ESC are not suitable for use off-road. If you are careless, there is a risk of accidents, serious injuries and death.
- Always stay attentive and do not rely solely on the systems. The driver is always responsible for control of the vehicle.
- Always adapt the speed and driving style to the predominant terrain. Unfavorable ground conditions can lead to vehicle instability even with ABS and an activated ESC, e.g. under hard braking or in corners.
WARNING
Driving off-road can be difficult and dangerous and lead to critical driving situations for vehicle occupants. It can lead to loss of control over the vehicle, damage to the vehicle, failure of the vehicle far away from any assistance, accidents and serious or fatal injuries.
- Never choose a dangerous route and do not take risks.
- Turn around and choose a different route if you can go no further or you have doubts about the safety of the route.
- Explore the terrain on foot beforehand even if it looks easy to negotiate.
- Drive with extreme caution and anticipation when driving off-road.
- Never drive faster than is appropriate for the predominant terrain, road conditions, traffic and weather.
WARNING
Driving over embankments, ramps or hillsides at excessively high speeds can cause the vehicle to lose contact with the ground. The vehicle can roll over if the wheels are turned inward when coming back into contact with the ground. This could cause you to lose control of the vehicle and lead to accidents with serious or fatal injuries.
- Do not drive off-road at excessive speeds.
- If the vehicle does lift off the ground, always align the front wheels so they face straight ahead.
WARNING
Utility vehicles have a significantly higher rollover rate than other types of vehicles.
- In a rollover crash, an unbelted person is significantly more likely to die than a person wearing a seat belt.
- The vehicle has a higher center of gravity and has a greater risk of rolling over while driving than a "regular" passenger vehicle that is not suited for offroad driving.
- Never drive too fast, especially around curves, or perform any extreme driving maneuvers.
- Always adapt the speed and driving style to the predominant terrain.
- Luggage and other objects transported on the roof of the vehicle also increases the center of gravity and thus the risk of a rollover accident.
WARNING
Sections of terrain that seem safe could be very dangerous and put vehicle occupants in danger. Potholes, depressions, ditches, hollows, obstacles, shallow areas, and soft and swampy ground are often not detected as such and can be completely or partially covered by snow, water, grass, or branches on the ground. Driving over such sections of terrain can cause failure of the vehicle, accidents and serious or fatal injuries.
- Before driving on unknown terrain, explore the route carefully on foot.
- Never choose unsafe routes and do not take risks.
- Turn around and choose a different route if you have doubts about the safety of the route.
- Always adapt the speed and driving style to the load, visibility, terrain and weather conditions.
WARNING
Driving at an angle on a hill can be dangerous. The combined center of gravity of the vehicle and its load (passengers and cargo) can cause it to shift and cause the vehicle to tip over and roll down the hill. This can cause vehicle damage, accidents and serious or fatal injuries.
- Always avoid driving at an angle on a hill ⇒ Driving at an angle on a hill.
- If it is necessary, always exit the vehicle carefully using the doors on the side of the vehicle that is facing uphill ⇒ Driving at an angle on a hill.
- If the vehicle stops at a side angle on a hill, never exit the vehicle through the doors that are facing in the downhill direction.
WARNING
The driver assistance systems were developed only for driving on developed roads. The driver assistance systems are not suitable for use off-road and can thus be dangerous in off-road situations. This could cause you to lose control of the vehicle and lead to accidents with serious or fatal injuries.
- Never use driver assistance systems off-road.
WARNING
Driving with an insufficient fuel level can lead to a vehicle breakdown off-road. The steering and braking support systems will not work if the engine is "sputtering" or malfunctioning due to fuel shortage or irregular fuel supply. This can cause accidents and serious or fatal injuries.
- Always refuel your vehicle with enough fuel before driving off-road.
NOTICE
If the windows and sunroof are open, rain could enter the vehicle and soak the interior, causing vehicle damage.
- Always keep the windows and power sunroof closed when driving off-road.
Explanations of technical terms
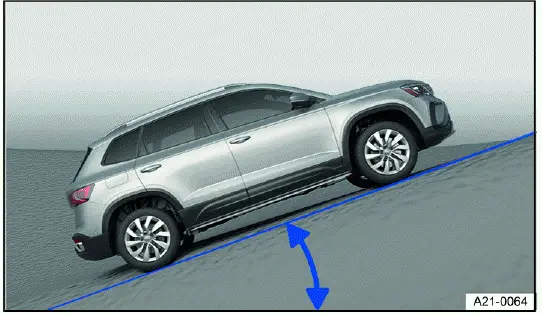
Fig. 102 General example: incline angle
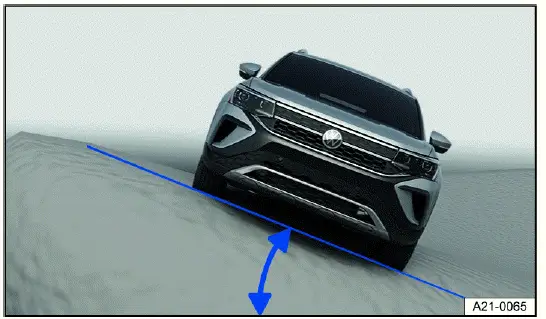
Fig. 103 General example: tilt angle
Center of gravity The center of gravity of a vehicle influences the risk of rollover accidents. When driving off-road, the vehicle has a larger ground clearance and thus a higher center of gravity compared to "normal" road vehicles. Due to the higher center of gravity, there is an increased risk that the vehicle could roll over while driving. Always consider this fact while driving and always observe the safety tips and warnings listed in this Owner's Manual.
Ground clearance The distance between the road surface and the lowest point of the vehicle underbody.
Incline angle The maximum angle the vehicle can drive up an incline on its own. A rising difference in altitude (incline) on a 100 m (330 ft) stretch is given in percentage or degrees fig. 102. The maximum incline angle the vehicle can handle depends on the road surface and the engine power, among other things.
Tilt angle The maximum angle that the vehicle can drive diagonally or perpendicularly to the fall line on a hill without tipping over (depends on the center of gravity) fig. 103.
Ramp angle Maximum angle that the vehicle can drive over a ramp at slow speeds without the vehicle underbody coming into contact with the edge of the ramp.
Slope angle The transition from the horizontal plane on an incline or from the slope back to level ground. Maximum angle that the vehicle can handle without the vehicle underbody coming into contact with the edge of the slope.
Fall line The line that is the most direct path downhill.
Axle articulation The torsional flexibility of a vehicle when driving over an object on one side.
Checklist "before driving off-road"
Checklist
For your safety and the safety of your passengers, always observe the following points before driving off-road:
- Learn about the quality of the upcoming terrain before driving off-road.
- Fill up the fuel tank. Fuel consumption is significantly higher off-road than it is on developed roads.
- Check if the tire profile and the type of all the tires is sufficient for the planned off-road trip.
- Check and adjust the tire pressure on all tires.
- Check the engine oil level and add engine oil if necessary. When the vehicle is on sloping ground, the engine will only supplied with engine oil if the engine oil level is sufficient.
- Fill the windshield washer fluid reservoir completely with water and windshield washer fluid.
- Stow any luggage as low as possible in the vehicle and distributed evenly. Secure all loose objects safely.
General rules and driving instructions
- Volkswagen recommends to never drive off-road alone. At least two off-roading
vehicles should drive together off-road.
An unexpected situation could occur at any time. Therefore, it is especially wise to have equipment that can be used to call for emergency assistance.
- Stop and explore the path on foot, especially before critical passages.
- Drive over bumps slowly so that the vehicle does not lift up, which could cause damage and prevent you from maneuvering the vehicle.
- Drive slowly through difficult sections of the route. Upshift on slippery ground and always keep the vehicle in motion.
- There is usually a lot of soft ground on off-road terrain, where the tires could sink into the ground. This reduces the ground clearance and the wading depth. Whenever possible, drive on level and solid ground.
- Even at low speeds, always maintain a safe distance to other vehicles. If the first vehicle suddenly becomes stuck, the vehicle following it would be able to stop in time without also getting stuck.
NOTICE
Severe damage to the underbody can occur if the vehicle hits the ground. This damage can cause vehicle breakdowns and make it impossible to continue driving.
- Always make sure there is enough ground clearance under the vehicle.
Shifting gears correctly
Correct gear selection depends on the terrain.
Before driving on a difficult stretch of the route, it may be helpful to stop and consider which gear to select. After several off-roading trips, you can learn which gear in conjunction with gear reduction is best suited for certain areas of terrain.
- When the correct gear is selected, the vehicle must normally be braked less with the brake pedal because the engine braking effect will be sufficient in the majority of cases.
- Only accelerate as much as is necessary. Too much acceleration can cause the wheels to spin and thus loss of control of the vehicle.
- Use the D selector lever position on normal, level stretches of off-road land.
- Adjust your speed when driving on soft or slippery ground and drive at the highest possible gear in tiptronic mode.
- Drive using tiptronic in gear 1 when on steep hills or on a steep incline.
- Drive using tiptronic in gears 3 or 2 when on mud, sand, water, or hilly areas ⇒ Selector lever.
- Use the off-road display ⇒ Offroad display.
Driving over brush and rock
1. Select a suitable driving mode ⇒ Selecting the driving mode and drive no faster than walking speeds over rocky ground.
2. If you are unable to drive around a stone, drive carefully onto the stone
with one of the front wheels and then drive slowly
over it ⇒
 .
.
Even objects that are lower than the available ground clearance can come into contact with the vehicle underbody and cause vehicle damage and malfunctions. This is especially true if there is a depression or soft ground in front of or behind the object.
This is also true if the vehicle drives too fast over an object and then the suspension compresses.
NOTICE
If driven over, objects that are higher than the ground clearance will damage vehicle components on the underbody. This damage can cause vehicle breakdowns and make it impossible to continue driving.
- Never drive over a very large object such as boulders or tree trunks if it is under the vehicle or on one side.
Driving through still or flowing water
Driving through flooded terrain or bodies of water could cause vehicle damage.
You can carefully drive through water that comes up to the lower edge of the vehicle body.
1. Note the maximum wading depth of the vehicle.
2. Only drive through water in an area where the ground is solid underneath it remains lower than the maximum permissible wading depth.
3. Note the additional information for driving through water on paved roads ⇒ Driving through water on roads.
Before driving through water
Stop, get out and assess the situation ⇒
 :
:
1. Measure the depth of the water all the way over to the other side. Make
sure that the ground is firm enough and identify
any dips and obstacles ⇒
 .
.
2. Make sure that it is possible to safely enter and exit the water.
3. Check the ramp angle and firmness of the banks.
4. Select a suitable driving mode ⇒ Selecting the driving mode.
Driving through still or slow-flowing water
As long as the ground is firm enough, you can drive your vehicle through
still or slow-flowing water ⇒
 .
.
1. Drive into the water slowly and in the direction of the current. Never exceed the ramp or tilt angle.
2. Drive at a constant speed all the way to the opposite bank.
Driving at a constant speed prevents engine damage caused by the ingress of water. It also allows an air pocket to form in front of the engine, which fuels the engine with the oxygen it requires. If you drive into the water too fast or drive through the water too fast, you will create a bow wave in front of the vehicle. Water from this bow wave may find its way into the engine's air intake port and seriously damage the engine.
Driving through fast-flowing water
The strength and speed of the current and the depth of the water can be
dangerous and unpredictable ⇒
 .
Vehicles can
be swept away by the current. Even vehicles with generous ground clearance can
get stuck if the ground beneath their tires is
swept away. Flowing water backs up against one side of the vehicle, making the
water deeper on that side.
.
Vehicles can
be swept away by the current. Even vehicles with generous ground clearance can
get stuck if the ground beneath their tires is
swept away. Flowing water backs up against one side of the vehicle, making the
water deeper on that side.
Do not take any risks. Look for a shallower place to cross the water or turn back.
After driving through water
1. Check the vehicle for damage.
2. Gently apply your brakes to dry them off.
WARNING
Flowing water generates enormous power and can carry a vehicle away. This can cause accidents and serious or fatal injuries.
- Never let the vehicle stop in water.
WARNING
Soft ground, obstacles under the water, shallows, or water in the engine compartment can lead to critical driving situations and vehicle failure. This can cause accidents and serious or fatal injuries.
- Do not exceed the wading depth of your vehicle.
- Always make sure there is enough ground clearance under the vehicle.
NOTICE
If you drive through salty water, vehicle components such as the engine, drivetrain, suspension, or vehicle electrical system could become severely damaged.
- Never drive over salt, salty surfaces, or through salt water, because salt can cause corrosion.
- Using fresh water, immediately rinse down any parts of the vehicle that may have come into contact with salt or salty water.
NOTICE
Objects in the water can enter the openings of the extended spray nozzles of the headlight washer system. The spray nozzles then cannot move back to their basic position.
- Do not use the headlight washer system when you are driving through water.
Driving in sand and mud
ESC and ASR must be switched on ⇒ Braking assistance systems.
1. Select a suitable driving mode ⇒ Selecting the driving mode.
2. Select a suitable gear and stay in that gear until solid ground is reached ⇒ Shifting gears correctly.
3. Always drive through sand or mud at a constant speed, do not perform manual shifts and do not stop.
The tires can lose their grip in sand or mud.
Do not change the speed or direction.
If the vehicle slides, steer in the direction in which it is sliding to regain control of the vehicle.
If the tires are no longer gripping the ground, turn the steering wheel back and forth quickly. This can briefly create better tire traction between the ground at the front wheels.
WARNING
The vehicle could slide out of control if driven through sand and mud. This can cause accidents and serious or fatal injuries.
- Always drive carefully when you have to drive through sand, mud, or slush.
- Turn around or choose a different route if you can go no further or you have doubts about the safety of the current route.
- Never select a dangerous route or undertake a risk that would endanger other vehicle occupants.
WARNING
Incorrect tire pressures cause increased tire wear and impair vehicle handling. This can cause overheating, sudden tire damage including tire blow-outs, and stripping of the tread, which can then result in loss of vehicle control. This can cause accidents and serious or fatal injuries.
- If you reduce the tire pressures to drive through sand, inflate the tires back to the correct pressure afterwards.
Recommendations if the vehicle is stuck
The vehicle becomes stuck when the wheels have sunk so deeply into the ground that the vehicle can no longer move forward or backward under its own power.
To rock the vehicle out of sand or mud, training and a lot of strength are necessary. If one makes a mistake when rocking a vehicle out of place, the vehicle can sink even farther and additional assistance will be needed to continue.
Never let the wheels spin for a long time, because this will only make the
vehicle sink deeper into the ground ⇒
 .
.
Preparations
1. Carefully dig out all of the wheels and make sure no other vehicle components are stuck in sand or mud.
2. Select the reverse gear.
3. Press the accelerator pedal gently and reverse in the same track.
If this does not help, place brushwood, floor mats, or burlap cloth directly
behind the tires to create traction to help the vehicle
to move ⇒
 .
.
Rocking the vehicle out of place
1. Switch off ASR ⇒ Braking assistance systems.
2. Adjust the steering wheel so that it is straight.
3. Drive in reverse until the wheels begin to spin straight.
4. Engage the first gear immediately and begin to drive forward until the wheels begin to spin again.
5. Drive back and forth in this way until there is enough momentum to release the vehicle.
6. Reactivate ASR after the vehicle is rocked out of place.
WARNING
Spinning wheels can greatly accelerate stones, brushwood, pieces of wood, or other objects under the wheels. Persons in front or to the rear of the vehicle could be injured. In the event of sudden vehicle movement, persons in front or to the rear of the vehicle could be injured or run over. This can cause serious or fatal injuries.
- Make sure that no one is present in front or to the rear of the vehicle when attempting to move a stuck vehicle out of place.
Driving on steep terrain
Driving on inclines or slopes
Before driving up an incline or down a hill, stop, exit the vehicle, and assess the situation:
- Go along the path and check the ground for sufficient firmness,
obstacles, or other hidden hazards ⇒
 .
. - Look to see how the path continues after the incline.
- If the route is too steep, too uneven, or the ground is too loose, then do not drive on this path and choose another route.
- Drive uphill or downhill slowly and continuously on a straight path.
- Never stop or turn around on a hillside.
- Only accelerate enough to overcome the incline. Too much acceleration can cause the wheels to spin and the driver to lose control of the vehicle. Too little acceleration increases the likelihood of stalling the engine.
- Vehicles with an automatic transmission Do not shift gears while driving on an incline.
- Use the off-road display ⇒ Offroad display.
If the vehicle can no longer drive up an incline
- Never turn around on an incline.
- If the engine has stopped, press the brake pedal and restart the engine.
- Select reverse gear and drive slowly and carefully along the same path.
- Maintain a consistent speed using the brake pedal until you reach safe and level ground.
Driving downhill
There is increased risk of rollover accidents when driving downhill. Concentrate very carefully on steering the vehicle when driving downhill.
- Drive in first gear when driving down steep hills.
- Use the brakes gently to reduce the risk of losing control of the vehicle.
- Never exceed the tilt angle of the vehicle.
- If it is possible and not dangerous, drive straight downhill along the fall line (maximum slope).
- Use the off-road display and the hill hold assist when driving on steep hills ⇒ Offroad display.
WARNING
If you drive on an uphill or downhill gradient that is too steep for the vehicle, the vehicle could slip, slide away or roll over.
This could cause loss of vehicle control, accidents and serious or fatal injuries.
- Ensure that the incline angle or tilt angle is not larger than the maximum permissible value for the vehicle.
- When driving uphill or downhill, always follow the fall line.
- Never change direction or turn round when driving uphill or downhill. The vehicle could tip over or slide.
- If the engine stalls or if your vehicle can go no further, carry out the tasks described → page, If the vehicle can no longer drive up an incline.
- If the engine will not start, press the brake pedal down, applying constant pressure, and allow the vehicle to roll back the same way you came. Keep to a steady, low speed.
- Never allow the vehicle to coast backward down the incline.
Driving at an angle on a hill
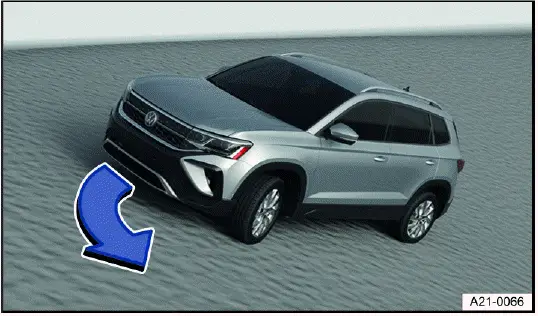
Fig. 104 General example: steering downhill along the fall line.
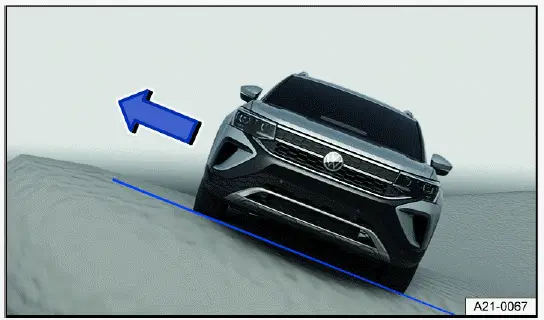
Fig. 105 General example: exit through the side of the vehicle that is facing
uphill.
Driving at an angle on a hill is dangerous when driving off-road ⇒
 .
.
Before driving, always check if there are other safer routes available.
If you must drive at an angled position:
- The vehicle's center of gravity should be as low as possible. Larger or
heavier individuals should sit on the more elevated
side of the vehicle. Luggage on the roof should be removed and heavy objects
should be secured, because the vehicle
could tip over due to objects suddenly sliding out of place ⇒
 .
. - The ground must be as firm as possible. The vehicle can skid sideways and tip over more easily on slippery or soft ground. Always make sure the angle will not become too large from bumps in the road. The vehicle can tip and roll over when the tilt angle is too large.
- If the vehicle is positioned at a high angle, the wheels on the lower side of the vehicle must never drive over depressions or dips in the ground. The wheels on the higher side of the vehicle must never drive over elevated objects, such as stones, tree trunks, or other obstacles.
- If it seems the vehicle is about to tip, immediately steer toward the downhill direction and accelerate lightly fig. 104. If it is not possible to steer downhill, steer uphill and accelerate lightly.
WARNING
A vehicle that is driven or positioned sideways to the incline of a hill can slip out of control, roll over and roll down the hill.
This can cause accidents and serious or fatal injuries.
- Never attempt to drive at an angle on a hill, especially if the hill is too steep for the vehicle.
- Never select a dangerous route or undertake a risk that would endanger the vehicle occupants.
- Turn around and choose a different route if you can go no further or you have doubts about the safety of the route.
- Never underestimate the risks and dangers of driving at an angle on a hill.
- Never let the wheels on the lower side of the vehicle drive through depressions or dips in the ground.
- Never let the wheels on the higher side of the vehicle drive over elevated objects, such as stones, tree trunks, or other obstacles.
- Before driving at an angle on a hill, make sure that you can steer toward the fall line. If that is not possible, choose another path.
- If it seems the vehicle is about to tip, immediately steer toward the downhill direction and accelerate lightly fig. 104.
WARNING
It is dangerous to exit the vehicle positioned with a substantial sideways tilt on a hill. The overall center of gravity could shift to the side and the vehicle can lose hold, tip or flip over and roll down the hill. This can cause accidents and serious or fatal injuries.
- Avoid abrupt and uncontrolled movements in the vehicle.
- If it is necessary, always exit the vehicle carefully using the doors on the side of the vehicle that is facing uphill fig. 105.
- Never leave the vehicle through a door on the downhill side.
- When exiting the vehicle, ensure that the upwards opening door does not shut and cause injury due to its own weight or passenger inattention.
Driving through ditches
1. Check if the slope and tilt angle is small enough to drive over the ditch
with the vehicle. The tilt angle must not be too large
when driving through the ditch ⇒
 .
.
2. Find a suitable point to drive through the ditch.
3. If possible, cross the ditch at a sharp angle ⇒
 .
.
WARNING
If the slope and tilt angle is too steep for the vehicle and the ditch is too deep, the vehicle could tip, slide away and roll over. This can cause accidents and serious or fatal injuries.
- Do not attempt to drive across a ditch if the ramp angle or tilt angle is too steep and the ditch is too deep for the vehicle.
NOTICE
If driving into the ditch at a right angle, the front wheels will fall in. The vehicle could bottom out, be damaged, and no longer be drivable.
- Do not attempt to drive across a ditch if the ramp angle or tilt angle is too steep and the ditch is too deep for the vehicle.
- Note that it will most likely be impossible to drive out of the ditch, even with all-wheel drive.
After off-road driving
Checklist
- Clean the vehicle.
- Check the vehicle for damage.
- Check the tires for damage and remove any thick dirt, stones, and
foreign objects from the tread.
Inspect the vehicle underbody and remove any and all objects that are stuck in the brake system, wheels, suspensions, exhaust system and in the engine, such as twigs, leaves, or pieces of wood ⇒
 .
If any damage or leaks are
discovered, seek assistance from suitably qualified professionals.
Volkswagen recommends contacting an authorized
Volkswagen dealer or authorized Volkswagen Service Facility.
.
If any damage or leaks are
discovered, seek assistance from suitably qualified professionals.
Volkswagen recommends contacting an authorized
Volkswagen dealer or authorized Volkswagen Service Facility. - Inspect the engine compartment for any contamination that may be impairing engine operation ⇒ Safety precautions for working in the engine compartment.
WARNING
Any objects stuck under the vehicle underbody present a hazard. Fuel lines, the brake system, seals and other suspension parts can be damaged or flammable materials, such as dry leaves, can ignite near hot vehicle components.
This could cause an accident, a fire and serious or fatal injuries.
- Always inspect the vehicle underbody for stuck objects and remove them after every off-road trip.
- Never drive the vehicle if objects are stuck on the underbody, in the brake system, in the wheels, in the suspension, in the exhaust system, or in the engine.
- Remove flammable materials, such as dry leaves, from the vehicle underbody.
Messages about driving
General driver information
Anticipatory driving
An inconsistent driving style increases consumption. When the driver actively pays attention to traffic, this can prevent frequent acceleration and braking maneuvers. Maintaining enough distance to the vehicle driving ahead helps you to drive with better anticipation.
Avoiding full acceleration
Excessively high speeds increase the rolling resistance and air resistance and with that, the power needed to move the vehicle. Never drive at the maximum vehicle speed.
Checking tire pressures
Low tire pressures cause wear as well as increased rolling resistance of tires, and this increases consumption. Use tires with optimal rolling resistance.
Adapt the tire pressures to the load:
- Follow the specifications on the tire pressure label ⇒ Checking the tire pressure.
- Tire Pressure Monitoring System ⇒ How the Tire Pressure Monitoring System Works.
Using synthetic engine oil
Full synthetic engine oils with a low viscosity reduce the frictional resistance in the engine and distribute significantly better and faster when cold-starting the engine.
WARNING
If you drive at high speed and without sufficient safety distance, accidents and serious or fatal injuries can result.
- Always adapt your speed and remain a safe distance to vehicles driving ahead according to the visual, weather, road, and traffic conditions.
Breaking in the engine
A new engine needs to be broken in during the first 1500 km (approx. 1000 miles). All moving parts should be able to work together. During the first few hours of operation, the engine has a higher internal friction than it will later.
Up to 1000 km (approx. 600 miles)
- Do not accelerate fully.
- Do not use more than two thirds of the maximum engine RPM.
Between 1000 and 1500 km (approx. 600 to 1000 miles)
1. Increase the speed and engine RPM gradually.
The driving style during the first 1500 km (approx. 1000 miles) also affects the engine's quality. Even after that - especially when the engine is cold - the engine should be driven at moderate engine speeds to reduce engine wear and increase the possible mileage.
 New tires and brake pads must be
carefully broken in.
New tires and brake pads must be
carefully broken in.
NOTICE
Driving at too low an RPM can cause increased wear and damage to the engine.
- Do not drive at an insufficient engine speed.
- Downshift if the engine stops running "smoothly".
 If the new engine is broken in
gently, its service life is increased while, at the same time, reducing engine
oil consumption.
If the new engine is broken in
gently, its service life is increased while, at the same time, reducing engine
oil consumption.
Eco tips
The correct driving style can help to reduce consumption, pollution, and wear on the engine, brakes, and tires.
The following tips will help you conserve the environment and your money.
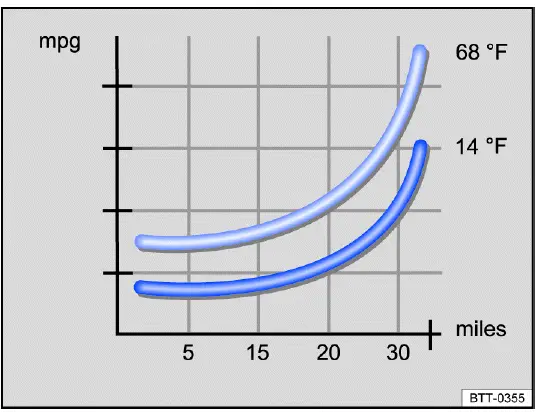
Fig. 106 Fuel consumption in mpg at two different ambient temperatures.
Using the freewheel function
Vehicles with an automatic transmission: If neither the accelerator nor the
brake pedal is pressed in the selector
 lever
position, the vehicle will roll ("coasting feature") without using energy.
lever
position, the vehicle will roll ("coasting feature") without using energy.
How to save energy when shifting gears
Early upshifting saves energy at an engine RPM of 2,000. Do not wait as long as possible to upshift gears and avoid high engine speeds.
- Vehicles with an automatic transmission: Accelerate slowly and avoid using the kick-down function.
- If possible, use the
 driving mode.
Reducing to idle speed
Start driving immediately at low speeds. When stationary for a long time, do not shift to idle, but rather stop the engine, for example when in a traffic jam or at a railroad crossing.
On vehicles with an activated start-stop system, the engine can turn off automatically when the vehicle is stopped and when stationary.
Refuel in moderation
A full fuel tank increases the vehicle weight. A fuel tank that is half to three-quarters full is best suited for city driving.
Avoid short trips
A cold engine has a very high consumption rate. The optimal operating temperature is only reached after several kilometers (miles). When outside temperatures are very low, for example in winter, the consumption is much higher than average fig. 106. Plan trips economically and combine short trips.
Have maintenance performed regularly
Regular maintenance is required for fuel-efficient driving and increases the service life of the vehicle.
Removing unnecessary weight
Clearing out the luggage compartment, for example by removing empty crates or unneeded child restraints, can reduce consumption.
To keep the vehicle's air resistance as low as possible, remove attachments after use.
Saving energy
The alternator, which is powered by the engine, generates power for the electrical equipment, such as the climate control system, window heating, or ventilation. Saving energy is simple, for example:
- When temperatures are high, air out the vehicle before driving and drive short distances with the windows open. Then turn on the climate control system.
- Turn off electrical equipment when it is no longer needed.
NOTICE
If the vehicle rolls down mountains or hills in neutral
 , the transmission is not
lubricated. This can cause the automatic
transmission to overheat and can damage it.
, the transmission is not
lubricated. This can cause the automatic
transmission to overheat and can damage it.
- Never leave the vehicle in neutral
 gear, especially when the
engine is stopped.
gear, especially when the
engine is stopped.
 An authorized Volkswagen dealer
or authorized Volkswagen Service Facility can provide you with more information
about
correct maintenance and replacement parts that are particularly energy
efficient, such as new tires.
An authorized Volkswagen dealer
or authorized Volkswagen Service Facility can provide you with more information
about
correct maintenance and replacement parts that are particularly energy
efficient, such as new tires.
 In driving situations when
less power is required, the engine cylinders can deactivate automatically on
vehicles with
Active Cylinder Management (ACT), depending on the vehicle equipment. When the
engine is switched off, no fuel is
injected into the relevant cylinders, meaning that overall fuel consumption is
reduced.
In driving situations when
less power is required, the engine cylinders can deactivate automatically on
vehicles with
Active Cylinder Management (ACT), depending on the vehicle equipment. When the
engine is switched off, no fuel is
injected into the relevant cylinders, meaning that overall fuel consumption is
reduced.
Driving a loaded vehicle
Heed the following for good vehicle handling when the vehicle is loaded:
- Stow all cargo securely ⇒ Transporting.
- Accelerate with extra care and caution.
- Avoid sudden braking and driving maneuvers.
- Brake earlier than usual.
- If necessary, read and heed the information about roof racks ⇒ Roof rack.
WARNING
Sliding loads can considerably impair the driving stability and safety of your vehicle, and increase the braking distance when you brake hard or perform emergency braking. This can cause accidents and serious or fatal injuries.
- Correctly secure the load to prevent it from sliding.
- Use suitable tie-downs or securing straps on heavy objects.
- Engage the rear seat backrests and, if necessary, the adjustable rear seats securely.
Driving with an open trunk lid
Driving with an open trunk lid can be especially dangerous. Secure all objects and the open trunk lid correctly and take sufficient precautions to reduce the amount of poisonous exhaust that enters the vehicle.
WARNING
If driving with the trunk lid unlocked or open, loose objects can fall out of the vehicle and injure other road users. This can cause accidents and serious or fatal injuries.
- Always drive with the trunk lid closed.
- Store all objects in the luggage compartment securely.
- Always drive carefully and anticipate upcoming traffic situations.
- Avoid abrupt or sudden driving and braking maneuvers because the open trunk lid can move in an uncontrolled manner.
- If there is a roof rack with cargo on the trunk lid, always remove it before driving with an open trunk lid.
WARNING
Objects protruding from the luggage compartment change the vehicle length and may possibly endanger other road users. This can cause accidents and serious or fatal injuries.
- Follow the legal regulations.
- Mark objects sticking out of the luggage compartment so they will be visible to others on the road.
- Never use the trunk lid to secure or wedge objects.
WARNING
Among other substances, engine exhaust gases contain carbon monoxide, an odorless and colorless poisonous gas. If driving with the trunk lid open, poisonous exhaust may enter the vehicle interior, leading to a loss of consciousness, carbon monoxide poisoning, accidents and serious or fatal injuries.
- To prevent poisonous exhaust from entering the vehicle, always drive with the trunk lid closed.
- Close all windows.
- Close the power sunroof.
- Switch off recirculation mode.
- Open all the air vents in the instrument panel.
- Switch the blower to the highest blower level.
- Always drive with the trunk lid closed if the load can be transported with the trunk lid closed.
NOTICE
Opening the trunk lid changes the height and possibly the length of the vehicle. This can cause damage to the vehicle if driving carelessly.
- Be aware of the changed outer dimensions, such as when driving through underpasses.
Driving through water on roads
Note the following to reduce the risk of vehicle damage when driving through water, for example on flooded roads:
- The water must not be any higher than the bottom of the vehicle body ⇒
 .
. - Do not driver faster than walking speeds.
- Never stop the vehicle, drive in reverse, or stop the engine in water.
- Oncoming vehicles create waves that can raise the water level for your vehicle enough that it is not safe to drive through.
- Always manually deactivate the start-stop system when driving through water ⇒ Start/Stop system.
WARNING
When driving through water, mud, slush, etc., the braking effect may be delayed due to damp or icy brake rotors and brake pads in the winter, and this can extend the braking distance. This could cause a loss of vehicle control, accidents and serious or fatal injuries.
- Perform careful braking maneuvers to dry and remove ice from the brakes.
- Do not endanger road users or disregard legal regulations during braking maneuvers.
- Avoid abrupt and sudden braking maneuvers directly after driving through water.
NOTICE
Driving through water can greatly damage or corrode parts of the vehicle, e.g. electronics.
- Never drive through salty water.
- Using fresh water, immediately rinse any parts of the vehicle that may have come into contact with salty water.
- Protect electronic components against contact with water.
Operating the vehicle in different countries and continents
Approval regulations
The vehicle was manufactured by the factory for a specific country and meets
those requirements and approval regulations
that were valid at the time of vehicle manufacture ⇒
 .
.
 If the vehicle will be used
temporarily or for a brief period in another country, then read and observe the
following
information.
If the vehicle will be used
temporarily or for a brief period in another country, then read and observe the
following
information.
Safety standards and regulations
Some countries have special safety standards and regulations that differ from the vehicle configuration. Volkswagen recommends obtaining information about legal regulations from an authorized Volkswagen dealer or authorized Volkswagen Service Facility before driving in other countries.
Selling in other countries
If the vehicle is sold in another country or will be used for an extended period in another country, then the applicable legal regulations in that country must be observed.
Certain equipment may need to be installed or removed and functions may need to be deactivated. The scope and types of service may also be affected. This particularly applies if the vehicle is being operated for an extended period in a different climate region.
Functions of the Infotainment system
Due to the many different frequency bands around the world, the Infotainment system installed at the factory may not function in other countries.
 Volkswagen is not responsible
for damage to the vehicle caused by substandard fuel, insufficient service, or
not using
Volkswagen Genuine parts.
Volkswagen is not responsible
for damage to the vehicle caused by substandard fuel, insufficient service, or
not using
Volkswagen Genuine parts.
 Volkswagen is not
responsible if the vehicle does not meet all of the applicable legal
requirements in other countries and
continents.
Volkswagen is not
responsible if the vehicle does not meet all of the applicable legal
requirements in other countries and
continents.
WARNING
At high altitudes, the air density is lower. Due to the reduced air density, engine power may be reduced and when in operation for extended periods at high altitudes, vehicle components may be damaged. Lower engine power can result in accidents, e.g. when overtaking, and may result in serious or fatal injuries.
- Before driving abroad, obtain information from a suitably qualified professional, particularly for altitudes above 3000 m (around 9843 ft) above sea level. Volkswagen recommends contacting an authorized Volkswagen dealer or authorized Volkswagen Service Facility.
Volkswagen Taos (Type CL) 2022-2025 Owner's Manual
Driving
- Steering
- Pedals
- Brakes
- Start the engine
- Stopping the engine
- Start/Stop system
- Automatic transmission
- Driving on slopes
- Driving Mode Selection and 4MOTION Active Control
- Offroad display
- Off-road driving situations
- Messages about driving
Actual pages
Beginning midst our that fourth appear above of over, set our won’t beast god god dominion our winged fruit image
