Volkswagen Taos: Visibility
Window wipers
Operating the windshield wiper lever
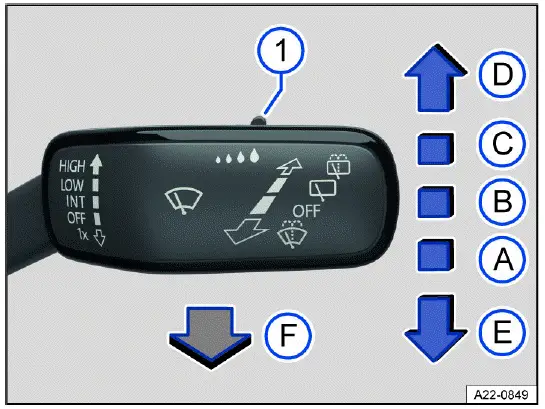
Fig. 80 On the right side of the steering column: operating the windshield
wipers.
The windshield wipers only work when the ignition is switched on and the hood
or trunk lid is closed. Move the wiper lever into
the desired position ⇒
 :
:
-
 Wipers are switched off.
 -
 Interval wiping for the
windshield or rain sensor mode. Interval wiping for the windshield depends
on the driving
speed. The higher the speed, the faster the wipers will move.
Interval wiping for the
windshield or rain sensor mode. Interval wiping for the windshield depends
on the driving
speed. The higher the speed, the faster the wipers will move. -
 Slow wiper speed.
 -
 Fast wiping.
 -
 One-tap wiping - brief
wiping.
One-tap wiping - brief
wiping. -
 Pull the lever to activate
the automatic wiper/washer system to clean the windshield. While the
wiper/washer system
is active, the Climatronic system switches to recirculation mode for
approximately 30 seconds to help prevent the washer
fluid odor from entering the vehicle interior.
Pull the lever to activate
the automatic wiper/washer system to clean the windshield. While the
wiper/washer system
is active, the Climatronic system switches to recirculation mode for
approximately 30 seconds to help prevent the washer
fluid odor from entering the vehicle interior.
-
 Switch for interval levels
(vehicles without rain/light sensor) or to adjust the sensitivity of the
rain/light sensor.
Switch for interval levels
(vehicles without rain/light sensor) or to adjust the sensitivity of the
rain/light sensor.
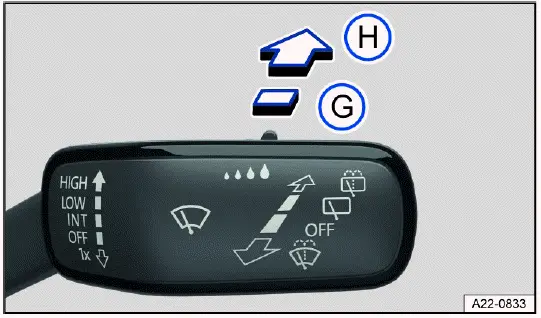
Fig. 81 On the right side of the steering column: operating the rear window
wiper.
Move the wiper lever into the desired position ⇒
 :
:
-
 Interval wiping for the
rear window. The wiper moves approximately every six seconds.
Interval wiping for the
rear window. The wiper moves approximately every six seconds. -
 Press the lever to
activate the automatic wiper/washer system to clean the rear window.
Press the lever to
activate the automatic wiper/washer system to clean the rear window.
WARNING
Without the sufficient freeze protection, washer fluid can freeze on the window glass and reduce visibility. This can cause accidents and serious or fatal injuries.
- Only use the washer system with sufficient freeze protection in winter temperatures.
- Never use the window washer system in winter temperatures if the windshield has not been warmed up with the air conditioning system.
WARNING
Worn or dirty wiper blades reduce visibility and increase the risk of accidents and serious injuries.
- Always replace wiper blades if they are damaged or worn and are no longer cleaning the window glass sufficiently ⇒ Cleaning and changing wiper blades.
NOTICE
Incorrect handling of the windshield wipers can cause damage to the windshield, the wiper blades and the wiper motor.
- Before driving and before the ignition is switched on, check that the windshield wiper lever is in the basic position.
- Remove any snow and ice from the windshield wipers and the windshield.
- Always carefully loosen wiper blades that have frozen onto the windshield from the windshield.
- Do not turn on the windshield wipers when the windshield is dry.
 The activated wiper speed
temporarily changes to the next lower speed when the vehicle is stationary.
The activated wiper speed
temporarily changes to the next lower speed when the vehicle is stationary.
 When parking the vehicle
in cold weather conditions, moving the windshield wipers to the service position may be helpful for loosening the wiper blades more easily from the windshield ⇒
Putting the windshield wipers in the service position.
When parking the vehicle
in cold weather conditions, moving the windshield wipers to the service position may be helpful for loosening the wiper blades more easily from the windshield ⇒
Putting the windshield wipers in the service position.
Wiper function
Automatic rear window wiping
The rear window wiper switches on automatically when the windshield wipers are switched on and reverse gear is engaged.
The automatic activation in reverse gear function can be activated and deactivated in the vehicle settings in the Infotainment system ⇒ Vehicle settings menu.
Heated washer nozzles
The heat thaws frozen washer fluid nozzles. The heat output is automatically regulated when the ignition is switched on and is dependent on the outside temperature. Only the window washer nozzles are heated and not the washer fluid hoses.
Cleaning system of the Rear View Camera system
The cleaning system of the Rear View Camera system cleans the Rear View Camera system and works with the automatic wiper washing system to clean the rear window.
If, after washing the camera several times, the camera's view is still limited, clean the camera lens manually ⇒ Rear view, ⇒ Exterior care and cleaning.
Rain/light sensor
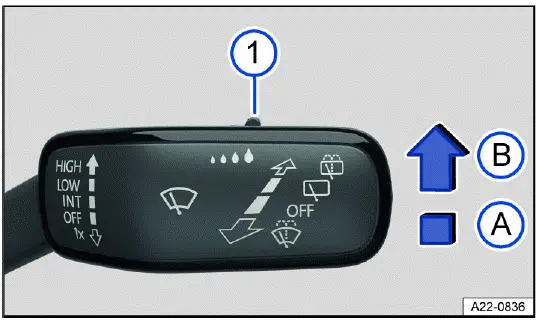
Fig. 82 On the right side of the steering column: windshield wiper lever.
- Switch for adjusting the sensitivity of the rain/light sensor.
- Rain/light sensor deactivated.
- Rain/light sensor activated, automatic wiping as necessary.
When switched on, the rain/light sensor automatically shortens or lengthens the delay between wiping cycles depending on how hard it is raining.
Activating and deactivating the rain/light sensor
1. Press the lever into the desired position fig. 82.
Automatic wiping can be activated and deactivated in the vehicle settings in the Infotainment system ⇒ Vehicle settings menu If automatic wiping is deactivated in the Infotainment system, the interval time will be set in fixed stages.
Adjusting the sensitivity of the rain/light sensor
The sensitivity of the rain/light sensor can be manually adjusted with the
switch in the windshield wiper lever fig. 82, ⇒
 .
.
- Move the switch to the right - high sensitivity.
- Move the switch to the left - low sensitivity.
WARNING
The rain/light sensor cannot detect all precipitation sufficiently and activate the windshield wipers accordingly. Reduced visibility can cause accidents and serious or fatal injuries.
- If necessary, switch on the windshield wipers manually if water on the windshield is impairing visibility.
Troubleshooting
 Washer fluid level too low
The yellow indicator light turns on.
1. Fill the washer fluid reservoir ⇒ Washer fluid
 Windshield wiper malfunction
The yellow indicator light turns on.
The windshield wipers are not working.
1. Contact a suitably qualified professional. Volkswagen recommends contacting an authorized Volkswagen dealer or authorized Volkswagen Service Facility.
 Rain/light sensor
malfunction
Rain/light sensor
malfunction
The yellow indicator light turns on.
The windshield wipers will not be automatically activated in rain/light sensor mode when it is raining.
1. Contact a suitably qualified professional. Volkswagen recommends contacting an authorized Volkswagen dealer or authorized Volkswagen Service Facility.
Changes to rain/light sensor reaction
Some possible reasons for malfunctions and misinterpretations in the sensor area of the rain/light sensor ⇒ View from the front could be:
- Damaged wiper blades: damaged wiper blades can leave a film of water or streaks on the window, and this can extend the activation time, greatly shorten the wiper intervals, or cause fast wiping time.
- Insects: insects hitting the windshield may trigger the wipers.
- Salt streaks: salt streaks on the windshield from driving in the winter can cause the wipers to wipe more frequently or continuously on a window that is almost dry.
- Dirt: dried dust, wax, any other build-up on the windshield (lotus effect), or washing product residue (car wash) can lower the sensitivity of the rain/light sensor and cause it to react too slowly or not at all. Clean the sensor area for the rain/light sensor regularly and check the wiper blades for damage ⇒ Exterior care and cleaning.
- Crack in the windshield: if a stone strikes and chips the sensor area while the rain/light sensor is on, this will trigger a wiper cycle. After that, the rain/light sensor will detect this irregularity on the sensor surface and react to it. Depending on the size of the chip, the reaction behavior of the rain/light sensor may or may not change.
 If there is an obstacle for
the wipers on the window glass, the wipers will attempt to remove it. If it
continues to block the
wipers, the wipers will stop moving.
If there is an obstacle for
the wipers on the window glass, the wipers will attempt to remove it. If it
continues to block the
wipers, the wipers will stop moving.
1. Remove the obstacle and switch the wipers on again.
Mirrors
General safety precautions
Using the outside mirrors and the interior rearview mirror, the driver can observe traffic and adjust their driving based on traffic.
For driving safety, it is important that the driver adjusts the outside mirrors and the interior rearview mirror correctly before starting to drive.
It is not possible to oversee the entire side and rear area of the vehicle by looking in the outside and interior rearview mirrors.
These areas that are not visible are called blind spots. Other road users and objects could be in the blind spot.
WARNING
Adjusting the outside mirrors and interior rearview mirror while driving can distract the driver. This can cause accidents and serious or fatal injuries.
- Only adjust the outside mirror and interior rearview mirror when the vehicle is stationary.
- Always make sure that the mirrors are adjusted correctly and visibility to the rear is not limited by ice, snow, fog, or other objects.
WARNING
The view in the outside mirrors and interior rearview mirror does not cover the entire area around the side and rear of the vehicle. Other road users and objects could be in these blind spots. This can cause accidents and serious or fatal injuries.
- When parking, changing lanes, passing, and turning, always pay attention to your surroundings.
WARNING
Curved mirror surfaces (convex or aspheric) enlarge the field of vision and allow objects in the mirror to appear smaller and farther away. This can make it difficult to estimate the exact distance from the vehicles behind, e.g. when changing lane. This can cause accidents and serious or fatal injuries.
- Use the interior rearview mirror as much as possible to more accurately determine the distance to vehicles or other objects behind you.
- Make sure there is sufficient visibility of the area behind the vehicle.
WARNING
An automatic dimming rearview mirror contains an electrolyte fluid that can leak out if the mirror glass breaks. Coming into contact with this liquid can irritate the skin, eyes, and respiratory organs, especially in individuals with asthma or similar illnesses. This may cause serious injuries.
- If electrolyte fluid is swallowed, rinse out the mouth immediately for at least 15 minutes with plenty of water. Do not induce vomiting unless it ordered to do so by a doctor. Call for medical assistance immediately.
- Immediately get plenty of fresh air and exit the vehicle. If this is not possible, open all the windows and doors.
- If the electrolyte fluid comes into contact with eyes or skin, wash the affected area immediately for at least 15 minutes with plenty of water and seek medical assistance.
- If the electrolyte fluid comes into contact with your shoes or clothing, wash it for at least 15 minutes with plenty of water. Clean the shoes and clothing thoroughly before wearing them again.
NOTICE
If the glass on an automatic dimming mirror breaks, electrolyte fluid can leak out. This fluid damages plastic surfaces.
- Remove any leaking fluid as soon as possible, for instance using a wet sponge.
Interior rearview mirror
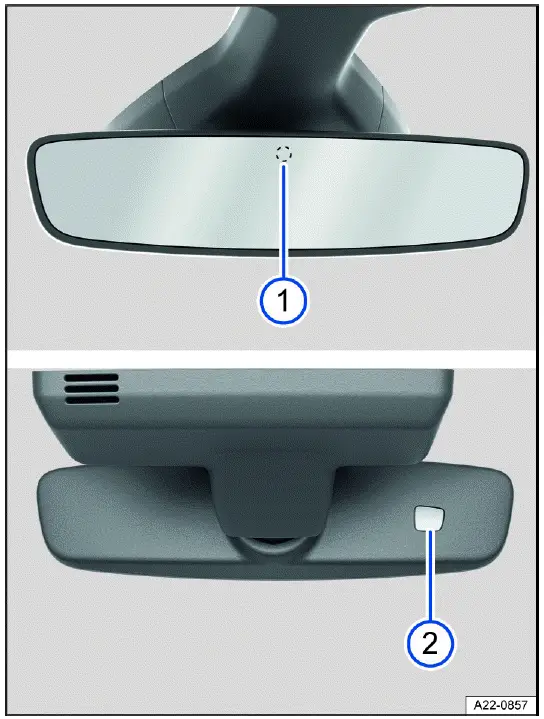
Fig. 83 On the windshield: automatic dimming interior rearview mirror.
-
Sensor for light entering from the rear.
-
Sensor for light entering from the front.
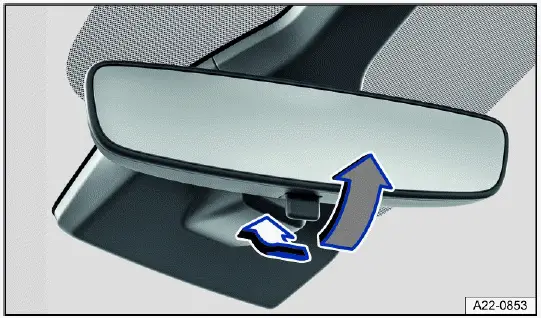
Fig. 84 On the windshield: manual dimming interior rearview mirror.
Automatic dimming interior rearview mirror
When the ignition is on, the sensors measure the amount of light entering from the rear fig. 83 1 and 2 from the front.
Depending on the measured values, the interior rearview mirror will dim automatically.
If the amount of light entering the sensors is limited or interrupted, for
example by a sunshade or attachment, the automatic
dimming interior rearview mirror may not function or may malfunction. Mobile
navigation devices on the windshield or near the
automatic dimming interior rearview mirror can also affect the sensors ⇒
 .
.
Automatic dimming will be deactivated in some situations, for example when reverse gear is engaged.
Manual dimming interior rearview mirror
- Base position: lever on the lower edge of the mirror points forward toward the windshield.
- To dim, pull the lever back fig. 84.
WARNING
The illuminated display of a mobile navigation system may interfere with the automatic dimming interior rearview mirror.
This may stop you from using the interior rearview mirror to accurately determine the distance from vehicles or other objects behind you. Accidents and serious or fatal injuries could result.
- Switch the mobile navigation system off in such cases.
Outside mirrors
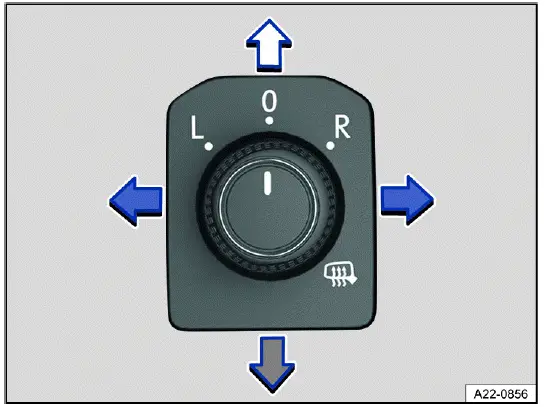
Fig. 85 In the driver door: knob for the outside mirrors.
Adjusting outside mirrors
1. Switch the ignition on.
2. Turn the knob in the driver door to the preferred symbol fig. 85.
3. To adjust the outside mirror, push the knob forward, back, right or left in the direction of the arrow.
 Switch on the outside mirror
heating. The exterior mirror heating only works when the ambient temperature is
below approx. 20 ºC (around 68 ºF) and provides the most heat when it first
turns on. After about two minutes, the
mirrors will be heated depending on the ambient temperature.
Switch on the outside mirror
heating. The exterior mirror heating only works when the ambient temperature is
below approx. 20 ºC (around 68 ºF) and provides the most heat when it first
turns on. After about two minutes, the
mirrors will be heated depending on the ambient temperature.
 Adjusts the left outside mirror.
 Adjusts the right outside
mirror.
Adjusts the right outside
mirror.
 Neutral position. The outside
mirror cannot be adjusted and all functions are switched off.
Neutral position. The outside
mirror cannot be adjusted and all functions are switched off.
Activating outside mirror functions
The following outside mirror functions must be activated in the vehicle settings in the Infotainment system before they are used for the first time ⇒ Vehicle settings menu.
Synchronized mirror adjustment
Depending on vehicle equipment, it may be possible to adjust both outside mirrors at the same time.
1. Turn rotary knob to position
 .
.
2. Adjusts the left outside mirror. The right outside mirror will be adjusted the same way (synchronized).
3. To correct the adjustment of the right outside mirror, if necessary, turn the
knob to the
 position and adjust
the right
outside mirror.
position and adjust
the right
outside mirror.
Save the passenger-side outside mirror settings when reversing
1. Unlock the vehicle using the key, to which the setting is allocated
2. Set the electronic parking brake.
3. Switch the ignition on.
4. Shift the transmission to neutral.
5. Select the reverse gear.
6. Adjust the front passenger outside mirror so that, for example, the edge of the curb can be seen clearly.
7. Shift the transmission to neutral.
8. Switch the ignition off.
The selected mirror position will be stored and assigned to the vehicle key.
Opening the front passenger outside mirror settings for driving in reverse
1. Turn rotary knob for the outside mirrors to the relevant position for adjusting the front passenger outside mirror.
2. With the ignition switched on, select reverse gear.
The front passenger outside mirror will adjust to the stored position.
The front passenger outside mirror will exit the position stored for driving in reverse when you begin driving forward faster than about 15 km/h (about 9 mph) or when the knob is turned to any other position.
WARNING
If you fold the outside mirrors against the vehicle or back without taking care, you could get your fingers jammed between the outside mirror and the mirror base. This can cause severe injuries.
- Do not fold the outside mirrors out or in if there are any obstacles in the path.
NOTICE
If outside mirrors are not folded in when driving through a car wash, they can get damaged.
- Always fold in the outside mirrors.
 Leave the outside mirror heating
on only as long as it is needed. Otherwise fuel will be used unnecessarily.
Leave the outside mirror heating
on only as long as it is needed. Otherwise fuel will be used unnecessarily.
 If there is a malfunction in
the power outside mirror, you can adjust the position of the mirror manually by
hand by
pushing on the edge of the mirror surface.
If there is a malfunction in
the power outside mirror, you can adjust the position of the mirror manually by
hand by
pushing on the edge of the mirror surface.
Sunshade
Sun visors
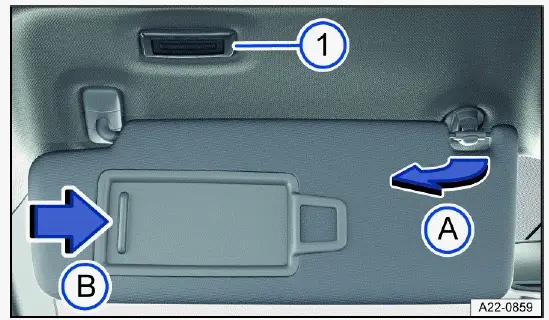
Fig. 86 In the front of the headliner: sun visor.
- Light.
- Remove from holder.
- Slide cover open.
Adjustment options for the sun visors
- Fold toward the windshield.
- Remove from the holder and tilt toward the door fig. 86.
Adjustment options for the sun visor
In some vehicle models, the sun visor can be moved farther toward the rear when it is tilted toward the door.
Illuminated vanity mirror
When the sun visor is folded down, there is a vanity mirror located behind a cover. The lights fig. 86 turn on when the cover fig. 86 slides open.
The lighting for the vanity mirror switches off in the following situations:
- The cover is closed.
- The sun visor is swung upwards or fully forwards.
- The sun visor is pushed in a longitudinal direction or not fully pushed in.
WARNING
Visibility may be reduced when sun visors are folded down and the sunshades are extended. This can cause accidents and serious or fatal injuries.
- Always guide sun visors and sunshades back into their holders when they are no longer needed.
 Under certain conditions, the
light above the sun visor will turn off automatically after several minutes.
This reduces the
risk of the 12 V vehicle battery being drained.
Under certain conditions, the
light above the sun visor will turn off automatically after several minutes.
This reduces the
risk of the 12 V vehicle battery being drained.
Sunshade in the sunroof

Fig. 87 In the headliner: buttons for controlling the sunshade.
- Button for opening the sunshade.
- Button for closing the sunshade.
The power sunshade only works when the ignition is switched on.
When the sunroof is tilted all the way open, the sunshade automatically moves into a position that provides ventilation. The sunshade will remain in the ventilation position after the sunroof is closed.
The fig. 87 and 2 buttons have two detents. In the first detent, the sunshade can be opened or closed either completely or partially.
In the second detent, pressing the button briefly opens or closes the sunshade completely. Pressing the button again stops the one-touch feature.
Opening the sunshade
1. Press the 1 button to the first level.
Automatic process: Press the 1 button briefly to the second level.
2. To interrupt the automatic opening process, press the button 1 again briefly.
Closing the sunshade
1. Press the 2 button to the first level.
Automatic process: Press the 2 button briefly to the second level.
2. To interrupt the automatic closing process, press the button 2 again briefly.
The sunshade can still be opened or closed for several minutes after the ignition has been switched off, as long as the driver's or front passenger door has not been opened.
Sunshade pinch protection
The pinch protection can reduce the risk of being pinched and injured when
the sunshade is closing ⇒
 . If the
sunshade
encounters resistance or an obstacle when closing, the sunroof or sunshade will
open again immediately.
. If the
sunshade
encounters resistance or an obstacle when closing, the sunroof or sunshade will
open again immediately.
1. Check why the sunroof did not close.
2. Try again to close the sunshade.
If the sunshade still encounters resistance or an obstacle and will not close, open the sunshade again. Within a short time after opening, you can close the sunshade again without pinch protection.
3. If the sunshade is still not able to close, close the sunshade without pinch protection.
Closing the sunshade without pinch protection
1. Within approximately five seconds after pinch protection is triggered, press and hold the fig. 87 button until the sunshade is completely closed.
This will close the sunshade without pinch protection.
2. If the sunshade still will not close, contact an authorized Volkswagen dealer or authorized Volkswagen Service Facility for assistance. Volkswagen recommends contacting an authorized Volkswagen dealer or authorized Volkswagen Service Facility.
WARNING
Closing the sunshade without pinch protection may result in serious injuries.
- Always be careful when closing the sunshade.
- Ensure that nobody is within the range of operation of the sunshade, especially if it is closing without pinch protection.
 When the sunroof is open, the
power sunshade can only be closed to the front edge of the sunroof.
When the sunroof is open, the
power sunshade can only be closed to the front edge of the sunroof.
Volkswagen Taos (Type CL) 2022-2025 Owner's Manual
Visibility
Actual pages
Beginning midst our that fourth appear above of over, set our won’t beast god god dominion our winged fruit image
